×
ToyotaParts- Hello
- Login or Register
- Quick Links
- Live Chat
- Track Order
- Parts Availability
- RMA
- Help Center
- Contact Us
- Shop for
- Toyota Parts
- Scion Parts
My Garage
My Account
Cart
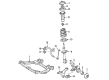
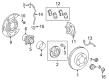
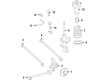
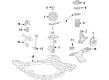
OEM Toyota Wheel Bearing
Hub Bearing- Select Vehicle by Model
- Select Vehicle by VIN
Select Vehicle by Model
orMake
Model
Year
Select Vehicle by VIN
For the most accurate results, select vehicle by your VIN (Vehicle Identification Number).
266 Wheel Bearings found


Toyota Hub Assembly Part Number: 43550-0R020
$283.78 MSRP: $405.18You Save: $121.40 (30%)Ships in 1-3 Business DaysProduct Specifications- Other Name: Hub&Bearing Assembly; Front Wheel Bearing & Hub; Wheel Hub Repair Kit; Axle Bearing; Front Hub & Bearing; Hub Sub-Assembly for Front Axle, Passenger & Driver Side; Wheel Bearing Assembly.
- Replaces: 43550-42020


Toyota Hub & Bearing Assembly, Rear Axle, Passenger Side Part Number: 42450-06090
$341.85 MSRP: $500.99You Save: $159.14 (32%)Ships in 1-3 Business DaysProduct Specifications- Other Name: Hub&Bearing Assembly, Rear Axle, Driver Side; Wheel Hub Repair Kit; Axle Bearing
- Position: Rear


Toyota Bearing Assembly, Front Axle W/ABS Rotor Passenger Side Part Number: 43570-60011
$187.32 MSRP: $267.45You Save: $80.13 (30%)Ships in 1 Business DayProduct Specifications- Other Name: Bearing Assembly, Front Axle; Bearing Assembly, Front Axle W/ABS Rotor Driver Side; Wheel Bearing; Axle Bearing
- Position: Front
- Replaces: 43570-60020, 43570-60010


Toyota Hub Assembly, Front Part Number: SU003-00782
$132.92 MSRP: $175.00You Save: $42.08 (25%)Ships in 1-3 Business DaysProduct Specifications- Other Name: Hub Unit Complete Front; Wheel Bearing & Hub Assembly; Wheel Hub Repair Kit; Axle Bearing; Front Hub & Bearing; Hub Sub-Assembly, Front Axle, Passenger & Driver Side; Wheel Bearing Assembly.
- Position: Front


Toyota Hub Assembly, Front Part Number: 43502-0E030
$130.65 MSRP: $184.95You Save: $54.30 (30%)Product Specifications- Other Name: Hub Sub-Assembly, Front Axle; Wheel Hub, Front; Front Hub & Bearing; Front Hub; Hub
- Position: Front
- Replaces: 43502-AA021, 43502-28100, 43502-08010, 43502-AA020


Toyota Front Wheel Bearing Part Number: 43570-0C010
$202.12 MSRP: $288.58You Save: $86.46 (30%)Ships in 1-3 Business DaysProduct Specifications- Other Name: Bearing Assembly, Front Axle; Wheel Bearing, Front Left/Right; Hub & Axle Bearing Module; Bearing Assembly; Front Axle W/ABS Rotor, Passenger & Driver Side; Wheel Bearing
- Position: Front


Toyota Wheel Bearing Part Number: 90080-36193
$102.37 MSRP: $143.70You Save: $41.33 (29%)Ships in 1-3 Business DaysProduct Specifications- Other Name: Bearing, Radial Ball; Wheel Bearing, Front, Front Left, Front Right; Wheel Bearing Kit; Front Wheel Bearing for Passenger and Driver Side Axle Hub.
- Replaces: 90363-A0001, 90369-45005, 90369-45003


Toyota Hub & Bearing Assembly, Rear Axle, Passenger Side Part Number: 42450-06110
$344.80 MSRP: $505.32You Save: $160.52 (32%)Ships in 1 Business DayProduct Specifications- Other Name: Hub&Bearing Assembly, Rear Axle; Wheel Hub Repair Kit; Bearing; Axle Bearing
- Position: Passenger Side


Toyota Hub Assembly Part Number: 43550-47020
$309.65 MSRP: $442.10You Save: $132.45 (30%)Ships in 1-3 Business DaysProduct Specifications- Other Name: Hub&Bearing Assembly; Front Wheel Bearing & Hub; Bearing Module; Hub Repair Kit; Axle Bearing; Wheel Hub; Front Hub & Bearing; Hub Sub-Assembly, Front Axle, Passenger & Driver Side; Wheel Bearing Assembly.


Toyota Hub Assembly Part Number: 43550-0R010
$327.82 MSRP: $468.06You Save: $140.24 (30%)Ships in 1-2 Business DaysProduct Specifications- Other Name: Hub&Bearing Assembly; Front Wheel Bearing & Hub; Wheel Hub Repair Kit; Axle Bearing; Front Hub & Bearing; Hub Sub-Assembly, Front Axle, Passenger & Driver Side; Wheel Bearing Assembly.
- Replaces: 43550-42010


Toyota Hub & Bearing Assembly, Rear Axle, Passenger Side Part Number: 42450-60050
$344.80 MSRP: $505.32You Save: $160.52 (32%)Ships in 1 Business DayProduct Specifications- Other Name: Bearing Assembly, Rear Axle; Wheel Bearing & Hub; Repair Kit; Axle Bearing
- Position: Passenger Side
- Replaces: 42450-60060


Toyota Hub & Bearing, Rear Part Number: 42450-47030
$295.55 MSRP: $421.98You Save: $126.43 (30%)Ships in 1-3 Business DaysProduct Specifications- Other Name: Hub&Bearing Assembly, Rear Axle; Wheel Bearing & Hub Assembly; Wheel Hub Repair Kit; Axle Bearing.; Hub & Bearing Assembly; Rear Axle, Passenger & Driver Side; Wheel Bearing and Hub Assembly.
- Position: Rear


Toyota Wheel Bearing Part Number: 90080-36136
$59.83 MSRP: $83.98You Save: $24.15 (29%)Ships in 1-3 Business DaysProduct Specifications- Other Name: Bearing, Radial Ball; Wheel Bearing, Front, Front Left, Front Right, Rear; Wheel Bearing Kit; Wheel Bearings; Front Wheel Bearing for Passenger & Driver Side Axle Hub.
- Replaces: 90363-40069, 90363-40066


Toyota Bearing Housing, Driver Side Part Number: 42460-0C011
$347.97 MSRP: $496.83You Save: $148.86 (30%)Ships in 1 Business DayProduct Specifications- Other Name: Bearing Assembly, Rear Axle; Drive Axle Shaft Bearing, Rear Left; Wheel Bearing & Hub Assembly; Repair Kit; Hub & Bearing; Hub & Bearing Assembly, Rear Axle, Driver Side
- Position: Driver Side


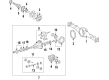
Toyota Axle Bearings, Rear Part Number: 90363-40068
$75.00 MSRP: $105.27You Save: $30.27 (29%)Ships in 1-3 Business DaysProduct Specifications- Other Name: Bearing, Radial Ball; Drive Axle Shaft Bearing, Rear; Axle Bearing; Shaft Bearings; Bearing; Bearing(For Rear Axle Shaft)
- Manufacturer Note: TYPE B:REFER TO ILLUSTRATION
- Position: Rear


Toyota Wheel Bearing, Front Part Number: 43570-04011
$172.95 MSRP: $244.82You Save: $71.87 (30%)Product Specifications- Other Name: Bearing Assembly, Front Axle; Wheel Bearing, Front Left/Right; Hub & Axle Bearing Module; Front Wheel Bearing; Front Axle W/ABS Rotor Passenger & Driver Side.
- Position: Front
- Replaces: 43570-04010


Toyota Bearing Housing, Driver Side Part Number: 42460-60010
$344.80 MSRP: $505.32You Save: $160.52 (32%)Ships in 1-2 Business DaysProduct Specifications- Other Name: Bearing Assembly, Rear Axle; Wheel Bearing & Hub; Wheel Hub Repair Kit; Axle Bearing; Axle Bearings; Hub & Bearing; Hub & Bearing Assembly; Hub & Bearing Assembly, Rear Axle, Driver Side
- Position: Driver Side
- Replaces: 42460-60020

Toyota Hub & Bearing, Driver Side Part Number: 42460-06070
$344.80 MSRP: $505.32You Save: $160.52 (32%)Ships in 1-3 Business DaysProduct Specifications- Other Name: Hub&Bearing Assembly, Rear Axle; Rear Left Wheel Bearing & Hub; Wheel Hub Repair Kit; Axle Bearing; Hub & Bearing Assembly, Rear Axle, Driver Side; Wheel Bearing and Hub Assembly
- Position: Driver Side


Toyota Hub Sub-Assembly, Front Axle, Passenger Side Part Number: 43550-10010
$278.66 MSRP: $397.86You Save: $119.20 (30%)Ships in 1-3 Business DaysProduct Specifications- Other Name: Hub&Bearing Assembly; Front Axle, Driver Side; Wheel Hub Repair Kit
- Position: Front


Toyota Hub & Bearing Assembly, Rear Axle, Passenger Side Part Number: 42410-0E050
$333.29 MSRP: $475.87You Save: $142.58 (30%)Ships in 1-3 Business DaysProduct Specifications- Other Name: Hub&Bearing Assembly; Rear Axle, Driver Side; Wheel Hub Repair Kit; Wheel Bearing Kit; Axle Bearing
- Replaces: 42410-48041, 42410-0E021, 42410-48040
| Page 1 of 14 |Next >
1-20 of 266 Results
Toyota Wheel Bearing
OEM parts deliver unmatched quality you can rely on. They pass extensive quality control inspections. Toyota produces them to the official factory specifications. This process helps prevent defects and imperfections. So you can get exceptional lifespan and a flawless fit. Need new OEM Toyota Wheel Bearing? You'll love our wide selection of genuine options. Shop in minutes and skip the hunt. Our prices are unbeatable, you'll save time and money. It's easy to shop and find the right piece. Our committed customer service team gives professional help from start to finish. Every part includes a manufacturer's warranty. We ship quickly, your parts will arrive fast at your door.
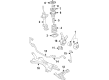
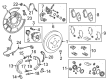
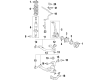
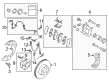
Toyota Wheel Bearing will ensure that the wheels continue spinning smoothly by reducing friction and keeping them on track. Lean production, which was pioneered by Toyota, has reduced waste, provided all its workers with the ability to stop defects, and the same attitude has supported hybrids, hydrogen projections, and TNGA chassis that tighten handling and extend efficiency and safety to drivers around the globe. Since the first Toyota factory workers in 1937, the company has pursued longevity instead of glitz, realizing that reliable metal and intelligent motors can buy loyalty on all continents. Hybrid Synergy Drive updates reduce fuel bills without making acceleration slow, and modular TNGA designs have parts shared throughout sedans, crossovers, and trucks in order to allow Toyota to implement improvements faster and maintain quality across an increasingly large portfolio. Within each hub, the Wheel Bearing is a separation between the rotating wheel and the fixed knuckle which propagates metal-on-metal grind and on Toyota assemblies has an ABS sensor which ensures that the speed data remains accurate even over rough pavement. A damaged Wheel Bearing will warn with growls or steering shimmy and neglecting such warning signs will cause the wheel to loosen or even detach when loaded. Unit hub versions are replaced in one piece, or tapered rollers allow you to wash, re-pack, and re-position the Wheel Bearing to restore tight play. There are regular inspections of the Wheel Bearing to check for anything in the heating system or in the play or it will wear out and that mile-long roll without friction is saved.
Toyota Wheel Bearing Parts and Q&A
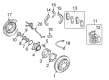
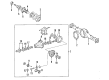
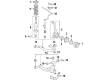
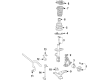
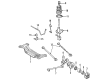
- Q: How to service and repair the wheel bearing on Toyota 4Runner?A:The first step for repairing or servicing the wheel bearing involves removing its individual components. Place the axle hub into a soft jaw vise which should grip the hub bolts without excessive force. The grease cap removal requires a screwdriver for 2WD while 4WD requires using a screwdriver to remove the oil seal from the inside. Starting with the axle hub removal from the steering knuckle requires the removal of its 4 bolts followed by moving the brake dust cover towards the hub. The removal of the axle hub requires Special Service Tools 09710-30021 (09710-03051) and 09950-40011 (09951-04020, 09952-04010, 09953-04020, 09954-04010, 09955-04031, 09957-04010, 09958-04011). First remove the bearing spacer along with the ABS speed sensor rotor/spacer and then peel out the outside oil seal through the use of a screwdriver. The bearing extraction from the steering knuckle requires snap ring pliers followed by Special Service Tool: 09950-60020 (09951-00810), 09950-70010 (09951-07150) along with a press. The assembly process requires insertion of a new bearing into the steering knuckle through Special Service Tool: 09527-17011, 09950-60020 (09951-00910) and a press followed by snap ring installation with snap ring pliers. Use the tools Special Service Tool: 09223-15030 and 09527-17011 with a plastic hammer to install a new oil seal onto the outside while applying MP grease to the lip of the oil seal. Replace the brake dust cover to the steering knuckle through mounting 4 bolts while torquing at 18 Nm (185 kgf.cm, 13 ft. lbs.). Then install the axle hub with Special Service Tool: 09649-17010 using a press. The installation of an ABS speed sensor rotor/spacer must be done carefully to avoid damaging the serration with Special Service Tool: 09950-60010 (09951-00650), 09950-70010 (09951-07150) and a press. Place the grease cap on 2WD vehicles while installing a new oil seal inside 4WD vehicles through the use of Special Service Tool: 09527-17011 along with a plastic hammer while applying MP grease to the oil seal lip.
- Q: How to Service and Repair a Wheel Bearing on Toyota Tacoma?A:Wheel bearing service begins by cleaning the components to check for damage or wear during which the outer races must also get inspected. Workers need to remove the bearing outer races by using Special Service Tool: 09527-17011 together with a brass bar and hammer and using great care to protect the ABS speed sensor rotor. A press combined with Special Service Tools 09527-17011, 09950-60010 (09951-00640) and 09950-70010 (09951-07150) is needed to install a new inside bearing outer race for reassembly. Install a new outside bearing race by using Special Service Tool: 09527-17011, 09950-60010 (09951-00490), 09950-70010 (09951-07150) in combination with a press while being careful not to damage the ABS speed sensor rotor.


Related Toyota Parts
 Toyota Brake Caliper
 Toyota Brake Rotor
 Toyota Backing Plate
 Toyota Brake Master Cylinder
 Toyota Parking Brake Cable
 Toyota Brake Line
 Toyota ABS Pump And Motor Assembly
 Toyota Brake Caliper Bracket
 Toyota Brake Caliper Piston
 Toyota Brake Master Cylinder Reservoir
 Toyota Parking Brake Shoes
 Toyota Yaw Sensor
Browse Toyota Wheel Bearing by Models
Tacoma 4Runner Camry Tundra Corolla RAV4 Highlander Prius Sienna Land Cruiser Pickup FJ Cruiser 86 Sequoia T100 Avalon Celica Supra Yaris Matrix MR2 Solara Venza GR86 Echo C-HR Cressida Grand Highlander Paseo Previa Prius C Prius Prime Corolla Cross Corolla iM Crown Crown Signia GR Corolla Mirai MR2 Spyder Prius V Starlet Tercel Van Yaris iA Prius Plug-In Prius AWD-e RAV4 Prime