×
ToyotaParts- Hello
- Login or Register
- Quick Links
- Live Chat
- Track Order
- Parts Availability
- RMA
- Help Center
- Contact Us
- Shop for
- Toyota Parts
- Scion Parts
My Garage
My Account
Cart
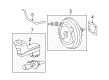
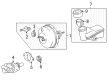
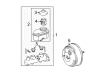
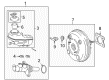
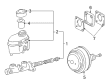
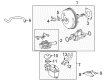
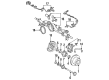
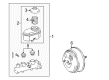
OEM Toyota Brake Booster
Brake Power Booster- Select Vehicle by Model
- Select Vehicle by VIN
Select Vehicle by Model
orMake
Model
Year
Select Vehicle by VIN
For the most accurate results, select vehicle by your VIN (Vehicle Identification Number).
262 Brake Boosters found


Toyota Brake Booster Part Number: 44610-04210
$613.57 MSRP: $899.19You Save: $285.62 (32%)Ships in 1-2 Business DaysProduct Specifications- Other Name: Booster Assembly, Brake; Power Brake Booster; Booster Assembly


Toyota Brake Booster Part Number: 44610-0R060
$587.12 MSRP: $860.44You Save: $273.32 (32%)Ships in 1-3 Business DaysProduct Specifications- Other Name: Booster Assembly, Brake; Power Brake Booster; Booster Assembly
- Replaces: 44610-42380


Toyota Brake Booster Part Number: 44610-08071
$606.42 MSRP: $888.71You Save: $282.29 (32%)Ships in 1-3 Business DaysProduct Specifications- Other Name: Booster Assembly, Brake; Power Brake Booster; Booster Assembly
- Replaces: 44610-08070


Toyota Brake Booster Part Number: 44610-04182
$606.42 MSRP: $888.71You Save: $282.29 (32%)Ships in 1-3 Business DaysProduct Specifications- Other Name: Booster Assembly, Brake; Power Brake Booster; Booster Assembly
- Replaces: 44610-04181, 44610-04171


Toyota Brake Booster Part Number: 44610-0T010
$625.60 MSRP: $916.83You Save: $291.23 (32%)Product Specifications- Other Name: Booster Assembly, Brake; Power Brake Booster; Booster


Toyota Brake Booster Part Number: 44610-52051
$716.85 MSRP: $1050.56You Save: $333.71 (32%)Ships in 1-3 Business DaysProduct Specifications- Other Name: Booster Assembly, Brake; Power Brake Booster; Booster Assembly; Pump
- Replaces: 44610-52050


Toyota Brake Booster Part Number: 44610-06260
$734.45 MSRP: $1076.34You Save: $341.89 (32%)Ships in 1-3 Business DaysProduct Specifications- Other Name: Booster Assembly, Brake; Power Brake Booster; Booster Assembly
- Manufacturer Note: BRAKE PEDAL = TYPE A OR TYPE C


Toyota Power Booster Part Number: 44610-12G00
$821.16 MSRP: $1203.42You Save: $382.26 (32%)Ships in 1-3 Business DaysProduct Specifications- Other Name: Booster Assembly, Brake; Power Brake Booster; Brake Booster


Toyota Brake Booster Part Number: 44610-0C041
$880.07 MSRP: $1289.75You Save: $409.68 (32%)Product Specifications- Other Name: Booster Assembly, Brake; Power Brake Booster; Booster Assembly
- Replaces: 44610-0C040


Toyota Brake Booster Part Number: 47200-08071
$1030.34 MSRP: $1509.98You Save: $479.64 (32%)Ships in 1-3 Business DaysProduct Specifications- Other Name: Cylinder Assembly, Brake; Power Brake Booster; Booster Assembly; Brake Booster Assembly, W/Master Cylinder
- Manufacturer Note: W(VSC)
- Replaces: 47200-08070

Toyota Brake Booster Part Number: 44610-0C030
$1167.00 MSRP: $1710.25You Save: $543.25 (32%)Product Specifications- Other Name: Booster Assembly, Brake; Power Brake Booster; Booster Assembly


Toyota Brake Booster Part Number: 44610-3D700
$1012.64 MSRP: $1484.03You Save: $471.39 (32%)Ships in 1-3 Business DaysProduct Specifications- Other Name: Booster Assembly, Brake


Toyota Booster Assembly, Brake Part Number: 44610-60792
$719.35 MSRP: $1054.22You Save: $334.87 (32%)Ships in 1-3 Business DaysProduct Specifications- Other Name: Brake Booster
- Replaces: 44610-60791, 44610-60790


Toyota Brake Booster Part Number: 44610-33510
$877.17 MSRP: $1285.51You Save: $408.34 (32%)Ships in 1-3 Business DaysProduct Specifications- Other Name: Booster Assembly, Brake; Power Brake Booster

Toyota Brake Booster Part Number: 44610-06670
$613.57 MSRP: $899.19You Save: $285.62 (32%)Ships in 1-3 Business DaysProduct Specifications- Other Name: Booster Assembly, Brake; Power Brake Booster; Booster Assembly; Booster
Toyota Brake Booster Part Number: 44610-08080
$644.78 MSRP: $944.94You Save: $300.16 (32%)Ships in 1-3 Business DaysProduct Specifications- Other Name: Booster Assembly, Brake; Power Brake Booster; Booster Assembly

Toyota Brake Booster Part Number: 44610-12N90
$650.34 MSRP: $953.09You Save: $302.75 (32%)Ships in 1-2 Business DaysProduct Specifications- Other Name: Booster Assembly, Brake; Booster Assembly

Toyota Brake Booster Part Number: 47210-12591
$1030.34 MSRP: $1509.98You Save: $479.64 (32%)Ships in 1-2 Business DaysProduct Specifications- Other Name: Cylinder Assembly, Brake; Booster Assembly; Brake Booster Assembly, W/Master Cylinder

Toyota Brake Booster Part Number: 44610-0C012
Product Specifications- Other Name: Booster Assembly, Brake; Power Brake Booster; Booster Assembly
- Replaces: 44610-0C010, 44610-0C011


Toyota Brake Booster Part Number: 44610-04110
Product Specifications- Other Name: Booster Assembly, Brake; Power Brake Booster; Booster Assembly
| Page 1 of 14 |Next >
1-20 of 262 Results
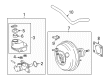
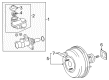
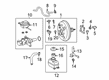
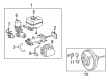
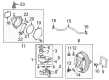
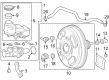
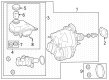
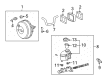
Toyota Brake Booster
OEM parts deliver unmatched quality you can rely on. They pass extensive quality control inspections. Toyota produces them to the official factory specifications. This process helps prevent defects and imperfections. So you can get exceptional lifespan and a flawless fit. Need new OEM Toyota Brake Booster? You'll love our wide selection of genuine options. Shop in minutes and skip the hunt. Our prices are unbeatable, you'll save time and money. It's easy to shop and find the right piece. Our committed customer service team gives professional help from start to finish. Every part includes a manufacturer's warranty. We ship quickly, your parts will arrive fast at your door.
Toyota Brake Booster enhances the force on the pedal to make stops earlier and with much less leg effort. Toyota originated in 1937 Japan and continues to sell all over the globe. Customers have confidence in Toyota due to its Hybrid Synergy Drive, which reduces fuel costs, the TNGA platform, which makes bodies stiff to handle, and plug-in models such as RAV4, which do not sacrifice cabin space and durability. Whether it is compact city cars or heavy-duty SUVs, Toyota brings consistent quality, extended components, and just-like-clockwork maintenance programs that render ownership predictable to families, ride-share companies, and any other person who intends to maintain a car over a decade. Whenever Toyota is revising a model, they seek actual benefits, meaning that hybrids attract more miles per gallon, safety technology responds quicker, and the steering wheel is more precise, yet none of this comes at the cost of adding pounds or complexity. Brake Booster is placed between the driver pedal and the master cylinder and utilizes engine vacuum or hydraulic pressure to multiply the action of the driver and provides the impulse to the blast of brake fluid to ensure that just a light toe tap can accelerate a heavy SUV down a hill. A healthy Brake Booster will have a firm pedal feel; leaks will creep in, and the pedal will become spongy, and the distances of stopping will increase. A replacement of the Brake Booster is required when your foot has to mash deeper due to lost assist, which leads to an increase in panic stops. The difference between hydraulic and vacuum Brake Booster designs is in their source of pressure, but in both cases, the aim is the same, which is to convert tiny muscle into huge clamping power.
Toyota Brake Booster Parts and Q&A
- Q: How to service and repair the vacuum brake booster on Toyota Camry?A:The service and repair of the vacuum brake booster requires a technician to remove sequentially the air cleaner cover and air cleaner hose then master cylinder and charcoal canister. The first step is disconnecting the vacuum hose from the brake booster before you take out the pedal return spring together with its clip and clevis pin. To service the brake booster one must remove its components starting with 4 clevis nuts and clevis which reveals the brake booster and its gasket. Installing the new gasket requires placement before putting the booster into position followed by mounting the booster onto the operating rod using the clevis. Torque the booster installation nuts to 13 Nm (130 kgf-cm, 9 ft. lbs.) and the clevis lock nut to 25 Nm (260 kgf-cm, 19 ft. lbs.). Place the clevis pin through the clevis then brake pedal combination followed by attaching the clip before putting back the pedal return spring. You can set the Special Service Tool: 09737-00010 on the new gasket positioned on the master cylinder so you can lower the pin until it touches the piston lightly. Place the Special Service Tool: 09737-00010 upside down on the booster to measure the clearance between the push rod and pin head while the clearance should equal 0 mm (0 inch). Lengthen or shorten the booster push rod until its end barely contacts the pin head. After reinstalling the charcoal canister together with the master cylinder and air cleaner cover you must secure the air cleaner hose before connecting the vacuum hose to the brake booster. The brake fluid reservoir should receive a refill before the technician completes brake system bleeding while inspecting for fluid leaks. The completion of checks on brake pedal performance and operational testing should be performed as the last step.
- Q: How to install the hydraulic brake booster on Toyota Tacoma?A:As the first step toward installing the hydraulic brake booster you must position a new brake booster gasket onto the unit before tightening the four nuts to 14 Nm (145 kgf-cm, 10 ft-lbf). Use a union nut wrench to attach the 4 brake lines at their correct positions on the hydraulic brake booster. Torque them to 15 Nm (155 kgf-cm, 11 ft-lbf) while the wrench is absent or to 14 Nm (145 kgf-cm, 10 ft-lbf) when using the torque wrench which should remain parallel to the tool. Connect three connectors then install the master cylinder push rod clevis followed by driving the driver side junction block to 8.0 Nm (82 kgf-cm, 71 in-lbf). Finish the work by installing the lower No. 1 instrument panel finish panel and the instrument panel under tray for automatic transmission as well as the instrument panel hole cover for manual transmission. Install the cowl side trim board LH for Regular Cab, Access Cab, Double Cab while moving onto the front door scuff plate LH and then the front floor footrest. To finish the repair, apply torque of 3.9 Nm (40 kgf-cm, 35 in-lbf) to the negative battery terminal cable while performing inspections of brake pedal height and free play and reserve distance and filling the reservoir with brake fluid followed by bleeding procedures for the brake booster using the accumulator pump assembly and the brake line then master cylinder solenoid and finally checking fluid levels and inspecting for leakage and brake master cylinder operation.


Related Toyota Parts
 Toyota Brake Pads
 Toyota Wheel Bearing
 Toyota Wheel Hub
 Toyota Spindle Nut
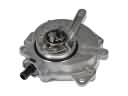 Toyota Vacuum Pump
 Toyota Brake Line
 Toyota ABS Reluctor Ring
 Toyota Brake Booster Vacuum Hose
 Toyota Brake Master Cylinder Reservoir
 Toyota Brake Shoe Set
 Toyota Master Cylinder Repair Kit
 Toyota Parking Brake Shoes
Browse Toyota Brake Booster by Models
Tacoma 4Runner Camry Tundra Corolla RAV4 Highlander Prius Sienna Land Cruiser Pickup Sequoia T100 Avalon Celica Supra Yaris Matrix MR2 Solara Venza GR86 Echo C-HR Cressida Grand Highlander Paseo Previa bZ4X Corolla Cross Corolla iM Crown Crown Signia GR Corolla Mirai MR2 Spyder Starlet Tercel Van Yaris iA GR Supra RAV4 Prime