×
ToyotaParts- Hello
- Login or Register
- Quick Links
- Live Chat
- Track Order
- Parts Availability
- RMA
- Help Center
- Contact Us
- Shop for
- Toyota Parts
- Scion Parts
My Garage
My Account
Cart
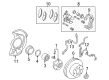
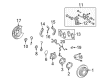
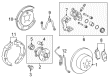
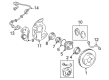
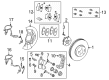
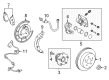
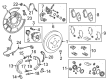
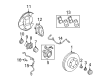
OEM Toyota Brake Pads
Disc Brake Pad Set- Select Vehicle by Model
- Select Vehicle by VIN
Select Vehicle by Model
orMake
Model
Year
Select Vehicle by VIN
For the most accurate results, select vehicle by your VIN (Vehicle Identification Number).
213 Brake Pads found


Toyota Pad Kit, Disc Brake, Rear Part Number: 04466-0E010
$51.98 MSRP: $72.00You Save: $20.02 (28%)Ships in 1-3 Business DaysProduct Specifications- Other Name: Pad Kit, Disc Brake L; Disc Brake Pad Set; Brake Pads
- Manufacturer Note: MARK AK PA561
- Position: Rear


Toyota Pad Kit, Disc Brake, Front Part Number: 04465-35290
$75.25 MSRP: $104.50You Save: $29.25 (28%)Ships in 1-3 Business DaysProduct Specifications- Other Name: Pad Kit, Disc Brake; Disc Brake Pad Set; Brake Pads
- Manufacturer Note: MARK SUMITOMO PS558H
- Position: Front
- Replaces: 04465-35250


Toyota Front Pads Part Number: 04465-0E010
$75.25 MSRP: $104.50You Save: $29.25 (28%)Product Specifications- Other Name: Pad Kit, Disc Brake L; Disc Brake Pad Set, Front; Disc Brake Pad Kit; Brake Pads; Pad Kit, Disc Brake, Front; Disc Brake Pad Set
- Manufacturer Note: MARK ADVICS PV565H
- Position: Front


Toyota Brake Pads, Rear Part Number: 04466-60140
$52.57 MSRP: $72.80You Save: $20.23 (28%)Product Specifications- Other Name: Pad Kit, Disc Brake; Disc Brake Pad Set, Rear; Disc Brake Pad Kit; Rear Pads; Pad Kit, Disc Brake, Rear; Disc Brake Pad Set
- Manufacturer Note: MARK AK PA561
- Position: Rear


Toyota Brake Pads, Front Part Number: 04465-07010
$76.07 MSRP: $105.63You Save: $29.56 (28%)Ships in 1-3 Business DaysProduct Specifications- Other Name: Pad Kit, Disc Brake; Disc Brake Pad Set, Front; Disc Brake Pad Kit; Front Pads; Pad Kit, Disc Brake, Front; Disc Brake Pad Set
- Manufacturer Note: MARK NBK D6911H
- Position: Front


Toyota Brake Pads, Rear Part Number: 04466-60090
$52.33 MSRP: $72.48You Save: $20.15 (28%)Ships in 1-3 Business DaysProduct Specifications- Other Name: Pad Kit, Disc Brake; Disc Brake Pad Set, Rear; Brake Pad Set, Disc Brake; Disc Brake Pad Kit; Rear Pads; Shoes; Pad Kit, Disc Brake, Rear; Disc Brake Pad Set
- Manufacturer Note: MARK SUMITOMO PS549
- Position: Rear
- Replaces: 04466-60060


Toyota Brake Pads, Rear Part Number: 04466-06200
$51.98 MSRP: $72.00You Save: $20.02 (28%)Ships in 1-3 Business DaysProduct Specifications- Other Name: Pad Kit, Disc Brake; Disc Brake Pad Set, Rear; Disc Brake Pad Kit; Rear Pads; Pad Kit, Disc Brake, Rear; Disc Brake Pad Set
- Manufacturer Note: MARK NBK D6247
- Position: Rear


Toyota Brake Pads, Front Part Number: 04465-60320
$75.25 MSRP: $104.50You Save: $29.25 (28%)Product Specifications- Other Name: Pad Kit, Disc Brake; Disc Brake Pad Set, Front; Disc Brake Pad Kit; Front Pads; Pad Kit, Disc Brake, Front; Disc Brake Pad Set
- Manufacturer Note: MARK ADVICS PV565H
- Position: Front


Toyota Brake Pads, Front Part Number: 04465-0E060
$75.25 MSRP: $104.50You Save: $29.25 (28%)Ships in 1-3 Business DaysProduct Specifications- Other Name: Pad Kit, Disc Brake; Disc Brake Pad Set, Front; Front Pads; Pad Kit, Disc Brake, Front; Disc Brake Pad Set
- Manufacturer Note: MARK NBK D6994H
- Position: Front


Toyota Pad Kit, Disc Brake, Rear Part Number: 04466-42060
$53.78 MSRP: $78.00You Save: $24.22 (32%)Ships in 1-3 Business DaysProduct Specifications- Other Name: Pad Kit, Disc Brake; Disc Brake Pad Set; Brake Pads
- Manufacturer Note: MARK ADVICS PS558
- Position: Rear


Toyota Brake Pads, Rear Part Number: 04466-33210
$51.98 MSRP: $72.00You Save: $20.02 (28%)Ships in 1-3 Business DaysProduct Specifications- Other Name: Pad Kit, Disc Brake; Disc Brake Pad Set, Rear; Disc Brake Pad Kit; Rear Pads; Pad Kit, Disc Brake, Rear; Disc Brake Pad Set
- Manufacturer Note: MARK AK NS542
- Position: Rear


Toyota Brake Pads, Front Part Number: 04465-04070
$75.25 MSRP: $104.50You Save: $29.25 (28%)Ships in 1-3 Business DaysProduct Specifications- Other Name: Pad Kit, Front Disc Brake; Disc Brake Pad Set, Front; Disc Brake Pad Kit; Front Pads; Pad Kit, Disc Brake, Front; Disc Brake Pad Set
- Manufacturer Note: MARK ADVICS PS558H
- Position: Front


Toyota Brake Pads, Front Part Number: 04465-08030
$76.07 MSRP: $105.63You Save: $29.56 (28%)Ships in 1-2 Business DaysProduct Specifications- Other Name: Pad Kit, Disc Brake; Disc Brake Pad Set, Front; Disc Brake Pad Kit; Front Pads; Pad Kit, Disc Brake, Front; Disc Brake Pad Set
- Manufacturer Note: MARK SELP PS558H
- Position: Front


Toyota Pad Kit, Disc Brake, Rear Part Number: 04466-06090
$56.15 MSRP: $77.78You Save: $21.63 (28%)Ships in 1-3 Business DaysProduct Specifications- Other Name: Pad Kit, Disc Brake; Disc Brake Pad Set; Brake Pads
- Manufacturer Note: MARK NBK D6247
- Position: Rear
- Replaces: 04466-33180, 04466-06060, 04466-33160


Toyota Pad Kit, Disc Brake, Rear Part Number: 04466-60070
$57.23 MSRP: $79.27You Save: $22.04 (28%)Ships in 1-3 Business DaysProduct Specifications- Other Name: Pad Kit, Disc Brake; Disc Brake Pad Set; Brake Pads
- Manufacturer Note: MARK AK PA511
- Position: Rear
- Replaces: 04466-60030, 04466-60100


Toyota Pad Kit, Disc Brake, Front Part Number: 04465-06100
$76.07 MSRP: $105.63You Save: $29.56 (28%)Product Specifications- Other Name: Pad Kit, Disc Brake; Disc Brake Pad Set; Brake Pads
- Manufacturer Note: MARK NBK PN562H
- Position: Front
- Replaces: 04465-33450, 04465-06070, 04465-33440


Toyota Brake Pads, Rear Part Number: 04466-0C010
$53.78 MSRP: $78.00You Save: $24.22 (32%)Ships in 1-3 Business DaysProduct Specifications- Other Name: Pad Kit, Disc Brake; Disc Brake Pad Set, Rear; Disc Brake Pad Kit; Rear Pads; Pad Kit, Disc Brake, Rear; Disc Brake Pad Set
- Manufacturer Note: MARK ADVICS PS558H
- Position: Rear


Toyota Brake Pads, Front Part Number: 04465-42200
$75.25 MSRP: $104.50You Save: $29.25 (28%)Ships in 1-3 Business DaysProduct Specifications- Other Name: Pad Kit, Disc Brake; Disc Brake Pad Set, Front; Brake Pad Set, Disc Brake; Disc Brake Pad Kit; Pad Kit, Disc Brake, Front; Disc Brake Pad Set
- Manufacturer Note: MARK ADVICS PV565H
- Position: Front
- Replaces: 04465-42160


Toyota Brake Pads, Rear Part Number: 04466-02310
$53.78 MSRP: $78.00You Save: $24.22 (32%)Ships in 1-3 Business DaysProduct Specifications- Other Name: Pad Kit, Disc Brake; Disc Brake Pad Set, Rear; Rear Pads; Pad Kit, Disc Brake, Rear; Disc Brake Pad Set
- Position: Rear
- Replaces: 04466-02270, 04466-02260, 04466-02210


Toyota Brake Pads, Front Part Number: 04465-04090
$75.25 MSRP: $104.50You Save: $29.25 (28%)Product Specifications- Other Name: Pad Kit, Disc Brake; Disc Brake Pad Set, Front; Disc Brake Pad Kit; Front Pads; Pad Kit, Disc Brake, Front; Disc Brake Pad Set
- Manufacturer Note: MARK ADVICS VC070H
- Position: Front
| Page 1 of 11 |Next >
1-20 of 213 Results
Toyota Brake Pads
OEM parts deliver unmatched quality you can rely on. They pass extensive quality control inspections. Toyota produces them to the official factory specifications. This process helps prevent defects and imperfections. So you can get exceptional lifespan and a flawless fit. Need new OEM Toyota Brake Pads? You'll love our wide selection of genuine options. Shop in minutes and skip the hunt. Our prices are unbeatable, you'll save time and money. It's easy to shop and find the right piece. Our committed customer service team gives professional help from start to finish. Every part includes a manufacturer's warranty. We ship quickly, your parts will arrive fast at your door.
Toyota Brake Pads bite hard and pull a vehicle down a pace with controlled and reliable capability. The trust Toyota has gained through the tiny waste on the line allows workers to see the trouble when it appears. Toyota continues to go all-hybrid, with plug-in Prius all the way to long-range RAV4, showing that being efficient and durable are not mutually exclusive. Toyota designed the TNGA platform to reduce weight, make bodies rigid, and enhance handling to ensure that each daily commute is nailed to the ground and secure. Options such as Hybrid Synergy Drive upgrade are added to more models annually and therefore even the entry-level trims do not gulp fuel like a thirsty camel. The outcome is a batch that is dependable, cost-effective, and can be applied on road trips of a decade without incident. The options of Toyota Brake Pads include non-metallic, semi-metallic, and ceramic mixtures all playing off stopping bite, rotor wear, dust output, and cabin quiet. Within each caliper, Brake Pads grip the spinning iron with a layer of friction, remove heat, and have wear tabs that squeal when the material is worn out. Brake Pads are optimal in swapping when new clips and springs slide in, and each pad is square and will not fade when applied many times. Maintain that between approximately 50,000-mile increments and the Brake Pads, the pedal feels firm and the stopping distance tight even after untold commute-hour crawls.
Toyota Brake Pads Parts and Q&A
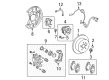
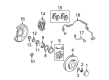
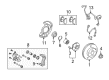
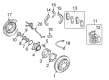
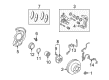
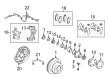
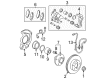
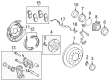
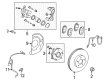
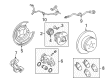
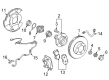
- Q: How to replace the Brake Pads on Toyota 4Runner?A:First inspect the pad lining thickness after removing the front wheel through this order: Check if the lining thickness exceeds 1.0 mm (0.039 inch). Replace the pads when the minimum specification is not met. You must separate the clip from the parts along with 2 pins, anti-rattle spring, 2 pads, and 4 anti-squeal shims. However only reuse the anti-rattle spring if it maintains its original condition without damaging cracks and rust or dirt contamination. Conduct a disc measurement check alongside runout inspection before pad installation while you should substitute original anti-squeal shims with new pads. To install the new pads you should tape the monkey wrench handle in advance before pressing brake fluid from the reservoir while using the handle to push in the pistons for each wheel alone to avoid the opposite piston from flying out; loosening bleeder plugs when facing piston resistance allows brake fluid escape. Apply disc brake grease to the inside surfaces of new anti-squeal shims and install both shims in their appropriate positions before putting on the pads without permitting oil or grease to touch the pad contact surface. First install the anti-rattle spring then the two pins followed by the clip and ultimately reinstall the front wheel and tighten it to 103 Nm (1,050 kgf-cm, 76 ft. lbs.). Complete the brake pedal operation a few times to confirm that the fluid rests at the top mark.
- Q: How to Properly Replace a Brake Pads on Toyota Tacoma?A:A mechanic must inspect driver brake pad lining thickness through the caliper inspection hole before pad replacement when lining reaches below 1.0 mm (0.039 inch). Lift the caliper into position by taking out the slide pin on the bottom side followed by a secure suspension that does not require flexible hose disconnect. First disconnect both brake pads together with four anti-squeal shims. After removing the pad wear indicator plate the support plates can be reused unless they show visible deformation or cracks or wear or have excessive rust or dirt. Measure disc thickness and runout before putting into place the four pad support plates. The procedure for installing new pads involves swapping both anti-squeal shims and wear indicator plates at the same time using the pads; the technician should install a pad wear indicator plate facing downward on the inner pad before securing two anti-squeal shims on each pad by applying disc brake grease to both sides of the inner anti-squeal shims. Start by placing the inner pad with its wear indicator plate pointing downwards before attaching the outer pad while making sure neither pad comes into contact with oil or grease on the rubbing surface. To press in the piston utilize a brake fluid suction from the reservoir followed by piston compression with appropriate tools such as a hammer handle or equivalent tools. Alternatively, if piston compression proves challenging loosen the bleeder plug to drain some brake fluid before using the compression tools. Apply the brake caliper inside while checking that the boot remains open and then install the slide pin with a torque setting of 88 Nm (900 kgf-cm, 65 ft. lbs.). The final task involves torquing the front wheel to 103 Nm (1,050 kgf-cm, 76 ft. lbs.) then you must press the brake pedal multiple times followed by verification that fluid reaches the maximum line.


Related Toyota Parts
 Toyota Wheel Bearing
 Toyota Speed Sensor
 Toyota Wheel Hub
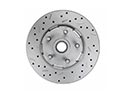 Toyota Brake Rotor
 Toyota Brake Caliper Bracket
 Toyota Brake Drum
 Toyota Brake Fluid Pump
 Toyota Hydraulic Hose
 Toyota Master Cylinder Repair Kit
 Toyota Parking Brake Shoes
 Toyota Wheel Bearing Dust Cap
 Toyota Wheel Stud
Browse Toyota Brake Pads by Models
Tacoma 4Runner Camry Tundra Corolla RAV4 Highlander Prius Sienna Land Cruiser Pickup FJ Cruiser 86 Sequoia T100 Avalon Celica Supra Yaris Matrix MR2 Solara Venza GR86 Echo C-HR Cressida Grand Highlander Paseo Previa Prius C Prius Prime bZ4X Corolla Cross Corolla iM Crown Crown Signia GR Corolla Mirai MR2 Spyder Prius V Starlet Tercel Van Yaris iA Prius Plug-In GR Supra Prius AWD-e RAV4 Prime