×
ToyotaParts- Hello
- Login or Register
- Quick Links
- Live Chat
- Track Order
- Parts Availability
- RMA
- Help Center
- Contact Us
- Shop for
- Toyota Parts
- Scion Parts
My Garage
My Account
Cart
OEM Toyota MR2 Spyder Brake Pad Set
Disc Brake Pad Set- Select Vehicle by Model
- Select Vehicle by VIN
Select Vehicle by Model
orMake
Model
Year
Select Vehicle by VIN
For the most accurate results, select vehicle by your VIN (Vehicle Identification Number).
2 Brake Pad Sets found


Toyota MR2 Spyder Brake Pads, Rear
Part Number: 04466-17100$42.65 MSRP: $59.30You Save: $16.65 (29%)Ships in 1-2 Business Days

Toyota MR2 Spyder Brake Pads, Front
Part Number: 04465-17140$76.07 MSRP: $105.63You Save: $29.56 (28%)Ships in 1-2 Business Days
Toyota MR2 Spyder Brake Pad Set
Choose genuine Brake Pad Set that pass strict quality control tests. You can trust the top quality and lasting durability. Shopping for OEM Brake Pad Set for your Toyota MR2 Spyder? Our website is your one-stop destination. We stock an extensive selection of genuine Toyota MR2 Spyder parts. The price is affordable so you can save more. It only takes minutes to browse and find the exact fit. Easily add to cart and check out fast. Our hassle-free return policy will keep you stress-free. We process orders quickly for swift delivery. Your parts will arrive faster, so you can get back on the road sooner.
The Toyota MR2 Spyder Brake Pad Set is one of the components affecting the performance and safety of this convertible sports car manufactured by Toyota from 1999 to 2007. Expected to be very dependable whenever you need to stop, this Brake Pad Set works by transforming kinetic energy to thermal energy by rubbing on the brake rotors. With their compatibility to different MR2 Spyder models, the Toyota MR2 Spyder Brake Pad Set is designed for high temperature applications which are up to 400 degrees Fahrenheit because of the incorporation of metals with synthetic ceramics. This longevity not only improves the braking action, but also is constructive to the vehicle's safety, which makes it a functional component of the brake system. It is recommended for the Toyota MR2 Spyder Brake Pad Set to be used for frequent maintenance as the pads of this model normally wear out within 50000 miles of usage to perform to the premier level. In the automotive market, specialty Toyota components such as the MR2 Spyder brake pad set have very high wearing resistance and are virtually noiseless during usage. Since it was designed to be part of the Toyota MR2 Spyder series, this Brake Pad Set shows the company's concern with quality and performance that MAK motorists and other users deem very valuable when looking for safe cars in the market.
Toyota MR2 Spyder Brake Pad Set Parts and Q&A
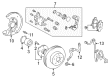
- Q: How to replace the front Brake Pad Set on Toyota MR2 Spyder?A:You need to take away the front wheel before mounting the hub nuts to hold the disc in place while replacing front brake pads. Use the caliper inspection hole to check pad lining thickness before pad replacement because minimum thickness should be 1.0 mm (0.039 inch). If the pad does not reach this standard then install new pads. Apply tooling to break loose the bolt securing the flexible hose from the front Shock Absorber. You should lift the caliper while maintaining hold of the sliding pin and unfastening the bottom-side bolt but keeping the flexible hose connected to the Brake Caliper before safely suspending the caliper. You should take out all the pads together with their associated components such as the four anti-squeal shims and two pad support plates. While these can be reused if they appear normal with no deformation damage or cracks and remain rust-free and clean of dirt along with foreign substances. The two pad support plates must be installed correctly while checking the disc thickness and runout values. To install new pads, users must replace anti-squeal shims at the same time they should apply disc brake grease on outer-facing inner anti-squeal shims and then install two anti-squeal shims on both pads' inside and outside surfaces while placing inside pads with worn indicator plates downward before installing outer pads without oil or grease touching the friction surfaces. Push the piston into position with a hammer handle tool after removing a small brake fluid portion from the reservoir and if resistance occurs use the bleeder plug to drain fluid until pushing is possible. Install the cylinder onto the torque plate with the bottom-side bolt while holding the sliding pin before torquing the bolt to 34 Nm (350 kgf-cm, 25 ft. lbs.). Install the flexible hose to the shock absorber followed by installing the bolt while torquing it to 29 Nm with 296 kgf-cm or 21 ft. lbs. of torque. To finalize the installation you need to apply torque of 103 Nm (1,050 kgf-cm, 76 ft. lbs.) to the front wheel then you should depress the brake pedal a few times before checking that fluid reaches the max line.
- Q: How to replace the rear Brake Pad Set on Toyota MR2 Spyder?A:Starting the rear brake pads replacement process begins by removing the rear wheel while keeping the disc fastened with hub nuts. The inspection hole of the caliper lets you check pad lining thickness so you must replace the pads when they reach 1.0 mm (0.039 inch) below the minimum length. The parking brake cable removal process begins with unclipping the cable while simultaneously extracting the cable pin and rotating the parking brake crank before disconnection. The bolt should be removed to disconnect the flexible hose from the Shock Absorber. Wedge the caliper by taking out the installation bolt on its bottom side yet maintain the flexible hose connection to the caliper and hang it safely. Take out the two pads together with four anti-squeal shims before removing the four pad support plates for reuse only when they are free of rust, dirt, have no signs of wear and no deformation or cracks. The disc thickness requires inspection before installing the four pad support plates but make sure these plates do not get mistaken for the wrong order. Take new pads to specification then replace the anti-squeal shims at the same time; spread disc brake grease across both sides of every inner anti-squeal shim before installing two outer shims and two inner shims followed by the outside pad with the wear indicator plate facing up and the inside pad. The Special Service Tool: 09719-14020 (09719-00020) should be used to turn the piston clockwise at a slow pace until it becomes free. This movement should align the cylinder protrusion with the piston stopper groove while pads should be replaced one wheel at a time to avoid the opposite piston escaping. Position the pad protrusion through the piston stopper groove before securing the caliper but avoid damaging the dust boot and flexible hose. After this secure the installation bolt with 20 Nm torque (204 kgf-cm, 15 ft. lbs.). The flexible hose should connect to the shock absorber before installing the bolt at 29 Nm (296 kgf-cm, 21 ft. lbs.). Reestablish the parking brake cable but start by installing the clip followed by the pin as you operate the parking brake crank. Finish by mounting the rear wheel at 103 Nm (1,050 kgf-cm, 76 ft. lbs.). After the installation of new brake fluid you should check that the fluid reaches the highest mark on the fluid reservoir.


Related Toyota MR2 Spyder Parts
 Toyota MR2 Spyder Backing Plate
 Toyota MR2 Spyder Brake Caliper Bracket
 Toyota MR2 Spyder Brake Caliper Piston
 Toyota MR2 Spyder Brake Disc
 Toyota MR2 Spyder Brake Line
 Toyota MR2 Spyder Hydraulic Hose
 Toyota MR2 Spyder Spindle Nut
 Toyota MR2 Spyder Wheel Bearing
 Toyota MR2 Spyder Wheel Cylinder
 Toyota MR2 Spyder Wheel Cylinder Repair Kit
 Toyota MR2 Spyder Wheel Hub
 Toyota MR2 Spyder Wheel Stud