×
ToyotaParts- Hello
- Login or Register
- Quick Links
- Live Chat
- Track Order
- Parts Availability
- RMA
- Help Center
- Contact Us
- Shop for
- Toyota Parts
- Scion Parts
My Garage
My Account
Cart
OEM 2002 Toyota MR2 Spyder Brake Pad Set
Disc Brake Pad Set- Select Vehicle by Model
- Select Vehicle by VIN
Select Vehicle by Model
orMake
Model
Year
Select Vehicle by VIN
For the most accurate results, select vehicle by your VIN (Vehicle Identification Number).
2 Brake Pad Sets found


2002 Toyota MR2 Spyder Brake Pads, Front
Part Number: 04465-17140$76.07 MSRP: $105.63You Save: $29.56 (28%)Ships in 1-2 Business DaysProduct Specifications- Other Name: Pad Kit, Disc Brake; Disc Brake Pad Set, Front; Brake Pad Set, Disc Brake; Disc Brake Pad Kit; Front Pads; Pads; Pad Kit, Disc Brake, Front; Disc Brake Pad Set
- Manufacturer Note: MARK NBK PN540H
- Position: Front
- Replaces: 04465-17100, 04465-17101, 04465-52010, 04465-52060
- Part Name Code: 04465
- Item Weight: 3.20 Pounds
- Item Dimensions: 15.3 x 10.9 x 3.0 inches
- Condition: New
- Fitment Type: Direct Replacement
- SKU: 04465-17140
- Warranty: This genuine part is guaranteed by Toyota's factory warranty.


2002 Toyota MR2 Spyder Brake Pads, Rear
Part Number: 04466-17100$42.65 MSRP: $59.30You Save: $16.65 (29%)Ships in 1-2 Business DaysProduct Specifications- Other Name: Pad Kit, Disc Brake; Disc Brake Pad Set, Rear; Rear Pads; Pad Kit, Disc Brake, Rear; Disc Brake Pad Set
- Manufacturer Note: MARK AK PA511
- Position: Rear
- Replaces: 04466-17080
- Part Name Code: 04466
- Item Weight: 2.20 Pounds
- Item Dimensions: 5.1 x 3.1 x 3.1 inches
- Condition: New
- Fitment Type: Direct Replacement
- SKU: 04466-17100
- Warranty: This genuine part is guaranteed by Toyota's factory warranty.
2002 Toyota MR2 Spyder Brake Pad Set
Looking for affordable OEM 2002 Toyota MR2 Spyder Brake Pad Set? Explore our comprehensive catalogue of genuine 2002 Toyota MR2 Spyder Brake Pad Set. All our parts are covered by the manufacturer's warranty. Plus, our straightforward return policy and speedy delivery service ensure an unparalleled shopping experience. We look forward to your visit!
2002 Toyota MR2 Spyder Brake Pad Set Parts Q&A
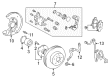
- Q: How to replace the front Brake Pad Set on 2002 Toyota MR2 Spyder?A: You must remove the front wheel before you secure the disc with the hub nuts but keep it temporarily in place. Use the caliper inspection hole to check pad lining thickness before pad replacement because the minimum required thickness is 1.0 mm (0.039 inch). Circumvent the brake caliper pad replacement process by observing two precautions: first disconnect the flexible hose from the shock absorber with the bolt then raise the caliper while gripping the sliding pin and unfasten the bottom side installation bolt while the flexible hose stays connected to the caliper. Securely suspend the caliper while removing both pads and all four anti-squeal shims and two pad support plates unless the items show no deformation, cracking or pad wear and remain rust-free of dirt and foreign particles. Examine the disc thickness and check its runout before securing the 2 pad support plates but avoid improper assembly of these plates. New anti-squeal shims should be installed simultaneously with the pads while you apply disc brake grease to the both sides of outside-positioned inner anti-squeal shims before placing the 2 anti-squeal shims on each pad from outside inwards. Position inside pads with wear indicator plates facing downwards and finally set outside pads while making sure no brake grease contacts friction surfaces. Use a brake fluid extractor to take out some fluid from the reservoir before pushing the piston using a hammer handle and avoid the piston area from becoming too tight by opening the bleeder plug. If this is not possible you must release braking fluid from the piston at the point where you press it. Install the cylinder onto the torque plate with its lower installation bolt already in while holding the sliding pin then torque the bolt to 34 Nm (350 kgf-cm, 25 ft. lbs.). Use the flexible hose to connect with the shock absorber before bolt installation and torque the bolt to 29 Nm (296 kgf-cm, 21 ft. lbs.). To finish installation fit the front wheel while torquing it to 103 Nm (1,050 kgf-cm, 76 ft. lbs.) and perform brake pedal depression multiple times before assuring the fluid reaches the max line.
Related 2002 Toyota MR2 Spyder Parts
 2002 Toyota MR2 Spyder Backing Plate
 2002 Toyota MR2 Spyder Brake Caliper Bracket
 2002 Toyota MR2 Spyder Brake Caliper Piston
 2002 Toyota MR2 Spyder Brake Disc
 2002 Toyota MR2 Spyder Brake Line
 2002 Toyota MR2 Spyder Hydraulic Hose
 2002 Toyota MR2 Spyder Spindle Nut
 2002 Toyota MR2 Spyder Wheel Bearing
 2002 Toyota MR2 Spyder Wheel Cylinder
 2002 Toyota MR2 Spyder Wheel Cylinder Repair Kit
 2002 Toyota MR2 Spyder Wheel Hub
 2002 Toyota MR2 Spyder Wheel Stud