×
ToyotaParts- Hello
- Login or Register
- Quick Links
- Live Chat
- Track Order
- Parts Availability
- RMA
- Help Center
- Contact Us
- Shop for
- Toyota Parts
- Scion Parts
My Garage
My Account
Cart
OEM Toyota Celica Brake Booster
Brake Power Booster- Select Vehicle by Model
- Select Vehicle by VIN
Select Vehicle by Model
orMake
Model
Year
Select Vehicle by VIN
For the most accurate results, select vehicle by your VIN (Vehicle Identification Number).
18 Brake Boosters found

Toyota Celica Brake Booster Part Number: 44610-2G080
$630.54 MSRP: $924.06You Save: $293.52 (32%)Ships in 1-3 Business Days

Toyota Celica Brake Booster Part Number: 44610-2D220
Toyota Celica Brake Booster Part Number: 44610-2D200
Toyota Celica Brake Booster Part Number: 44610-2D190
Toyota Celica Brake Booster Part Number: 44610-2D110
Toyota Celica Brake Booster Part Number: 44610-2B650

Toyota Celica Brake Booster Part Number: 44610-2B100


Toyota Celica Brake Booster Part Number: 44610-14700
Toyota Celica Brake Booster Part Number: 44610-14580

Toyota Celica Booster Overhaul Kit Part Number: 04443-14410

Toyota Celica Booster Overhaul Kit Part Number: 04443-14430
Toyota Celica Booster Overhaul Kit Part Number: 04443-14470
Toyota Celica Brake Booster Part Number: 44610-2G060
Toyota Celica Brake Booster Part Number: 44610-2B601
Toyota Celica Brake Booster Part Number: 44610-2B670
Toyota Celica Brake Booster Part Number: 44610-2B621

Toyota Celica Brake Booster Part Number: 44610-2D460
Toyota Celica Brake Booster Part Number: 44610-2D140
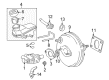
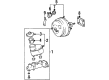
Toyota Celica Brake Booster
Choose genuine Brake Booster that pass strict quality control tests. You can trust the top quality and lasting durability. Shopping for OEM Brake Booster for your Toyota Celica? Our website is your one-stop destination. We stock an extensive selection of genuine Toyota Celica parts. The price is affordable so you can save more. It only takes minutes to browse and find the exact fit. Easily add to cart and check out fast. Our hassle-free return policy will keep you stress-free. We process orders quickly for swift delivery. Your parts will arrive faster, so you can get back on the road sooner.
Toyota Celica Brake Booster Parts and Q&A
- Q: How to service and repair the Vacuum Brake Booster on Toyota Celica?A:The service and repair process for the Vacuum Brake Booster starts with front LH wheel removal at a torque of 103 Nm (1,050 kgf-cm, 76 ft. lbs.). The first step consists of removing the master cylinder and breaking off the vacuum hose that connects to the brake booster. Service technicians should use Special Service Tool: 09751-36011 along with a spanner to disconnect the front LH Brake Line from its flexible hose before removing both the brake line with integrated grommet from the body. To remove the brake booster first remove the lower No. 1 panel and finish panel before taking out the return spring, clip and clevis pin, then remove the clevis and 4 nuts, until the brake booster and gasket can be pulled out. First install a new gasket as well as brake booster before tightening its 4 nuts to 13 Nm (130 kgf-cm and 9 ft. lbs.) and then install the clevis followed by tightening the lock nut to 25 Nm (260 kgf-cm and 19 ft. lbs.). The next process requires you to put the clevis pin into both clevis and brake pedal before installing the clip to secure it and adding the pedal return spring. Install the front LH brake line by feeding in the grommet and attaching it to the front LH brake flexible hose with the use of Special Service Tool: 09751-36011 and a spanner while torquing to 15 Nm (155 kgf-cm, 11 ft. lbs.). Installation of the ABS actuator assembly should proceed only after system equipping. To properly adjust the brake booster push rod during master cylinder replacement use an accessory tool with chalk marking applied to its tip which you place on the brake booster to measure clearance until reaching the target 0 mm (0 inch). Use an accessory tool to measure push rod length adjustments on the brake booster but ensure the brake system maintains no vacuum while depressing the pedal multiple times after shutting off the engine. The brake booster receives the vacuum hose followed by master cylinder installation while brake fluid fills the reservoir before finishing with brake system bleeding. After verifying fluid leakage you must check and set the brake pedal then reinstall the finish panel together with the lower No. 1 panel. Finally, perform an operational check.

Related Toyota Celica Parts
 Toyota Celica Wheel Hub
 Toyota Celica Brake Master Cylinder
 Toyota Celica Backing Plate
 Toyota Celica Brake Caliper Bracket
 Toyota Celica Brake Drum
 Toyota Celica Brake Line
 Toyota Celica Brake Master Cylinder Reservoir
 Toyota Celica Brake Proportioning Valve
 Toyota Celica Brake Shoe Set
 Toyota Celica Hydraulic Hose
 Toyota Celica Master Cylinder Repair Kit
 Toyota Celica Parking Brake Shoes