×
ToyotaParts- Hello
- Login or Register
- Quick Links
- Live Chat
- Track Order
- Parts Availability
- RMA
- Help Center
- Contact Us
- Shop for
- Toyota Parts
- Scion Parts
My Garage
My Account
Cart
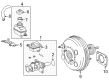
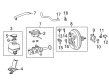
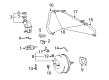
OEM Toyota Highlander Brake Booster
Brake Power Booster- Select Vehicle by Model
- Select Vehicle by VIN
Select Vehicle by Model
orMake
Model
Year
Select Vehicle by VIN
For the most accurate results, select vehicle by your VIN (Vehicle Identification Number).
17 Brake Boosters found

Toyota Highlander Brake Booster Part Number: 44610-0E150
$597.68 MSRP: $875.91You Save: $278.23 (32%)Ships in 1-3 Business Days
Toyota Highlander Brake Booster Part Number: 44610-0E200
$598.43 MSRP: $877.00You Save: $278.57 (32%)Ships in 1-3 Business DaysToyota Highlander Brake Booster Part Number: 44610-0E080
$618.45 MSRP: $906.35You Save: $287.90 (32%)Ships in 1-3 Business Days
Toyota Highlander Brake Booster Part Number: 44610-0E191
$606.53 MSRP: $888.88You Save: $282.35 (32%)Ships in 1-2 Business DaysToyota Highlander Brake Booster Part Number: 44610-0E190
$664.08 MSRP: $973.21You Save: $309.13 (32%)Ships in 1-3 Business Days
Toyota Highlander Brake Booster Part Number: 44610-0E060
$668.96 MSRP: $980.37You Save: $311.41 (32%)Ships in 1-3 Business DaysToyota Highlander Brake Booster Part Number: 44610-0E160
$672.48 MSRP: $985.52You Save: $313.04 (32%)Ships in 1-3 Business DaysToyota Highlander Brake Booster Part Number: 44610-0E100
$685.19 MSRP: $1004.15You Save: $318.96 (32%)Ships in 1-3 Business Days
Toyota Highlander Brake Booster Part Number: 44610-48141
$675.36 MSRP: $989.74You Save: $314.38 (32%)Ships in 1-3 Business DaysToyota Highlander Brake Booster Part Number: 44610-0E070
$708.23 MSRP: $1037.92You Save: $329.69 (32%)Ships in 1-3 Business Days

Toyota Highlander Brake Booster Part Number: 44610-48291
$717.88 MSRP: $1052.06You Save: $334.18 (32%)Ships in 1-3 Business DaysToyota Highlander Brake Booster Part Number: 44610-48361
$741.60 MSRP: $1086.82You Save: $345.22 (32%)Ships in 1-3 Business Days
Toyota Highlander Brake Booster Part Number: 44610-48271
$818.21 MSRP: $1199.09You Save: $380.88 (32%)Ships in 1-3 Business Days
Toyota Highlander Master Cylinder Part Number: 47055-0E061
$924.90 MSRP: $1355.45You Save: $430.55 (32%)Ships in 1-2 Business Days
Toyota Highlander Brake Booster Part Number: 44610-48142
$649.20 MSRP: $951.41You Save: $302.21 (32%)Ships in 1-3 Business Days
Toyota Highlander Brake Booster Assembly, W/Master Cylinder Part Number: 47055-0E020
$934.89 MSRP: $1370.09You Save: $435.20 (32%)Ships in 1-2 Business DaysToyota Highlander Brake Booster Part Number: 44610-48151
Toyota Highlander Brake Booster
Choose genuine Brake Booster that pass strict quality control tests. You can trust the top quality and lasting durability. Shopping for OEM Brake Booster for your Toyota Highlander? Our website is your one-stop destination. We stock an extensive selection of genuine Toyota Highlander parts. The price is affordable so you can save more. It only takes minutes to browse and find the exact fit. Easily add to cart and check out fast. Our hassle-free return policy will keep you stress-free. We process orders quickly for swift delivery. Your parts will arrive faster, so you can get back on the road sooner.
Toyota Highlander Brake Booster Parts and Q&A
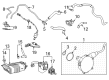
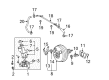
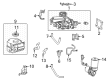
- Q: How to install the brake booster and related components on Toyota Highlander?A:Begin installation of the brake booster by applying a new brake booster gasket to the brake booster assembly. Fasten the brake booster assembly onto the body by using 4 nuts at first but keep them loose until both Brake Master Cylinder push rod clevis and push rod clevis lock nut are installed. Then tighten all 4 nuts completely while being careful to not damage the Brake Lines. Secure the 2 clamps to join the brake lines onto the body while paying attention to avoid part damage with replacements for any harmed sections. The engine wire needs installation to the body through a bolt while torquing it up to 8.4 Nm (86 kgf-cm, 74 in-lbf). Users who install a security Horn need to connect the alarm horn connector before installing the engine wire to the body with a bolt while maintaining 8.4 Nm (86 kgf-cm, 74 in-lbf) torque. The brake booster assembly needs a new check valve grommet after which you can install the vacuum check valve assembly. Apply the vacuum hose to the vacuum check valve then fasten it with a clip. Install the brake booster assembly to the body with four nuts while tightening them to 13 Nm (132 kgf-cm, 10 ft-lbf) after temporary lock nut tightening of the push rod clevis lock nut and brake master cylinder push rod clevis assembly on the brake booster assembly. After connecting the brake master cylinder push rod clevis use the brake pedal return spring and inspect all brake pedal measurements. The brake line joins with the No. 1 reservoir tube before installing the air cleaner cap sub-assembly followed by installation of the outer cowl top panel sub-assembly. The service technician should install the windshield Wiper Motor combined with link as well as the cowl top ventilator louver sub-assembly and both front wiper arm and blade assemblies (RH and LH). The installation process ends with filling the brake fluid reservoir before performing a brake master cylinder bleed along with brake line and brake actuator bleeds. Inspect for brake fluid leaks while checking the fluid level.
- Q: How to remove the Vacuum Brake Booster on Toyota Highlander?A:The first step to remove the Vacuum Brake Booster requires releasing vacuum through brake pedal depression multiple times followed by separating the Brake Master Cylinder from its assembly connection. With the removal of components from the 1AR-FE engine the No. 1 engine cover sub-assembly and ejector tube need to be taken off. Both engine types require disassembly of front wiper arm and blade assemblies (LH and RH) following by separation of cowl top ventilator louver sub-assembly, windshield Wiper Motor and link and outer cowl top panel sub-assembly. During the 1AR-FE procedure you need to remove the air cleaner cap combined with filter element sub-assemblies while the 2GR-FE requires elimination of its air cleaner cap and filter element. First drain brake fluid then disconnect the No.1 reservoir tube, Brake Line and remove the brake master cylinder sub-assembly. Remove the vacuum hoses from the 1AR-FE by sliding off the clips before taking out two nuts securing the vacuum assembly and then separating the vacuum check valve assemblies and check valve grommets from the brake booster. The vacuum hose removal process for the 2GR-FE requires disconnecting it while you also remove the vacuum check valve assembly together with its check valve grommet. First remove the brake pedal return spring then separate the brake master cylinder push rod clevis followed by pushing out the brake booster assembly through four nut removal. Go ahead and free the lock nut before you can extract the brake master cylinder push rod clevis along with its lock nut from the brake booster assembly. Separate the engine wire from the body using nine clamps while you also disconnect the alarm horn connector if needed. The two clamps need to be unlocked for removing the brake lines from the body while the team extracts both the brake booster assembly and brake booster gasket. Handle the brake lines and clamps with care because brake line damage will require new replacement parts.

Related Toyota Highlander Parts
 Toyota Highlander Brake Caliper
 Toyota Highlander Speed Sensor
 Toyota Highlander Backing Plate
 Toyota Highlander Brake Booster Vacuum Hose
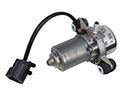 Toyota Highlander Brake Booster Vacuum Pump
 Toyota Highlander Brake Caliper Piston
 Toyota Highlander Brake Fluid Pump
 Toyota Highlander Brake Master Cylinder
 Toyota Highlander Brake Master Cylinder Reservoir
 Toyota Highlander Master Cylinder Repair Kit
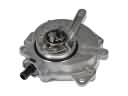 Toyota Highlander Vacuum Pump
 Toyota Highlander Yaw Sensor