×
ToyotaParts- Hello
- Login or Register
- Quick Links
- Live Chat
- Track Order
- Parts Availability
- RMA
- Help Center
- Contact Us
- Shop for
- Toyota Parts
- Scion Parts
My Garage
My Account
Cart
OEM Toyota Highlander Brake Line
Brake Hose- Select Vehicle by Model
- Select Vehicle by VIN
Select Vehicle by Model
orMake
Model
Year
Select Vehicle by VIN
For the most accurate results, select vehicle by your VIN (Vehicle Identification Number).
27 Brake Lines found


Toyota Highlander Flex Hose, Front Driver Side Part Number: 90947-A2094
$77.49 MSRP: $108.77You Save: $31.28 (29%)Ships in 1-3 Business Days
Toyota Highlander Flex Hose, Front Driver Side Part Number: 90947-A2120
$67.18 MSRP: $94.30You Save: $27.12 (29%)Ships in 1-3 Business DaysToyota Highlander Flex Hose, Front Passenger Side Part Number: 90947-A2119
$67.18 MSRP: $94.30You Save: $27.12 (29%)Ships in 1-3 Business Days

Toyota Highlander Flex Hose, Passenger Side Part Number: 90947-A2023
$73.81 MSRP: $103.61You Save: $29.80 (29%)Ships in 1-3 Business Days
Toyota Highlander Flex Hose, Rear Driver Side Part Number: 90947-A2047
$74.17 MSRP: $104.11You Save: $29.94 (29%)Ships in 1-3 Business DaysToyota Highlander Flex Hose, Passenger Side Part Number: 90947-A2046
$74.17 MSRP: $104.11You Save: $29.94 (29%)Ships in 1-3 Business DaysToyota Highlander Hose, Flexible(For Front), Passenger Side Part Number: 90947-A2093
$77.49 MSRP: $108.77You Save: $31.28 (29%)Ships in 1-3 Business Days
Toyota Highlander Flex Hose, Rear Driver Side Part Number: 90947-A2049
$78.91 MSRP: $110.76You Save: $31.85 (29%)Ships in 1-3 Business DaysToyota Highlander Flex Hose, Passenger Side Part Number: 90947-A2048
$76.54 MSRP: $107.44You Save: $30.90 (29%)Ships in 1-3 Business Days
Toyota Highlander Flex Hose, Front Driver Side Part Number: 90947-A2053
$82.58 MSRP: $115.92You Save: $33.34 (29%)Ships in 1-2 Business DaysToyota Highlander Flex Hose, Front Passenger Side Part Number: 90947-A2052
$82.58 MSRP: $115.92You Save: $33.34 (29%)Ships in 1-2 Business Days
Toyota Highlander Flex Hose, Rear Driver Side Part Number: 90947-02C62
$83.53 MSRP: $117.25You Save: $33.72 (29%)Ships in 1-3 Business DaysToyota Highlander Flex Hose, Passenger Side Part Number: 90947-02C61
$81.10 MSRP: $113.84You Save: $32.74 (29%)Ships in 1-3 Business DaysToyota Highlander Flex Hose, Front Part Number: 90947-A2034
$84.36 MSRP: $118.41You Save: $34.05 (29%)Ships in 1-3 Business Days
Toyota Highlander Hose, Flexible(For Rear Passenger Side) Part Number: 90947-02970
$82.46 MSRP: $115.75You Save: $33.29 (29%)Ships in 1-3 Business Days
Toyota Highlander Flex Hose, Front Driver Side Part Number: 90947-02F65
$86.49 MSRP: $121.41You Save: $34.92 (29%)Ships in 1-3 Business DaysToyota Highlander Hose, Flexible Part Number: 90947-02F64
$86.49 MSRP: $121.41You Save: $34.92 (29%)Ships in 1-3 Business Days
Toyota Highlander Hose, Flexible Part Number: 90080-94208
$87.63 MSRP: $123.00You Save: $35.37 (29%)Ships in 1-3 Business DaysToyota Highlander Flex Hose, Rear Passenger Side Part Number: 90080-94207
$87.63 MSRP: $123.00You Save: $35.37 (29%)Ships in 1-3 Business Days
Toyota Highlander Flex Hose, Rear Driver Side Part Number: 90947-A2122
$91.59 MSRP: $128.56You Save: $36.97 (29%)Ships in 1-3 Business Days
| Page 1 of 2 |Next >
1-20 of 27 Results
Toyota Highlander Brake Line
Choose genuine Brake Line that pass strict quality control tests. You can trust the top quality and lasting durability. Shopping for OEM Brake Line for your Toyota Highlander? Our website is your one-stop destination. We stock an extensive selection of genuine Toyota Highlander parts. The price is affordable so you can save more. It only takes minutes to browse and find the exact fit. Easily add to cart and check out fast. Our hassle-free return policy will keep you stress-free. We process orders quickly for swift delivery. Your parts will arrive faster, so you can get back on the road sooner.
Toyota Highlander Brake Line Parts and Q&A
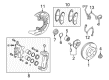
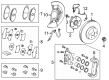
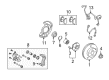
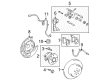
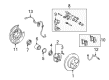
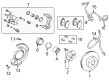
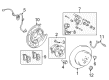
- Q: How to install the front Brake Line on Toyota Highlander?A:The initial step to install the front brake flexible hose requires checking that left and right hoses are non-identical by confirming their part numbers. You can use reused hoses only after verifying their identification marks which were present during their removal. Begin the process by fastening the front flexible hose to the cylinder assembly through the union bolt along with its new gasket and tightening it to 30 Nm (306 kgf-cm, 22 ft-lbf). You should install the front flexible hose with its new clip by making sure the clip is fully extended into its opening. Users should connect brake lines to the front flexible hose by using a union nut wrench (10 mm) while holding the hose with a wrench; otherwise torque to 15 Nm (155 kgf-cm, 11 ft-lbf) but torque to 14 Nm (143 kgf-cm, 10 ft-lbf) if using the wrench. Your priority should include avoiding brake line bending as well as damage to it. Additionally, you must shield the line from foreign material ingress. A torque wrench measuring 250 mm (9.84 in.) in length should be used with a union nut wrench positioned parallel to apply the correct torque. Insert the front flexible hose onto the absorber bracket by using a bolt torqued to 19 Nm (194 kgf-cm, 14 ft-lbf). Seal off your brake fluid reservoir before you start the following process: brake line bleeding and brake actuator bleeding. The front wheel requirement includes brake fluid leak checks followed by a fluid level inspection before torqueing it to 103 Nm (1050 kgf-cm, 76 ft-lbf).
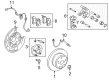
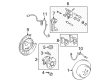
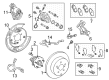
- Q: How to remove the rear Brake Line on Toyota Highlander?A:The removal of the rear brake flexible hose starts with draining brake fluid followed by removing the rear wheel. Separate the hose while removing its union bolt with gasket to disconnect the rear flexible hose. The brake line disconnect requires a union nut wrench (10 mm) but safety demands the simultaneous grip of the rear flexible hose with another wrench to safeguard the brake line from damage besides blocking possible foreign objects from invasion. First separate the clip and next remove the bolt together with the rear flexible hose from the absorber bracket. You should mark the positions of both RH side and LH side hoses when you disconnect them at the same time. The methods used for each side remain similar.

Related Toyota Highlander Parts
 Toyota Highlander Brake Pads
 Toyota Highlander Speed Sensor
 Toyota Highlander ABS Pump And Motor Assembly
 Toyota Highlander Brake Bleeder Screw
 Toyota Highlander Brake Caliper Bracket
 Toyota Highlander Brake Caliper Piston
 Toyota Highlander Brake Fluid Pump
 Toyota Highlander Brake Shoe Set
 Toyota Highlander Hydraulic Hose
 Toyota Highlander Parking Brake Cable
 Toyota Highlander Parking Brake Shoes
 Toyota Highlander Wheel Stud