×
ToyotaParts- Hello
- Login or Register
- Quick Links
- Live Chat
- Track Order
- Parts Availability
- RMA
- Help Center
- Contact Us
- Shop for
- Toyota Parts
- Scion Parts
My Garage
My Account
Cart
OEM 2008 Toyota Highlander Brake Booster
Brake Power Booster- Select Vehicle by Model
- Select Vehicle by VIN
Select Vehicle by Model
orMake
Model
Year
Select Vehicle by VIN
For the most accurate results, select vehicle by your VIN (Vehicle Identification Number).
1 Brake Booster found

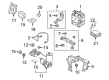
2008 Toyota Highlander Brake Booster
Part Number: 44610-48291$696.88 MSRP: $1021.28You Save: $324.40 (32%)Ships in 1-3 Business DaysProduct Specifications- Other Name: Booster Assembly, Brake; Power Brake Booster; Booster Assembly
- Replaces: 44610-48290
- Part Name Code: 44610
- Item Weight: 7.70 Pounds
- Item Dimensions: 12.4 x 11.8 x 11.4 inches
- Condition: New
- Fitment Type: Direct Replacement
- SKU: 44610-48291
- Warranty: This genuine part is guaranteed by Toyota's factory warranty.
2008 Toyota Highlander Brake Booster
Looking for affordable OEM 2008 Toyota Highlander Brake Booster? Explore our comprehensive catalogue of genuine 2008 Toyota Highlander Brake Booster. All our parts are covered by the manufacturer's warranty. Plus, our straightforward return policy and speedy delivery service ensure an unparalleled shopping experience. We look forward to your visit!
2008 Toyota Highlander Brake Booster Parts Q&A
- Q: How to remove the Vacuum Brake Booster on 2008 Toyota Highlander?A: Saving time is possible for Vacuum Brake Booster removal when the brake booster vacuum is pushed out first while taking away the master cylinder. The process starts with removing the V-bank cover sub-assembly followed by uninstalling both front wiper arms with blades from their left and right positions. The maintenance process requires removal of the cowl top ventilator louver sub-assembly and the windshield wiper motor link and outer cowl top panel sub-assembly. The first step involves draining the brake fluid as well as removing the air cleaner cap sub-assembly to disconnect the No. 1 reservoir tube along with the brake line. The brake master cylinder sub-assembly should be removed before disconnecting the vacuum hose with its clip and extracting the brake vacuum check valve assembly and check valve grommet. Next move on to take away the brake pedal return spring followed by separating the brake master cylinder push rod clevis then complete the clevis removal by taking off four nuts while pushing out the brake booster assembly without causing harm to brake lines. Use a wrench to take off the lock nut and extract both brake master cylinder push rod clevis together with the lock nut which is attached to the brake booster assembly. The engine wire can be separated from the body by first disconnecting nine clamps and a bolt then separating the engine wire if needed by disconnecting the alarm horn connector. The end of the process involves dislodging the brake lines from their position on the body by removing two clamps before removing both the brake booster assembly and gasket. The procedure requires attention to avoid harming brake lines or clamps.
Related 2008 Toyota Highlander Parts
 2008 Toyota Highlander Brake Disc
 2008 Toyota Highlander Brake Fluid Pump
 2008 Toyota Highlander Brake Master Cylinder
 2008 Toyota Highlander Brake Master Cylinder Reservoir
 2008 Toyota Highlander Brake Pad Set
 2008 Toyota Highlander Master Cylinder Repair Kit
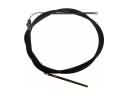 2008 Toyota Highlander Parking Brake Cable
 2008 Toyota Highlander Wheel Cylinder
 2008 Toyota Highlander Wheel Cylinder Repair Kit
 2008 Toyota Highlander Wheel Hub
 2008 Toyota Highlander Wheel Stud
 2008 Toyota Highlander Yaw Sensor