×
ToyotaParts- Hello
- Login or Register
- Quick Links
- Live Chat
- Track Order
- Parts Availability
- RMA
- Help Center
- Contact Us
- Shop for
- Toyota Parts
- Scion Parts
My Garage
My Account
Cart
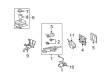
OEM Toyota Highlander Brake Master Cylinder Reservoir
Brake Fluid Storage Tank- Select Vehicle by Model
- Select Vehicle by VIN
Select Vehicle by Model
orMake
Model
Year
Select Vehicle by VIN
For the most accurate results, select vehicle by your VIN (Vehicle Identification Number).
7 Brake Master Cylinder Reservoirs found


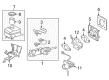
Toyota Highlander Master Cylinder Reservoir Part Number: 47220-48220
$141.69 MSRP: $200.58You Save: $58.89 (30%)Ships in 1-3 Business Days
Toyota Highlander Reservoir Sub-Assembly, Brake Master Cylinder Part Number: 47220-48200
$123.60 MSRP: $174.97You Save: $51.37 (30%)Ships in 1-3 Business Days
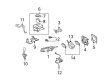
Toyota Highlander Master Cylinder Reservoir Part Number: 47220-48180
$154.74 MSRP: $219.05You Save: $64.31 (30%)Ships in 1-3 Business Days
Toyota Highlander Master Cylinder Reservoir Part Number: 47220-48160
$150.39 MSRP: $212.90You Save: $62.51 (30%)Ships in 1-3 Business Days
Toyota Highlander Master Cylinder Reservoir Part Number: 47220-48210
$165.43 MSRP: $234.18You Save: $68.75 (30%)Ships in 1-3 Business Days
Toyota Highlander Master Cylinder Reservoir Part Number: 47220-48121
$117.91 MSRP: $165.50You Save: $47.59 (29%)Toyota Highlander Master Cylinder Reservoir Part Number: 47220-48111
$117.91 MSRP: $165.50You Save: $47.59 (29%)
Toyota Highlander Brake Master Cylinder Reservoir
Choose genuine Brake Master Cylinder Reservoir that pass strict quality control tests. You can trust the top quality and lasting durability. Shopping for OEM Brake Master Cylinder Reservoir for your Toyota Highlander? Our website is your one-stop destination. We stock an extensive selection of genuine Toyota Highlander parts. The price is affordable so you can save more. It only takes minutes to browse and find the exact fit. Easily add to cart and check out fast. Our hassle-free return policy will keep you stress-free. We process orders quickly for swift delivery. Your parts will arrive faster, so you can get back on the road sooner.
Toyota Highlander Brake Master Cylinder Reservoir Parts and Q&A
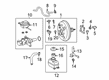
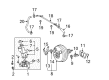
- Q: How to replace the Brake Master Cylinder Reservoir Sub-Assembly on Toyota Highlander?A:Draining the brake fluid is essential when replacing the Brake Master Less Reservoir Tank Cylinder Sub-Assembly method. This step must be performed without allowing fluid to contact painted surfaces. First remove the air cleaner assembly with hose before you detach the four nuts from the front suspension brace sub-assembly upper center [53607A/98-99] by releasing the wire harness clamps. The brake master less reservoir tank cylinder sub-assembly [47207/98-81] must be removed by disconnecting the brake fluid level warning switch connector then sliding the clip to disconnect the actuator No. 1 hose (if equipped with VSC) and using Special Service Tool: 09023-00100 to remove the 2 brake lines before pulling out the check valve bracket and master cylinder sub-assembly. To remove the brake master cylinder gasket [47275/98-81] and brake master cylinder reservoir tank stopper [47237A/98-81] you should pull out the brake master cylinder reservoir sub-assembly [47202/98-81] while taking off its two master cylinder reservoir grommets [47255/98-81]. Librate the new grommets with lithium soap base glycol grease and mount them onto the master cylinder reservoir sub-assembly before installing the assembly to the master cylinder. Install the reservoir tank stopper after ensuring proper fitment while using new brake master cylinder gasket [47275/98-81]. Before mounting the master cylinder apply chalk to an accessory tool tip and rest it against the Brake Booster to measure push rod tool clearance which can be adjusted with Special Service Tool: 09737-00020. Finish installation of the brake master less reservoir tank cylinder sub-assembly [47207/98-81] by applying 2 nuts and torque them to 13 Nm (130 kgf-cm, 9 ft. lbs.) then proceed with connecting brake lines using Special Service Tool: 09023-00100 to a torque of 15 Nm (155 kgf-cm, 11 ft. lbs.) also reinstall the actuator No. 1 hose and brake fluid level warning switch connector. The front suspension brace sub-assembly upper center [53607A/98-99] must be installed with 4 nuts which require a torque of 80 Nm (815 kgf-cm, 59 ft. lbs.). Additionally, reconnect all applicable wire harness clamps to their mounting locations. The correct installation procedure includes attaching the air cleaner assembly with hose followed by brake fluid addition in the reservoir. Master cylinder and brake line needs bleeding before checking reservoir fluid levels and verifying brake fluid leakage.

Related Toyota Highlander Parts
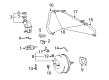
 Toyota Highlander Brake Booster
 Toyota Highlander Speed Sensor
 Toyota Highlander ABS Pump And Motor Assembly
 Toyota Highlander Brake Booster Vacuum Hose
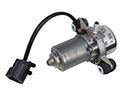 Toyota Highlander Brake Booster Vacuum Pump
 Toyota Highlander Brake Caliper Piston
 Toyota Highlander Brake Fluid Pump
 Toyota Highlander Brake Master Cylinder
 Toyota Highlander Hydraulic Hose
 Toyota Highlander Master Cylinder Repair Kit
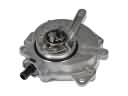 Toyota Highlander Vacuum Pump
 Toyota Highlander Yaw Sensor