×
ToyotaParts- Hello
- Login or Register
- Quick Links
- Live Chat
- Track Order
- Parts Availability
- RMA
- Help Center
- Contact Us
- Shop for
- Toyota Parts
- Scion Parts
My Garage
My Account
Cart
OEM Toyota Highlander Brake Master Cylinder
- Select Vehicle by Model
- Select Vehicle by VIN
Select Vehicle by Model
orMake
Model
Year
Select Vehicle by VIN
For the most accurate results, select vehicle by your VIN (Vehicle Identification Number).
13 Brake Master Cylinders found


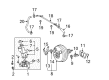
Toyota Highlander Master Cylinder Part Number: 47028-48041
$291.24 MSRP: $415.83You Save: $124.59 (30%)Ships in 1-2 Business Days
Toyota Highlander Master Cylinder Part Number: 47207-48030
$223.09 MSRP: $318.52You Save: $95.43 (30%)Ships in 1-3 Business Days
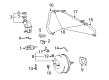
Toyota Highlander Master Cylinder Part Number: 47055-48010
$745.91 MSRP: $1093.14You Save: $347.23 (32%)Ships in 1-3 Business DaysToyota Highlander Master Cylinder Part Number: 47055-0E061
$924.90 MSRP: $1355.45You Save: $430.55 (32%)Ships in 1-2 Business DaysToyota Highlander Master Cylinder Part Number: 47055-0E060
$924.90 MSRP: $1355.45You Save: $430.55 (32%)Ships in 1-3 Business Days
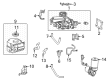
Toyota Highlander Master Cylinder Part Number: 47201-48210
$133.82 MSRP: $189.44You Save: $55.62 (30%)Ships in 1-3 Business Days
Toyota Highlander Master Cylinder Part Number: 47201-0E040
$189.18 MSRP: $270.11You Save: $80.93 (30%)Ships in 1-3 Business Days
Toyota Highlander Cylinder Part Number: 47207-48070
$205.96 MSRP: $294.06You Save: $88.10 (30%)Ships in 1-3 Business Days
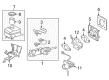
Toyota Highlander Cylinder Sub-Assembly, Brake Master Part Number: 47201-48190
$213.88 MSRP: $305.38You Save: $91.50 (30%)Ships in 1-3 Business Days
Toyota Highlander Cylinder Sub-Assembly, Brake Stroke Simulator Part Number: 47207-48050
$207.71 MSRP: $296.56You Save: $88.85 (30%)Ships in 1-3 Business DaysToyota Highlander Master Cylinder Part Number: 47207-48040
$229.14 MSRP: $327.17You Save: $98.03 (30%)Ships in 1-3 Business Days
Toyota Highlander Brake Booster Assembly, W/Master Cylinder Part Number: 47055-0E020
$934.89 MSRP: $1370.09You Save: $435.20 (32%)Ships in 1-2 Business Days
Toyota Highlander Master Cylinder Part Number: 47201-0E060
$246.74 MSRP: $352.28You Save: $105.54 (30%)
Toyota Highlander Brake Master Cylinder
Choose genuine Brake Master Cylinder that pass strict quality control tests. You can trust the top quality and lasting durability. Shopping for OEM Brake Master Cylinder for your Toyota Highlander? Our website is your one-stop destination. We stock an extensive selection of genuine Toyota Highlander parts. The price is affordable so you can save more. It only takes minutes to browse and find the exact fit. Easily add to cart and check out fast. Our hassle-free return policy will keep you stress-free. We process orders quickly for swift delivery. Your parts will arrive faster, so you can get back on the road sooner.
Toyota Highlander Brake Master Cylinder Parts and Q&A
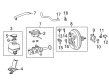
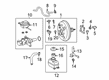
- Q: How to install the brake master cylinder on Toyota Highlander?A:An installer must start by examining and setting the Brake Booster push rod before moving on to install the brake master cylinder. Install a new O-ring to the brake master cylinder sub-assembly afterward you should attach it to the brake booster assembly through 2 nuts which need to be torqued to 13 Nm (132 kgf-cm, 10 ft-lbf). nezvous handling of the master cylinder and maintain its horizontal position or vertical position with piston in an up direction to stop the piston from dropping away during installation or removal procedures. The brake master cylinder piston needs cleaning with a rag to remove foreign matter and receipt of uniform lithium soap-based glycol grease distribution should occur around its total circumference. The installation of two Brake Lines onto the brake master cylinder sub-assembly happens through a 12 mm union nut wrench where torque reaches a specific value of 20 Nm (without wrench) or 18 Nm (with wrench) and must be parallel to the tool and have a 250 mm (9.84 in.) fulcrum length. Install the Brake Master Cylinder Reservoir assembly with No. 1 reservoir tube then proceed to install the outer cowl top panel sub-assembly and windshield Wiper Motor with link as well as the cowl top ventilator louver sub-assembly and both front wiper arm and blade assemblies (RH and LH). The process involves filling the brake fluid reservoir followed by bleeding the brake master cylinder together with the brake line and brake actuator where inspection for brake fluid leaks, and fluid level checking must be performed.
- Q: How to remove the brake master cylinder on Toyota Highlander?A:Before you pull out the brake master cylinder you must eliminate vacuum from the Brake Booster system. Proceed by uninstalling Wiper Blades with their front arms from both sides as well as removing the cowl ventilator assembly and broken window motor connection. Proceed to the next task by taking off the outer cowl top panel sub-assembly. Remove brake fluid from the reservoir before extracting the No.1 reservoir tube by sliding its clip off from the brake master reservoir assembly. The brake master cylinder sub-assembly requires disconnection of its two Brake Lines through usage of a union nut wrench (12 mm). Detach the two brake master cylinder sub-assembly nuts and remove its O-ring from the assembly. Keep the master cylinder free of impacts while handling it because dropped components cannot be reused. Vertical orientation of the master cylinder at all times remains essential since it stops the piston from escaping. Particularly when cleaning the master cylinder piston use a shop rag or cloth followed by applying lithium soap base glycol grease around its circumference where you should always avoid other types of greases or fluids.


Related Toyota Highlander Parts
 Toyota Highlander Brake Booster
 Toyota Highlander Brake Booster Vacuum Hose
 Toyota Highlander Brake Booster Vacuum Pump
 Toyota Highlander Brake Fluid Pump
 Toyota Highlander Brake Master Cylinder Reservoir
 Toyota Highlander Hydraulic Hose
 Toyota Highlander Master Cylinder Repair Kit
 Toyota Highlander Parking Brake Shoes
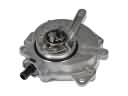 Toyota Highlander Vacuum Pump
 Toyota Highlander Wheel Cylinder Repair Kit
 Toyota Highlander Wheel Hub
 Toyota Highlander Yaw Sensor