×
ToyotaParts- Hello
- Login or Register
- Quick Links
- Live Chat
- Track Order
- Parts Availability
- RMA
- Help Center
- Contact Us
- Shop for
- Toyota Parts
- Scion Parts
My Garage
My Account
Cart
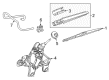
OEM Toyota Highlander Wiper Motor
Windshield Wiper Motor- Select Vehicle by Model
- Select Vehicle by VIN
Select Vehicle by Model
orMake
Model
Year
Select Vehicle by VIN
For the most accurate results, select vehicle by your VIN (Vehicle Identification Number).
14 Wiper Motors found


Toyota Highlander Wiper Motor, Rear Part Number: 85130-0E051
$172.36 MSRP: $244.00You Save: $71.64 (30%)Ships in 1-2 Business Days


Toyota Highlander Wiper Motor, Front Part Number: 85110-0E060
$164.02 MSRP: $232.19You Save: $68.17 (30%)Ships in 1-2 Business Days


Toyota Highlander Wiper Motor, Rear Part Number: 85130-0E080
$122.07 MSRP: $172.81You Save: $50.74 (30%)Ships in 1-2 Business Days


Toyota Highlander Wiper Motor, Rear Part Number: 85130-0E060
$153.68 MSRP: $217.55You Save: $63.87 (30%)Ships in 1-3 Business Days


Toyota Highlander Wiper Motor, Front Part Number: 85110-0E050
$202.93 MSRP: $289.74You Save: $86.81 (30%)Ships in 1-3 Business Days


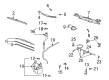
Toyota Highlander Wiper Motor, Front Part Number: 85110-48070
$207.82 MSRP: $296.73You Save: $88.91 (30%)Ships in 1-3 Business Days
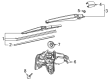
Toyota Highlander Wiper Motor, Rear Part Number: 85130-0E120
$140.17 MSRP: $198.42You Save: $58.25 (30%)Ships in 1-3 Business Days
Toyota Highlander Motor Part Number: 85007-09005
$1405.46 MSRP: $2059.72You Save: $654.26 (32%)Ships in 1-3 Business Days
Toyota Highlander Wiper Motor, Rear Part Number: 85130-0E070
$122.07 MSRP: $172.81You Save: $50.74 (30%)Ships in 1-2 Business Days
Toyota Highlander Wiper Motor, Rear Part Number: 85130-48050
$152.62 MSRP: $216.05You Save: $63.43 (30%)
Toyota Highlander Wiper Motor, Rear Part Number: 85130-48020
$162.61 MSRP: $230.19You Save: $67.58 (30%)Ships in 1-3 Business Days
Toyota Highlander Wiper Motor, Front Part Number: 85110-0E120
$176.12 MSRP: $249.32You Save: $73.20 (30%)Ships in 1-3 Business DaysToyota Highlander Wiper Motor, Front Part Number: 85110-48120
$178.35 MSRP: $254.64You Save: $76.29 (30%)Ships in 1-3 Business DaysToyota Highlander Wiper Motor, Front Part Number: 85110-0E100
$158.38 MSRP: $224.20You Save: $65.82 (30%)
Toyota Highlander Wiper Motor
Choose genuine Wiper Motor that pass strict quality control tests. You can trust the top quality and lasting durability. Shopping for OEM Wiper Motor for your Toyota Highlander? Our website is your one-stop destination. We stock an extensive selection of genuine Toyota Highlander parts. The price is affordable so you can save more. It only takes minutes to browse and find the exact fit. Easily add to cart and check out fast. Our hassle-free return policy will keep you stress-free. We process orders quickly for swift delivery. Your parts will arrive faster, so you can get back on the road sooner.
Toyota Highlander Wiper Motor Parts and Q&A
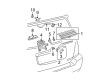
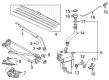
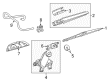
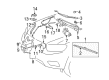
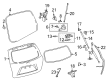
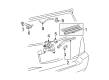
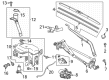
- Q: How to remove the rear wiper motor assembly for the Glass Hatch Type on Toyota Highlander?A:Using the centering jig is essential when removing the rear wiper motor assembly of the Glass Hatch Type because failing to do so will require a complete new assembly replacement. The service begins with removing the back window upper trim panel assembly then continuing with the back door trim cover LH (without Power Back Door) and the back door service hole cover LH (with Power Back Door) after disconnecting the power back door rod if installed. Continue by disassembling sequence which includes removing the back door trim cover RH along with the back door lock cover (if vehicle has Glass Hatch Type) and also the assist strap hole cover and assist strap assembly. Starting with the removal of the 3 clips allows you to extract both the back door trim panel assembly and the rear wiper shaft cover. The first removal step involves taking off the head cap and proceeding with the arm and blade assembly disassembly by loosening the nut. When working on the Fixed Glass Type up to the rear wiper motor grommet and on the Glass Hatch Type up to the rear wiper link cap and pivot which require nut removal. Disconnect the connector before removing the 4 bolts which allow you to extract the rear wiper motor assembly when using the Fixed Glass Type. During rear wiper motor assembly removal on the Glass Hatch Type users must open the glass hatch first before engaging the 3 claws and 2 guides. After that users must install the new centering jig that cannot be reused. The glass hatch should be closed after properly connecting the 2 claws and guide while detaching the connector and unscrewing both 2 nuts and 4 bolts to extract the rear wiper motor assembly. The removal of the new rear wiper motor assembly begins with disconnecting the connector before removing 4 bolts in sequence with the 2 nuts while preventing damage to the back door glass during the operation.
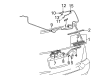
- Q: How to install the rear wiper motor assembly for the Fixed Glass Type and Glass Hatch Type on Toyota Highlander?A:The installation of the Fixed Glass Type rear wiper motor assembly requires four bolts tightened to 5.5 Nm (56 kgf-cm, 49 in-lbf) torque while avoiding back door glass scratching and connector linking. The rear wiper motor assembly of Glass Hatch Type requires temporary installation through 4 bolts and 2 nuts with a procedure to avoid holding the rear wiper link pivot and to maintain the centering jig until installation of the rear wiper link pivot is complete. Secure the bolts to 5.5 Nm (56 kgf-cm, 49 in-lbf) tension and the nuts to 8.0 Nm (82 kgf-cm, 71 in-lbf) before connecting the connector. Dip the wiper motor grommet lip in MP grease before installing it to the Fixed Glass Type where the position mark should face upward. During Glass Hatch Type installation users should install the rear wiper link pivot with a 7.0 Nm (71 kgf-cm, 62 in-lbf) nut torque but must first open the glass hatch by disengaging guides and claws and then removing the centering jig while closing the hatch. Install the rear wiper link cap after applying MP grease to its surface. The installation procedure includes stopping the wiper motor at its automatic stop point followed by cleaning both wiper pieces and pivot joints together with blade alignment and final assembly with a torque of 5.5 Nm (56 kgf-cm, 49 in-lbf) while keeping the arm extended during tightening. The rear wiper arm head cap needs to be installed until clicking sounds are heard. To complete installation hook the glass hatch open for access then establish the clips and add the rear wiper shaft cover which should be followed by wiper operation during washer fluid use for correct functioning free of hindrances. You must finish the installation by adding the back door trim panel assembly together with the assist strap assembly followed by the assist strap hole cover and the back door lock cover for Glass Hatch Type then add the back door trim cover LH (with and without Power Back Door) and connect the Power Back Door rod and place the back door service hole cover LH (with Power Back Door) and finally secure the back door trim cover RH and back window upper trim panel assembly.


Related Toyota Highlander Parts
 Toyota Highlander Bumper
 Toyota Highlander Bumper Cover
 Toyota Highlander Door Lock Actuator
 Toyota Highlander Emblem
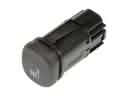 Toyota Highlander Seat Heater Switch
 Toyota Highlander Door Hinge
 Toyota Highlander Liftgate Hinge
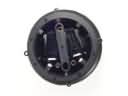 Toyota Highlander Mirror Actuator
 Toyota Highlander Rear Door Striker
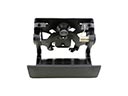 Toyota Highlander Tailgate Handle
 Toyota Highlander Windshield Washer Nozzle
 Toyota Highlander Wiper Linkage
Browse Toyota Highlander Wiper Motor by Years
2025 2024
2023
2022
2021
2020
2019
2018
2017
2016
2015
2014
2013
2012
2011
2010
2009
2008
2007
2006
2005
2004
2003
2002
2001