×
ToyotaParts- Hello
- Login or Register
- Quick Links
- Live Chat
- Track Order
- Parts Availability
- RMA
- Help Center
- Contact Us
- Shop for
- Toyota Parts
- Scion Parts
My Garage
My Account
Cart
OEM Toyota Sequoia Wheel Bearing
Hub Bearing- Select Vehicle by Model
- Select Vehicle by VIN
Select Vehicle by Model
orMake
Model
Year
Select Vehicle by VIN
For the most accurate results, select vehicle by your VIN (Vehicle Identification Number).
8 Wheel Bearings found


Toyota Sequoia Front Wheel Bearing Part Number: 43570-0C010
$202.12 MSRP: $288.58You Save: $86.46 (30%)Ships in 1-3 Business Days


Toyota Sequoia Wheel Bearing Part Number: 90369-54002
$114.58 MSRP: $160.83You Save: $46.25 (29%)Ships in 1-3 Business Days

Toyota Sequoia Hub Assembly, Front Part Number: 43502-35110
$242.31 MSRP: $345.96You Save: $103.65 (30%)Ships in 1 Business Day

Toyota Sequoia Hub Assembly, Front Part Number: 43502-0C021
$223.78 MSRP: $319.52You Save: $95.74 (30%)Ships in 1-3 Business Days


Toyota Sequoia Hub Assembly, Front Part Number: 43502-35170
$224.37 MSRP: $320.34You Save: $95.97 (30%)Ships in 1-2 Business Days


Toyota Sequoia Bearing Housing, Rear Part Number: 42409-34010
$330.03 MSRP: $471.21You Save: $141.18 (30%)Ships in 1-3 Business Days

Toyota Sequoia Bearing, Rear Part Number: 42450-0C020
$425.61 MSRP: $623.74You Save: $198.13 (32%)Ships in 1-2 Business Days

Toyota Sequoia Hub Assembly, Front Part Number: 43502-0C031
$223.78 MSRP: $319.52You Save: $95.74 (30%)Ships in 1-3 Business Days
Toyota Sequoia Wheel Bearing
Choose genuine Wheel Bearing that pass strict quality control tests. You can trust the top quality and lasting durability. Shopping for OEM Wheel Bearing for your Toyota Sequoia? Our website is your one-stop destination. We stock an extensive selection of genuine Toyota Sequoia parts. The price is affordable so you can save more. It only takes minutes to browse and find the exact fit. Easily add to cart and check out fast. Our hassle-free return policy will keep you stress-free. We process orders quickly for swift delivery. Your parts will arrive faster, so you can get back on the road sooner.
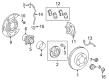
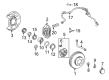
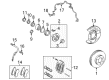
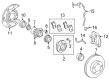
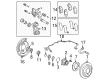
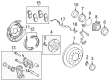
The Wheel Bearing of Toyota Sequoia are the components whose main function is to ensure that the wheels are spinning, and this is a very important part in as far as safety and performance is concerned. There are 3 types of setup of hubs and bearings, and the most frequent setup is the unit form of an assembly, containing a sensor of ABS. The working of the bearings, for example, loose or worn out bearings may lead to noises and vibration and at long last, lead to the loss of the wheels. It is prescribed in practice to inspect the fasteners periodically, at least regarding roughness and play, and, if possible, to make a visual check and look for any signs of damage. It may become necessary to replace them, new races are needed together with high-quality grease for the equipment to work optimally. All in all, Wheel Bearings are very essential in making sure that you have a comfortable and safe drive in the Toyota Sequoia vehicle.
Toyota Sequoia Wheel Bearing Parts and Q&A
- Q: How to service and repair the wheel bearing on Toyota Sequoia?A:You can start wheel bearing servicing by eliminating the front wheel along with the grease cap by using both a screwdriver and hammer. Dual-wheel vehicles require users to remove the Drive Shaft through process of unfastening the cotter pin and lock cap while using brake power to unscrew the locknut. Unplug the Speed Sensor and wire harness clamp from the Steering Knuckle through the removal of its 2 bolts. Begin by removing the Brake Caliper and disc through Brake Line clamp removal from the steering knuckle and subsequent disentanglement of the 2 caliper and disc securing bolts which must be performed without damaging a brake tube. Then secure the brake caliper in place. Tear away the Shock Absorber then cut off the lower Ball Joint through removal of its four bolts. Disassembling the steering knuckle requires removal of the cotter pin followed by nut loosening then connection disconnection using Special Service Tool 09950-40011 (09951-04010, 09952-04010, 09553-04020, 09550-04010, 09955-04031, 09958-04011). Finish by removing the nut and steering knuckle while protecting the oil seal and drive shaft boot. The drive shaft goes into the axle hub before temporarily tightening the nut without causing damage to oil seal and drive shaft boot while connecting the steering knuckle to upper suspension arm using a new cotter pin and a torque of 105 Nm (1,100 kgf-cm, 77 ft. lbs.) and additional tightening to 60 degrees if the cotter pin holes are not properly aligned. Use the 4 bolts to join the lower ball joint with the steering knuckle using 80 Nm (820 kgf-cm, 59 ft. lbs.) torque before installing the shock absorber. The vehicle requires the disc and brake caliper to have two bolts installed before torquing to 123 Nm (1,250 kgf-cm, 90 ft. lbs.) while the brake line clamp needs a bolt to attach to the steering knuckle with torquing to 28 Nm (285 kgf-cm, 21 ft. lbs.). The speed sensor and wire harness clamp must be installed onto the steering knuckle with 2 bolts which need torque at 8.0 Nm (82 kgf-cm, 71 ft. lbs.). When installing the drive shaft lock nut on 4WD vehicles applicants must use braking force followed by nut tightening to 235 Nm (2,400 kgf-cm, 173 ft. lbs.) and closing with lock cap and new cotter pin and continued tightening up to 60° if needed. After completing these steps, the technician shall install the grease cap followed by the front wheel using 110 Nm (1,150 kgf-cm, 83 ft. lbs.) torque. The technician should depress the brake pedal several times before checking the front wheel alignment and verifying the speed sensor signal and zero-point calibrating steering angle, master cylinder pressure, yaw rate, and deceleration sensors.

Related Toyota Sequoia Parts
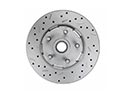 Toyota Sequoia Brake Rotor
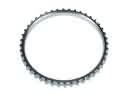 Toyota Sequoia ABS Reluctor Ring
 Toyota Sequoia Brake Bleeder Screw
 Toyota Sequoia Brake Caliper Piston
 Toyota Sequoia Brake Fluid Pump
 Toyota Sequoia Brake Line
 Toyota Sequoia Brake Shoe Set
 Toyota Sequoia Hydraulic Hose
 Toyota Sequoia Parking Brake Shoes
 Toyota Sequoia Speed Sensor
 Toyota Sequoia Spindle Nut
 Toyota Sequoia Wheel Cylinder Repair Kit