×
ToyotaParts- Hello
- Login or Register
- Quick Links
- Live Chat
- Track Order
- Parts Availability
- RMA
- Help Center
- Contact Us
- Shop for
- Toyota Parts
- Scion Parts
My Garage
My Account
Cart
OEM Toyota Sequoia Shock Absorber
Suspension Shock Absorber- Select Vehicle by Model
- Select Vehicle by VIN
Select Vehicle by Model
orMake
Model
Year
Select Vehicle by VIN
For the most accurate results, select vehicle by your VIN (Vehicle Identification Number).
31 Shock Absorbers found


Toyota Sequoia Shock Absorber Part Number: 48510-34040
$154.85 MSRP: $219.21You Save: $64.36 (30%)Ships in 1-2 Business Days

Toyota Sequoia Shock Absorber, Rear Part Number: 48530-34053
$570.33 MSRP: $835.82You Save: $265.49 (32%)Ships in 1-3 Business Days


Toyota Sequoia Shock Absorber, Front Part Number: 48510-A9180
$151.92 MSRP: $215.06You Save: $63.14 (30%)Ships in 1-2 Business Days
Toyota Sequoia Shock Absorber Part Number: 48510-A9590
$146.63 MSRP: $207.57You Save: $60.94 (30%)Ships in 1-3 Business Days

Toyota Sequoia Shock Absorber Part Number: 48510-09S71
$148.51 MSRP: $210.23You Save: $61.72 (30%)Ships in 1-2 Business Days


Toyota Sequoia Shock Absorber Part Number: 48510-A9600
$144.16 MSRP: $204.08You Save: $59.92 (30%)Ships in 1-3 Business Days

Toyota Sequoia Shock Absorber Part Number: 48510-A9580
$145.69 MSRP: $206.24You Save: $60.55 (30%)Ships in 1-2 Business Days
Toyota Sequoia Shock Absorber, Front Part Number: 48510-A9170
$156.26 MSRP: $221.21You Save: $64.95 (30%)Ships in 1-3 Business Days

Toyota Sequoia Shock Absorber Part Number: 48530-A9110
$65.28 MSRP: $91.63You Save: $26.35 (29%)Ships in 1-3 Business Days

Toyota Sequoia Shock Absorber, Rear Part Number: 48530-A9470
$91.00 MSRP: $127.73You Save: $36.73 (29%)Ships in 1-3 Business Days
Toyota Sequoia Shock Absorber, Rear Part Number: 48530-A9490
$95.14 MSRP: $133.55You Save: $38.41 (29%)Ships in 1-3 Business Days
Toyota Sequoia Shock Absorber Part Number: 48530-A9180
$95.62 MSRP: $134.22You Save: $38.60 (29%)Ships in 1-3 Business Days
Toyota Sequoia Shock Absorber, Rear Part Number: 48530-A9460
$96.68 MSRP: $135.71You Save: $39.03 (29%)Ships in 1-3 Business Days
Toyota Sequoia Shock Absorber Part Number: 48510-09760
$143.34 MSRP: $202.91You Save: $59.57 (30%)Ships in 1-3 Business Days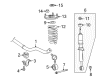
Toyota Sequoia Shock Absorber Part Number: 48510-09S61
$148.51 MSRP: $210.23You Save: $61.72 (30%)Ships in 1-3 Business DaysToyota Sequoia Shock Absorber Part Number: 48510-34010
$206.66 MSRP: $295.06You Save: $88.40 (30%)Ships in 1-3 Business Days
Toyota Sequoia Shock Absorber Part Number: 48530-0C101
$48.51 MSRP: $67.52You Save: $19.01 (29%)Toyota Sequoia Shock Absorber Part Number: 48530-A9170
$99.41 MSRP: $139.54You Save: $40.13 (29%)Ships in 1-2 Business DaysToyota Sequoia Shock Absorber Part Number: 48530-80189
$382.60 MSRP: $560.70You Save: $178.10 (32%)Ships in 1-3 Business DaysToyota Sequoia Shock Absorber Part Number: 48530-80190
$409.95 MSRP: $600.79You Save: $190.84 (32%)Ships in 1-3 Business Days
| Page 1 of 2 |Next >
1-20 of 31 Results
Toyota Sequoia Shock Absorber
Choose genuine Shock Absorber that pass strict quality control tests. You can trust the top quality and lasting durability. Shopping for OEM Shock Absorber for your Toyota Sequoia? Our website is your one-stop destination. We stock an extensive selection of genuine Toyota Sequoia parts. The price is affordable so you can save more. It only takes minutes to browse and find the exact fit. Easily add to cart and check out fast. Our hassle-free return policy will keep you stress-free. We process orders quickly for swift delivery. Your parts will arrive faster, so you can get back on the road sooner.
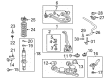
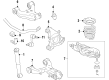
The Shock Absorber of Toyota Sequoia vehicles is one of the important components of the suspension system together with the struts to ensure stability in the vehicles. These components reduce bouncing, or the tendency of the foot to strike the ground forcefully, and mut the shock impulse through a transformation of kinetic energy to heat. Twin- Tube and Mono-Tube etc., which are applied in the shock absorbers of Toyota over the years, are known to have different mechanisms of controlling the flow of the hydraulic fluids and enhance its effectiveness to various levels of driving style of the vehicle and other conditions. There are also enhanced designs such as Position Sensitive Damping (PSD) and Acceleration Sensitive Damping (ASD) that improve further on the ride and handling quality of the vehicle, semi and active suspension systems assist from electrorheological and magnetorheological damping.
Toyota Sequoia Shock Absorber Parts and Q&A
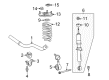
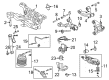
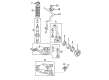
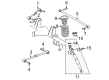
- Q: How to remove the front shock absorber with coil spring on Toyota Sequoia?A:The first step to remove the front shock absorber with coil spring begins by taking away the front wheel. One must first follow the suspension control section to detach the absorber control actuator (w/ AVS). The suspension control bracket (w/ AVS) should be removed by disassembling the bracket nut and bracket component. Begin the repair of the left-hand front shock absorber with coil spring by removing its lower side nut only when the bolt remains in place to stop any assembly dislodgment. Remove the four nuts first then extract the bolt from the lower side which will remove both shock absorber and coil spring.
- Q: How to install the front shock absorber with coil spring on Toyota Sequoia?A:Begin the installation of the front shock absorber with coil spring by screwing 3 nuts onto the chassis frame at the upper shock absorber point while maintaining 64 Nm torque (650 kgf-cm, 47 ft. lbs.). The lower suspension arm meets the shock absorber's lower side through its combination with the bolt and washer along with the nut by applying 135 Nm (1,400 kgf-cm, 100 ft. lbs.) of torque. Place the front wheel and secure it with proper torque of 110 Nm (1,150 kgf-cm, 83 ft. lbs.).


Related Toyota Sequoia Parts
 Toyota Sequoia Control Arm
 Toyota Sequoia Coil Springs
 Toyota Sequoia Axle Beam Mount
 Toyota Sequoia Ball Joint
 Toyota Sequoia Camber and Alignment Kit
 Toyota Sequoia Control Arm Bolt
 Toyota Sequoia Control Arm Bushing
 Toyota Sequoia CV Joint
 Toyota Sequoia Strut Housing
 Toyota Sequoia Strut Mounts
 Toyota Sequoia Sway Bar Link
 Toyota Sequoia Sway Bars
Browse Toyota Sequoia Shock Absorber by Years
2025
2024
2023
2022
2021
2020
2019
2018
2017
2016
2015
2014
2013
2012
2011
2010
2009
2008
2007
2006
2005
2004
2003
2002
2001