×
ToyotaParts- Hello
- Login or Register
- Quick Links
- Live Chat
- Track Order
- Parts Availability
- RMA
- Help Center
- Contact Us
- Shop for
- Toyota Parts
- Scion Parts
My Garage
My Account
Cart
OEM Toyota Prius Wheel Bearing
Hub Bearing- Select Vehicle by Model
- Select Vehicle by VIN
Select Vehicle by Model
orMake
Model
Year
Select Vehicle by VIN
For the most accurate results, select vehicle by your VIN (Vehicle Identification Number).
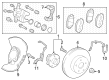
14 Wheel Bearings found


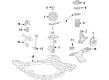
Toyota Prius Hub Assembly Part Number: 43550-47020
$309.65 MSRP: $442.10You Save: $132.45 (30%)Ships in 1-3 Business Days

Toyota Prius Hub & Bearing, Rear Part Number: 42450-47030
$295.55 MSRP: $421.98You Save: $126.43 (30%)Ships in 1-3 Business Days


Toyota Prius Wheel Bearing Part Number: 90080-36136
$59.83 MSRP: $83.98You Save: $24.15 (29%)Ships in 1-3 Business Days


Toyota Prius Front Hub Part Number: 43510-47012
$236.37 MSRP: $337.48You Save: $101.11 (30%)Ships in 1-2 Business Days


Toyota Prius Hub & Bearing, Rear Part Number: 42450-47040
$261.53 MSRP: $373.41You Save: $111.88 (30%)Ships in 1 Business Day

Toyota Prius Front Hub Part Number: 43502-12140
$126.07 MSRP: $178.46You Save: $52.39 (30%)Ships in 1-3 Business Days


Toyota Prius Front Hub & Bearing Part Number: 43550-47011
$295.20 MSRP: $421.47You Save: $126.27 (30%)Ships in 1-2 Business Days

Toyota Prius Hub & Bearing Assembly, Rear Axle, Passenger Side Part Number: 42450-76021
$268.99 MSRP: $384.05You Save: $115.06 (30%)Ships in 1-2 Business Days
Toyota Prius Hub Assembly, Rear Part Number: 42450-47090
$352.63 MSRP: $516.79You Save: $164.16 (32%)Ships in 1-2 Business Days
Toyota Prius Hub & Bearing, Rear Part Number: 42450-47020
$372.04 MSRP: $545.23You Save: $173.19 (32%)Ships in 1-3 Business Days

Toyota Prius Hub Assembly Part Number: 42410-47050
$272.02 MSRP: $388.38You Save: $116.36 (30%)Ships in 1-2 Business Days
Toyota Prius Hub Assembly Part Number: 43550-47080
$295.90 MSRP: $422.48You Save: $126.58 (30%)Ships in 1-2 Business Days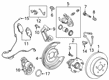
Toyota Prius Hub Assembly, Rear Part Number: 42450-12211
$320.01 MSRP: $456.90You Save: $136.89 (30%)Ships in 1-2 Business Days
Toyota Prius Hub Assembly, Rear Part Number: 42410-47030
$337.49 MSRP: $481.86You Save: $144.37 (30%)Ships in 1-3 Business Days
Toyota Prius Wheel Bearing
Choose genuine Wheel Bearing that pass strict quality control tests. You can trust the top quality and lasting durability. Shopping for OEM Wheel Bearing for your Toyota Prius? Our website is your one-stop destination. We stock an extensive selection of genuine Toyota Prius parts. The price is affordable so you can save more. It only takes minutes to browse and find the exact fit. Easily add to cart and check out fast. Our hassle-free return policy will keep you stress-free. We process orders quickly for swift delivery. Your parts will arrive faster, so you can get back on the road sooner.
The Toyota Prius Wheel Bearing is an important part that greatly strengthens at the very least the dependability, flexibility as well as toughness of the Toyota Prius variant series. The Wheel Bearing, known for its high sturdiness, enables the proper rotation of wheels, that in turn defines vehicle reliability and safety. This integral part is located in the center of different types of Prius' hubs where it reduces friction for the wheel and tire assembly to function. In the latest Toyota Prius models, the common hub and bearing configuration is the unit or integral type that usually comes with an ABS sensor so the hub and bearing assembly can be replace easily with another complete unit. Compatibility extends up to the current NHW20 models, and since it is a scanner, it supports all the generations of Prius, starting from the first generation, NHW10. Maintenance of the Wheel Bearing is important and wh enever one starts making a louder sound or gets loose, it may depict that it needs attention. This Toyota Prius wheel bearing is quite unique in the market because of its high-temperature grease lubrication that helps in the extension of its or lifespan and efficiency. Also, mechanisms such as replaceable taper roller bearings which can be incorporated in non-driven axle hubs will also add to the overall performance of a car and its safety aspects. Remaining loyal to innovation and environmental safety, Toyota still stays the president of hybrids development for the Prius family with the Wheel Bearing being the core element in this process.
Toyota Prius Wheel Bearing Parts and Q&A
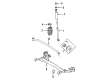
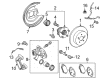
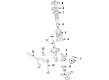
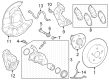
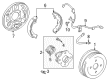
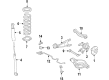
- Q: How to replace the REAR AXLE HUB & Wheel Bearing ASSY LH on Toyota Prius?A:Begin the replacement of rear axle hub & bearing assy LH by disconnecting the rear wheel and the rear brake drum sub-assy. Begin by disconnecting the skid control sensor connector while being cautious of any foreign substances which could encroach on the connector or its installation area. The four bolts need to be removed to detach the rear axle hub and bearing assembly on the left-hand side. Fit the rear axle hub & bearing assy LH into the position on the axle beam assy before tightening its 4 bolts to 61 Nm (622 kgf-cm, 45 ft. lbs.). Connect the skid control sensor connector before conducting a check for loose or runout conditions in the axle hub bearing. Finally install the rear brake drum sub-assy together with the rear wheel and torque wheel bolts to 103 Nm (1,050 kgf-cm, 76 ft. lbs.). The wheel alignment of the rear should be checked while inspecting the speed sensor signal of the ABS.
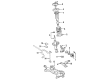
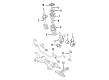
- Q: How to Service and Repair a Wheel Bearing on Toyota Prius?A:The procedure for wheel bearing service starts with front wheel removal at a torque level of 103 Nm which corresponds to 1,050 kgf-cm and 76 ft. lbs. First inspect the bearing backlash and axle hub deviation by removing the 2 bolts and Brake Caliper and disc followed by proper support of the brake caliper. The bearing should be replaced if a dial indicator determines that backlash in the axle hub area exceeds 0.05 mm (0.0020 inch). Measure the axle hub surface at the area outside the bolt using a maximum range of 0.07 mm (0.0028 inch) for correct measurements. If exceeding 0.07 mm (0.0028 inch), replace the axle hub. Reassemble the brake caliper along with the 2 bolts and disc by torquing them to 107 Nm (1,090 kgf-cm, 79 ft. lbs.). The drive shaft lock nut can be unstaked by using Special Service Tool: 09930-00010 with a hammer while applying brake pressure until achieving a torque of 216 Nm (2,200 kgf-cm, 159 ft. lbs.). Support the brake caliper in place and detach both brake components degrees First remove the ABS speed sensor by applying 8.0 Nm (82 kgf-cm, 71 inch lbs.) before unfastening the 2 nuts from the Shock Absorber's lower side with 153 Nm (1,560 kgf-cm, 113 ft. lbs.) while leaving the bolts intact. Following tie rod end detachment from the steering knuckle, users must first remove the cotter pin and nut with 49 Nm torque (500 kgf-cm, 36 ft.lbs.). Users should adjust nut torque when holes for new cotter pins do not align to 60 Nm. The tie rod end needs to be disconnected by using Special Service Tool 09628-62011. The technician must disassemble the lower suspension arm from the lower Ball Joint through a torque procedure of 142 Nm (1,450 kgf-cm, 105 ft. lbs.) by removing two nuts and a bolt. You should detach the steering knuckle along with the axle hub by removing its 2 bolts and nuts situated at the shock absorber's lower side while protecting both the boot and ABS speed sensor rotor from damage. The installation process repeats the disassembly order while you should verify ABS speed sensor performance together with front wheel alignment following installation.


Related Toyota Prius Parts
 Toyota Prius Brake Pads
 Toyota Prius Brake Caliper
 Toyota Prius Brake Booster Vacuum Hose
 Toyota Prius Brake Caliper Bracket
 Toyota Prius Brake Caliper Piston
 Toyota Prius Brake Fluid Pump
 Toyota Prius Brake Shoe Set
 Toyota Prius Spindle Nut
 Toyota Prius Wheel Cylinder
 Toyota Prius Wheel Cylinder Repair Kit
 Toyota Prius Wheel Stud
 Toyota Prius Yaw Sensor