×
ToyotaParts- Hello
- Login or Register
- Quick Links
- Live Chat
- Track Order
- Parts Availability
- RMA
- Help Center
- Contact Us
- Shop for
- Toyota Parts
- Scion Parts
My Garage
My Account
Cart
OEM Toyota Prius Ball Joint
Control Arm Joint- Select Vehicle by Model
- Select Vehicle by VIN
Select Vehicle by Model
orMake
Model
Year
Select Vehicle by VIN
For the most accurate results, select vehicle by your VIN (Vehicle Identification Number).
5 Ball Joints found


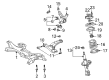
Toyota Prius Ball Joint, Lower Part Number: 43330-09230
$65.52 MSRP: $91.97You Save: $26.45 (29%)Ships in 1-3 Business Days


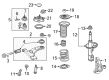
Toyota Prius Lower Ball Joint Part Number: 43330-49185
$57.47 MSRP: $79.99You Save: $22.52 (29%)Ships in 1-2 Business Days


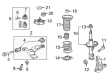
Toyota Prius Ball Joint, Lower Part Number: 43330-19115
$64.57 MSRP: $90.64You Save: $26.07 (29%)Ships in 1-3 Business Days

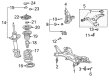
Toyota Prius Lower Ball Joint Part Number: 43330-49055
$72.51 MSRP: $101.78You Save: $29.27 (29%)Ships in 1-3 Business Days

Toyota Prius Lower Ball Joint Part Number: 43330-49255
$60.19 MSRP: $84.48You Save: $24.29 (29%)Ships in 1-2 Business Days
Toyota Prius Ball Joint
Choose genuine Ball Joint that pass strict quality control tests. You can trust the top quality and lasting durability. Shopping for OEM Ball Joint for your Toyota Prius? Our website is your one-stop destination. We stock an extensive selection of genuine Toyota Prius parts. The price is affordable so you can save more. It only takes minutes to browse and find the exact fit. Easily add to cart and check out fast. Our hassle-free return policy will keep you stress-free. We process orders quickly for swift delivery. Your parts will arrive faster, so you can get back on the road sooner.
Toyota Prius Ball Joint Parts and Q&A
- Q: How to service and repair the lower ball joint on Toyota Prius?A:A service or repair of the lower ball joint starts by taking out the steering knuckle with its axle hub followed by removing the lower ball joint after removing its cotter pin and nut. Special Service Tool: 09628-62011 should be employed for removing the lower ball joint. The installation process requires testers to place the ball joint stud in a condition of constant rotation for 5 turns at a rate of 2-4 seconds prior to nut tightening. Once the nut is tightened testers need to measure its torque on the 5th turn to confirm it falls within the specified range of 1.0 - 4.9 Nm (10 - 50 kgf-cm, 8.7 - 43 inch lbs.). To install the lower ball joint attach it to the car body with a torque of 103 Nm (1,050 kgf-cm, 76 ft. lbs.) then mount a fresh cotter pin. Additional nut tightening goes up to 60 degrees when the cotter pin holes do not match. Install the steering knuckle with the axle hub and check ABS speed sensor signal before conducting front wheel alignment tests.
- Q: How to remove the front lower ball joint assembly on the LH side on Toyota Prius?A:Before starting the LH side front lower ball joint assembly removal process, the first step entails jacking up the vehicle front section followed by examining the assembly while moving the front suspension lower No. 1 arm vertically. This check evaluates loosening using a cloth-wrapped wood block to avoid damaging bolt or nut components. First remove the front wheel and then disconnect the front axle hub nut on the left-hand side. The technician should disconnect the front Speed Sensor LH followed by the front disc Brake Caliper assembly LH to remove the front disc. The front suspension lower No. 1 arm sub-assembly LH requires separation from the front lower ball joint through unfastening the bolt in addition to the two nuts while lowering the arm to complete the separation process. Approach the LH front axle assembly together with the front No. 1 wheel bearing dust deflector. Use the Special Service Tool: 09611-36020 to eliminate the front lower ball joint assembly LH through clip and castle nut removal. During this procedure avoid damaging the steering knuckle while securely hanging the tool at the spacer of the steering knuckle. A replacement steering knuckle will be necessary if the spacer detaches.


Related Toyota Prius Parts
 Toyota Prius Shock Absorber
 Toyota Prius Sway Bar Link
 Toyota Prius Bump Stop
 Toyota Prius Camber and Alignment Kit
 Toyota Prius Coil Spring Insulator
 Toyota Prius Coil Springs
 Toyota Prius Control Arm Bolt
 Toyota Prius Shock and Strut Boot
 Toyota Prius Steering Knuckle
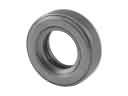 Toyota Prius Strut Bearing
 Toyota Prius Strut Housing
 Toyota Prius Strut Mounts