×
ToyotaParts- Hello
- Login or Register
- Quick Links
- Live Chat
- Track Order
- Parts Availability
- RMA
- Help Center
- Contact Us
- Shop for
- Toyota Parts
- Scion Parts
My Garage
My Account
Cart
OEM Toyota Solara Wheel Bearing
Hub Bearing- Select Vehicle by Model
- Select Vehicle by VIN
Select Vehicle by Model
orMake
Model
Year
Select Vehicle by VIN
For the most accurate results, select vehicle by your VIN (Vehicle Identification Number).
12 Wheel Bearings found


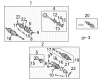
Toyota Solara Hub Assembly, Front Part Number: 43502-0E030
$130.65 MSRP: $184.95You Save: $54.30 (30%)


Toyota Solara Wheel Bearing Part Number: 90080-36193
$102.37 MSRP: $143.70You Save: $41.33 (29%)Ships in 1-3 Business Days

Toyota Solara Hub Assembly, Front Part Number: 43502-28090
$129.36 MSRP: $183.12You Save: $53.76 (30%)Ships in 1-3 Business Days

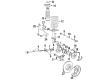
Toyota Solara Hub & Bearing Assembly, Rear Axle, Driver Side Part Number: 42460-48011
$478.62 MSRP: $701.43You Save: $222.81 (32%)Ships in 1-2 Business Days

Toyota Solara Hub & Bearing Assembly, Rear Axle, Passenger Side Part Number: 42450-33020
$413.81 MSRP: $606.44You Save: $192.63 (32%)Ships in 1-3 Business Days

Toyota Solara Front Hub Part Number: 43502-32070
$174.85 MSRP: $249.65You Save: $74.80 (30%)Ships in 1-3 Business Days


Toyota Solara Bearing (For Front Drive Shaft) Part Number: 90080-36133
$32.13 MSRP: $44.73You Save: $12.60 (29%)Ships in 1-2 Business Days

Toyota Solara Wheel Bearings Part Number: 90369-43008
$102.49 MSRP: $143.86You Save: $41.37 (29%)Ships in 1-3 Business Days
Toyota Solara Hub Assembly Part Number: 42410-33040
$428.45 MSRP: $627.90You Save: $199.45 (32%)Ships in 1-3 Business DaysToyota Solara Hub Assembly, Passenger Side Part Number: 42450-48011
$515.62 MSRP: $755.65You Save: $240.03 (32%)Ships in 1 Business Day
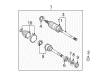
Toyota Solara Inner Shaft Bearing, Front Part Number: 90369-36001-77
$47.67 MSRP: $66.35You Save: $18.68 (29%)Ships in 1-3 Business Days


Toyota Solara Hub Sub-Assembly, Front Axle, Passenger Side Part Number: 43502-06040
$162.49 MSRP: $230.03You Save: $67.54 (30%)
Toyota Solara Wheel Bearing
Choose genuine Wheel Bearing that pass strict quality control tests. You can trust the top quality and lasting durability. Shopping for OEM Wheel Bearing for your Toyota Solara? Our website is your one-stop destination. We stock an extensive selection of genuine Toyota Solara parts. The price is affordable so you can save more. It only takes minutes to browse and find the exact fit. Easily add to cart and check out fast. Our hassle-free return policy will keep you stress-free. We process orders quickly for swift delivery. Your parts will arrive faster, so you can get back on the road sooner.
Toyota Solara Wheel Bearing is one of the most important assemblies which dramatically increases the steadiness and productivity of Toyota Solara automobiles. Consequently, this Wheel Bearing is intended to allow the easy rotation of the wheels given that this component is designed to reduce the friction between the wheel and the tire to allow proper function of the wheel and tire assembly, which is very essential in as much as one wants to achieve the prime performance and safety of the vehicle. The first generation of Toyota Solara includes the models from the year 1998 to 2003 while the, second generation Toyota Solara models were manufactured between the year 2004 and 2008; the three primary hub and bearing system used in these models includes integral hub and bearing, hub and separate bearings, and the hub carrier system. This assembly may contain an ABS sensor and hence when it is replaced, it is done as a single piece which attests to Toyota's ease of maintenance. Tire and Wheel are checking the Wheel Bearing, by touch and listening for sounds such noise, vibration, and roughness, due to worn bearings are a safety concern that could result in loss of the wheel. This specific Wheel Bearing uniquely shines as the prime wheel bearing product in the market because of its durable build, and its applicability to the different models of Solara, as they provide the drivers with the prime efficiency and safety experience. Moreover, high quality grease which is an important factor for bearing to have a longer life is used and the other factor is the strict company standard set for end-play adjustment of the bearings for the Toyota Solara Wheel Bearing. In summing up, it can be emphasized that the Toyota Solara Wheel Bearing has been designed and produced as a result of the company's commitment to engineering excellence, which makes it one of the most vital components of every Toyota Solara.
Toyota Solara Wheel Bearing Parts and Q&A
- Q: How to install the rear axle hub and Wheel Bearing assembly LH on Toyota Solara?A:The installation of the rear axle hub and bearing assembly LH requires 4 bolts with a torques specification of 80 Nm (816 kgf-cm, 59 ft-lbf). The installation of the skid control sensor requires safe wire connection while maintaining the wire straight and untwisted. Before moving forward with the rear disc installation check the bearing backlash and measure axle hub deviation. The rear disc Brake Caliper assembly LH should be installed with 2 bolts torqued to 62 Nm (630 kgf-cm, 46 ft-lbf) and require the rear flexible hose attachment through a bolt torqued to 19 Nm (192 kgf-cm, 14 ft-lbf). Mount the rear wheel afterward and tighten it to 103 Nm before inspecting the rear wheel alignment precision. The last step should involve checking the ABS speed sensor signal through proper test modes depending on VSC system presence.
- Q: How to remove the rear axle hub and Wheel Bearing assembly on the LH side on Toyota Solara?A:The first step to take the LH side rear axle hub and bearing assembly out is to detach the rear wheel. Start by unfastening the rear disc Brake Caliper assembly bolt then remove the flexible hose from the Shock Absorber before removing its 2 bolts to separate the assembly. Then tie off the brake caliper assembly with string or an appropriate tool to prevent flexing from the flexible hose. The skid control sensor installation requires disc removal followed by disconnection of its connector. The operation concludes by taking out four bolts which separate the rear axle hub and bearing assembly LH.


Related Toyota Solara Parts
 Toyota Solara Backing Plate
 Toyota Solara Brake Caliper
 Toyota Solara Brake Caliper Bracket
 Toyota Solara Brake Drum
 Toyota Solara Brake Line
 Toyota Solara Brake Shoe Set
 Toyota Solara Hydraulic Hose
 Toyota Solara Parking Brake Cable
 Toyota Solara Parking Brake Shoes
 Toyota Solara Speed Sensor
 Toyota Solara Spindle Nut
 Toyota Solara Yaw Sensor