×
ToyotaParts- Hello
- Login or Register
- Quick Links
- Live Chat
- Track Order
- Parts Availability
- RMA
- Help Center
- Contact Us
- Shop for
- Toyota Parts
- Scion Parts
My Garage
My Account
Cart
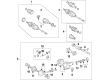
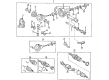
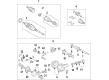
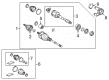
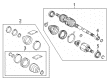
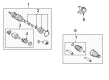
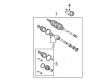
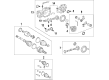
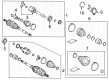
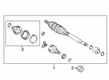
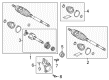
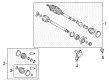
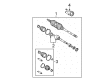
OEM Toyota Axle Shaft
Car Axle Shaft- Select Vehicle by Model
- Select Vehicle by VIN
Select Vehicle by Model
orMake
Model
Year
Select Vehicle by VIN
For the most accurate results, select vehicle by your VIN (Vehicle Identification Number).
795 Axle Shafts found


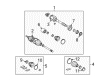
Toyota Axle Assembly Part Number: 43430-60061
$419.71 MSRP: $615.09You Save: $195.38 (32%)Ships in 1 Business DayProduct Specifications- Other Name: CV Axle Assembly, Front Left, Front Right; CV Axle Assembly; GSP Cv Axle; Axle Shaft
- Replaced by: 43430-60062


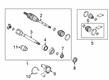
Toyota Axle Assembly, Front Part Number: 43430-60040
$372.28 MSRP: $572.11You Save: $199.83 (35%)Ships in 1-2 Business DaysProduct Specifications- Other Name: Shaft Assembly, Front Drive; CV Axle Assembly, Front Left, Front Right; Joint Kit, Drive Shaft; GSP Cv Axle; Axle Shaft; Shaft Assembly, Front Drive, Passenger Side; Shaft Assembly, Front Drive, Driver Side; CV Axle Assembly
- Position: Front


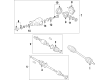
Toyota Axle Assembly, Front Part Number: 43430-04071
$339.00 MSRP: $484.02You Save: $145.02 (30%)Product Specifications- Other Name: Shaft Assembly, Front Drive; CV Axle Assembly, Front, Front Left, Front Right; GSP Cv Axle; Axle Shaft; Shaft Assembly, Front Drive, Passenger Side; Shaft Assembly, Front Drive, Driver Side; CV Axle Assembly
- Position: Front
- Replaces: 43430-04070

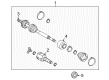
Toyota Shaft Assembly, Front Drive, Passenger Side Part Number: 43430-60082
$332.25 MSRP: $474.38You Save: $142.13 (30%)Ships in 1-2 Business DaysProduct Specifications- Other Name: Shaft Assembly, Front Drive, Driver Side; Axle Shaft
- Replaced by: 43430-60083


Toyota Axle Assembly, Passenger Side Part Number: 43410-0R092
$436.17 MSRP: $639.21You Save: $203.04 (32%)Ships in 1-3 Business DaysProduct Specifications- Other Name: Shaft Assembly, Front Drive; CV Axle Assembly, Front Right; GSP Cv Axle; Axle Shaft; Shaft Assembly, Front Drive, Passenger Side; CV Axle Assembly
- Position: Passenger Side
- Replaces: 43410-0R091, 43410-0R090


Toyota Axle Assembly, Driver Side Part Number: 43420-0T011
$409.95 MSRP: $600.79You Save: $190.84 (32%)Ships in 1-3 Business DaysProduct Specifications- Other Name: Shaft Assembly, Front Drive; CV Axle Assembly, Front Left; GSP Cv Axle; Axle Shaft; Shaft Assembly, Front Drive, Driver Side; CV Axle Assembly
- Position: Driver Side
- Replaces: 43420-0T010


Toyota Axle Assembly, Driver Side Part Number: 43420-06B30
$401.89 MSRP: $588.98You Save: $187.09 (32%)Ships in 1-2 Business DaysProduct Specifications- Other Name: Shaft Assembly, Front Drive; CV Axle Assembly, Front Left; GSP Cv Axle; Axle Shaft; Shaft Assembly, Front Drive, Driver Side; CV Axle Assembly
- Position: Driver Side


Toyota Axle Assembly, Rear Part Number: SU003-00785
$309.96 MSRP: $411.57You Save: $101.61 (25%)Ships in 1-3 Business DaysProduct Specifications- Other Name: Drive Shaft Assembly Rear 92205; CV Axle Assembly, Rear; GSP Cv Axle; Axle Shaft; Shaft Assembly, Rear Drive, Passenger Side; Shaft Assembly, Rear Drive, Driver Side; CV Axle Assembly
- Position: Rear


Toyota Axle Assembly, Driver Side Part Number: 43420-02B12
$280.95 MSRP: $427.68You Save: $146.73 (35%)Product Specifications- Other Name: Shaft Assembly, Front Drive; CV Axle Assembly, Front Left; GSP Cv Axle; Axle Shaft; Axle; Shaft Assembly, Front Drive, Driver Side; CV Axle Assembly
- Position: Driver Side
- Replaces: 43420-02B11, 43420-02B10, 43420-02820, 43420-01110


Toyota Axle Assembly, Passenger Side Part Number: 43410-02A03
$308.77 MSRP: $467.38You Save: $158.61 (34%)Product Specifications- Other Name: Shaft Assembly, Front Drive; CV Axle Assembly, Front Right; GSP Cv Axle; Axle Shaft; Axle; Shaft Assembly, Front Drive, Passenger Side; CV Axle Assembly
- Position: Passenger Side
- Replaces: 43410-02760, 43410-02A02, 43410-01130, 43410-02A01, 43410-01131, 43410-02A00


Toyota Axle Assembly, Passenger Side Part Number: 43410-47040
$131.12 MSRP: $185.61You Save: $54.49 (30%)Ships in 1-3 Business DaysProduct Specifications- Other Name: Shaft Assembly, Front Drive; CV Axle Assembly, Front Right; GSP Cv Axle; Axle Shaft; Shaft Assembly, Front Drive, Passenger Side; CV Axle Assembly
- Position: Passenger Side


Toyota Axle Assembly, Driver Side Part Number: 43420-0R030
$298.66 MSRP: $452.96You Save: $154.30 (35%)Ships in 1-3 Business DaysProduct Specifications- Other Name: Shaft Assembly, Front Drive; CV Axle Assembly, Front Left; GSP Cv Axle; Axle Shaft; Shaft Assembly, Front Drive, Driver Side; CV Axle Assembly
- Position: Driver Side
- Replaces: 43420-42170


Toyota Axle Assembly, Passenger Side Part Number: 43410-08030
$364.89 MSRP: $561.28You Save: $196.39 (35%)Product Specifications- Other Name: Shaft Assembly, Front Drive; CV Axle Assembly, Front Right; GSP Cv Axle; Axle Shaft; Shaft Assembly, Front Drive, Passenger Side; CV Axle Assembly
- Position: Passenger Side


Toyota Axle Assembly, Passenger Side Part Number: 42340-0E050
$344.46 MSRP: $504.82You Save: $160.36 (32%)Ships in 1-3 Business DaysProduct Specifications- Other Name: Shaft Assembly, Rear Drive; CV Axle Assembly, Rear Right; Axle Shaft; Shaft Assembly, Rear Drive, Passenger Side
- Position: Passenger Side


Toyota Axle Assembly, Driver Side Part Number: 43420-0E230
$409.95 MSRP: $600.79You Save: $190.84 (32%)Ships in 1-2 Business DaysProduct Specifications- Other Name: Shaft Assembly, Front Drive; CV Axle Assembly, Front Left; Axle Shaft; Shaft Assembly, Front Drive, Driver Side
- Position: Driver Side


Toyota Axle Shaft, Rear Part Number: 42311-0C010
$448.20 MSRP: $656.84You Save: $208.64 (32%)Product Specifications- Other Name: Shaft, Rear Axle; Drive Axle Shaft, Rear; Axle Shafts; Shaft, Rear Axle, Passenger Side; Shaft, Rear Axle, Driver Side
- Position: Rear


Toyota Axle Assembly, Passenger Side Part Number: 43410-12B60
$439.35 MSRP: $643.87You Save: $204.52 (32%)Ships in 1-3 Business DaysProduct Specifications- Other Name: Shaft Assembly, Front Drive; CV Axle Assembly, Front Right; Axle Shaft; Shaft Assembly, Front Drive, Passenger Side
- Position: Passenger Side


Toyota Axle Assembly, Passenger Side Part Number: 43410-10410
$455.58 MSRP: $667.66You Save: $212.08 (32%)Ships in 1 Business DayProduct Specifications- Other Name: Shaft Assembly, Front Drive; CV Axle Assembly, Front Right; Axle Shaft; Shaft Assembly, Front Drive, Passenger Side
- Manufacturer Note: W/O LABEL
- Position: Passenger Side
- Replaces: 43410-F4030


Toyota Axle Assembly, Passenger Side Part Number: 43410-06870
$481.12 MSRP: $705.08You Save: $223.96 (32%)Ships in 1-3 Business DaysProduct Specifications- Other Name: Shaft Assembly, Front Drive; CV Axle Assembly, Front Right; GSP Cv Axle; Axle Shaft; Shaft Assembly, Front Drive, Passenger Side; CV Axle Assembly
- Position: Passenger Side


Toyota Axle Assembly, Driver Side Part Number: 43420-08091
$351.16 MSRP: $514.63You Save: $163.47 (32%)Product Specifications- Other Name: Shaft Assembly, Front Drive; CV Axle Assembly, Front Left; GSP Cv Axle; Axle Shaft; Shaft Assembly, Front Drive, Driver Side; CV Axle Assembly
- Position: Driver Side
- Replaces: 43420-08040, 43420-08090
| Page 1 of 40 |Next >
1-20 of 795 Results
Toyota Axle Shaft
OEM parts deliver unmatched quality you can rely on. They pass extensive quality control inspections. Toyota produces them to the official factory specifications. This process helps prevent defects and imperfections. So you can get exceptional lifespan and a flawless fit. Need new OEM Toyota Axle Shaft? You'll love our wide selection of genuine options. Shop in minutes and skip the hunt. Our prices are unbeatable, you'll save time and money. It's easy to shop and find the right piece. Our committed customer service team gives professional help from start to finish. Every part includes a manufacturer's warranty. We ship quickly, your parts will arrive fast at your door.
Toyota Axle Shaft injects engine twist onto wheel rotation so that the car continues to move without causing a commotion. Toyota has become big by being small starting in 1937 but expanding globally by following the path of lean production that reduces wasteful motion, empowers workers with the authority to halt a line and fix the flaw before it leaves the factory, so that drivers get cars that run long, use little fuel, and shrug off uneven roads; and hybrids that stretch each gallon and sprint over traffic, even when more costly vehicles are in the market. That trust shows when millions of people choose the brand each year no matter the weather, on all money, across all models, and all continents. Within each of these independent suspensions, a Toyota drive system transmits torque to the wheels via an Axle Shaft crafted of high-strength steel, including provision of curb weight, rotation at highway speeds, and elasticity to the on and off extremities of potholes. When seals remain intact, the Toyota lubricated Axle Shaft will be smooth and silent; however, when the tube is dented by rocks or the tube is cut by grit, the part will begin engaging with sound in a scratching, vibrating fashion, spraying grease onto the floor, and the driver will know that alignment and traction will soon suffer. Replace it with a new Toyota rated Axle Shaft and steering is once more direct, acceleration no longer leaps, and the chassis becomes planted on the ground when barging around corners or changing lanes on the asphalt. Do not mind a clicking Axle Shaft; the joint will freeze or break without any mercy.
Toyota Axle Shaft Parts and Q&A
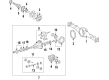
- Q: What is the description and diagnosis of front axle shaft problems on 2003 through 2009 Toyota 4Runner?A:The rear axle assembly of a vehicle is a hypoid, semi-floating type with a differential that allows the outer rear tire to turn more quickly than the inner tire when going around a corner. The axle shafts are splined to the differential side gears, and the differential pinion gears roll around the slower side gear, driving the outer side gear more quickly. Some models use a locking limited-slip rear axle that allows for normal operation until one wheel loses traction. On 4WD models, a fully independent front axle assembly is used, consisting of a differential and a pair of drive axles with inner and outer constant velocity (CV) joints. When diagnosing axle problems, it's important to check other possible causes before assuming the axle is the problem. Common noises associated with axle diagnosis procedures include road noise, tire noise, and engine and transmission noise, which can be deceiving and travel along the driveline. Overhauling the differential requires special tools and isn't cost-effective for a do-it-yourselfer.
- Q: What is the description and function of the rear axle shaft on 2005 through 2009 Toyota Tacoma?A:The rear axle assembly is a hypoid, semi-floating type, the outer rear wheel of turns more fast as compared to the inner wheel when it is in cornering, with axleshafts splined to the side gears of differential. Some models feature an electronic locking rear differential, which operates in two modes: normal and locked and the latter engages when when there is mud or deep snow causing one wheel to spin. On the 4WD models, there will be a fully floating front axle assembly, best described as a differential and drive axles contain constant velocity joints. In diagnosing an axle problem, it is mandatory to look for other possible origins of noise since road noise, tire noise, and engine/transmission noises could be mistaken for axle noise. Hearing road noise does not vary with the power of the vehicle while tire noise is due to the state of the tires. Another method of solving this problem is to identify the main components that make the engine and the gearbox noisy; the tachometer is used to track the engine speed, and further tests are conducted with the car in Neutral. Changing the differential demands specific tools, thus, it may not be changed by the owner of the vehicle; details of removing the axels haft, replacing the oil seal, and replacing the bearings are provided, while other complicated procedures should be done by a mechanic.


Related Toyota Parts
 Toyota Control Arm
 Toyota Sway Bar Link
 Toyota Coil Springs
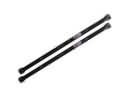 Toyota Torsion Bar
 Toyota Bump Stop
 Toyota Coil Spring Insulator
 Toyota Leaf Spring
 Toyota Rear Crossmember
 Toyota Shock Absorber
 Toyota Shock and Strut Boot
 Toyota Suspension Strut Rod
 Toyota Wheel Seal
Browse Toyota Axle Shaft by Models
Tacoma 4Runner Camry Tundra Corolla RAV4 Highlander Prius Sienna Land Cruiser Pickup FJ Cruiser 86 Sequoia T100 Avalon Celica Supra Yaris Matrix MR2 Solara Venza GR86 Echo C-HR Cressida Grand Highlander Paseo Previa Prius C Prius Prime bZ4X Corolla Cross Corolla iM Crown Crown Signia GR Corolla Mirai MR2 Spyder Prius V Starlet Tercel Van Yaris iA Prius Plug-In GR Supra Prius AWD-e RAV4 Prime