×
ToyotaParts- Hello
- Login or Register
- Quick Links
- Live Chat
- Track Order
- Parts Availability
- RMA
- Help Center
- Contact Us
- Shop for
- Toyota Parts
- Scion Parts
My Garage
My Account
Cart
OEM Toyota Shock Absorber
Suspension Shock Absorber- Select Vehicle by Model
- Select Vehicle by VIN
Select Vehicle by Model
orMake
Model
Year
Select Vehicle by VIN
For the most accurate results, select vehicle by your VIN (Vehicle Identification Number).
1052 Shock Absorbers found


Toyota Shock Absorber, Rear Driver Side Part Number: 48540-39865
$82.23 MSRP: $115.42You Save: $33.19 (29%)Product Specifications- Other Name: Absorber Set, Shock; Rear Left Shock Absorber; Suspension Kit; Strut Assembly; Complete Strut; Shock; Absorber Assembly, Shock, Rear Driver Side
- Position: Rear Driver Side

Toyota Shock Absorber, Rear Passenger Side Part Number: 48530-80557
$82.23 MSRP: $115.42You Save: $33.19 (29%)Ships in 1-3 Business DaysProduct Specifications- Other Name: Absorber Set, Shock; Rear Right Shock Absorber; Suspension Kit; Strut Assembly; Complete Strut; Shock; Absorber Assembly, Shock, Rear Passenger Side
- Position: Rear Passenger Side


Toyota Shock, Rear Part Number: 48530-8Z055
$56.75 MSRP: $78.99You Save: $22.24 (29%)Product Specifications- Other Name: Absorber Set, Shock; Shock Absorber, Rear; Strut; Absorber Assembly, Shock, Rear Passenger Side; Absorber Assembly, Shock, Rear Driver Side; Shock Absorber
- Position: Rear


Toyota Shock Absorber Part Number: 48530-80554
$70.61 MSRP: $99.12You Save: $28.51 (29%)Ships in 1-3 Business DaysProduct Specifications- Other Name: Absorber Set, Shock; Rear Shock Absorber; Suspension Strut Kit; Strut Shock Kit; Complete Strut; Shock; Absorber Assembly, Shock, Rear Passenger Side; Absorber Assembly, Shock, Rear Driver Side
- Manufacturer Note: MARK 48530-52F10
- Replaces: 48530-80324, 48530-80283, 48530-80340


Toyota Shock Absorber, Front Driver Side Part Number: 48520-80232
$305.80 MSRP: $436.62You Save: $130.82 (30%)Ships in 1-3 Business DaysProduct Specifications- Other Name: Absorber Assembly, Shock; Front Left Shock Absorber; Suspension Kit; Strut Assembly; Shock Set; Strut Kit.; Strut; Absorber Assembly, Shock, Front Driver Side; Shock
- Position: Front Driver Side


Toyota Shock Absorber, Rear Part Number: 48531-0E290
$50.78 MSRP: $70.68You Save: $19.90 (29%)Ships in 1-3 Business DaysProduct Specifications- Other Name: Absorber, Shock, Rear; Shock Absorber, Rear; Suspension Shock Absorber; Shock; Absorber Assembly, Shock, Rear Passenger Side; Absorber Assembly, Shock, Rear Driver Side
- Manufacturer Note: MARK 48531-0E290
- Position: Rear


Toyota Shock Absorber Part Number: 48510-34040
$154.85 MSRP: $219.21You Save: $64.36 (30%)Ships in 1-2 Business DaysProduct Specifications- Other Name: Absorber Assembly, Shock; Shock Absorber, Front; Suspension Shock Absorber; Strut; Absorber Assembly, Shock, Front Passenger Side; Absorber Assembly, Shock, Front Driver Side; Shock
- Manufacturer Note: MARK 48510-34040


Toyota Shock Absorber Part Number: 48531-09A80
$45.76 MSRP: $63.69You Save: $17.93 (29%)Ships in 1-2 Business DaysProduct Specifications- Other Name: Absorber Set, Shock; Rear Shock Absorber; Suspension Kit; Strut Kit; Shock; Absorber Assembly, Shock, Rear Passenger Side; Absorber Assembly, Shock, Rear Driver Side
- Manufacturer Note: MARK 48531-08050


Toyota Shock Absorber, Rear Part Number: 48530-80892
$56.75 MSRP: $78.99You Save: $22.24 (29%)Ships in 1-3 Business DaysProduct Specifications- Other Name: Absorber Assembly, Shock; Shock Absorber, Rear; Shock; Absorber Assembly, Shock, Rear Passenger Side; Absorber Assembly, Shock, Rear Driver Side
- Manufacturer Note: MARK 48530-42100
- Position: Rear


Toyota Strut Assembly Part Number: 48530-02B50
$90.88 MSRP: $127.56You Save: $36.68 (29%)Ships in 1-3 Business DaysProduct Specifications- Other Name: Absorber Assembly, Shock; Rear Suspension Strut; Complete Strut Kit; Shock Absorber; Strut; Absorber Assembly, Shock, Rear Passenger Side; Absorber Assembly, Shock, Rear Driver Side
- Manufacturer Note: MARK 48530-02B50


Toyota Shock Absorber, Rear Part Number: 48530-34053
$570.33 MSRP: $835.82You Save: $265.49 (32%)Ships in 1-3 Business DaysProduct Specifications- Other Name: Absorber Assembly, Shock; Shock Absorber, Rear; Suspension Shock Absorber; Shock; Absorber Assembly, Shock, Rear Passenger Side; Absorber Assembly, Shock, Rear Driver Side
- Manufacturer Note: MARK 48530-34053
- Position: Rear
- Replaces: 48530-34051


Toyota Strut, Front Driver Side Part Number: 48520-80341
$151.33 MSRP: $214.22You Save: $62.89 (30%)Ships in 1-2 Business DaysProduct Specifications- Other Name: Absorber Set, Shock; Suspension Strut, Front Left; Shock Absorber
- Position: Front Driver Side
- Replaces: 48520-80071

Toyota Shock Absorber, Front Passenger Side Part Number: 48510-80499
$318.38 MSRP: $454.58You Save: $136.20 (30%)Ships in 1-3 Business DaysProduct Specifications- Other Name: Absorber Assembly, Shock; Front Right Shock Absorber; Suspension Kit; Strut Assembly; Shock Set; Strut Kit.; Strut; Absorber Assembly, Shock, Front Passenger Side; Shock
- Position: Front Passenger Side


Toyota Shock Absorber Part Number: 48531-09A90
$45.76 MSRP: $63.69You Save: $17.93 (29%)Ships in 1-2 Business DaysProduct Specifications- Other Name: Absorber Set, Shock; Rear Shock Absorber; Suspension Kit; Strut Kit; Shock; Absorber Assembly, Shock, Rear Passenger Side; Absorber Assembly, Shock, Rear Driver Side


Toyota Strut, Rear Driver Side Part Number: 48540-09B70
$154.62 MSRP: $218.88You Save: $64.26 (30%)Ships in 1-2 Business DaysProduct Specifications- Other Name: Absorber Set, Shock; Rear Left Suspension Strut; Strut Assembly Kit; Complete Strut; Shock Absorber; Absorber Assembly, Shock, Rear Driver Side
- Position: Rear Driver Side


Toyota Shock Absorber Part Number: 48510-09897
$168.48 MSRP: $238.51You Save: $70.03 (30%)Ships in 1-3 Business DaysProduct Specifications- Other Name: Absorber Assembly Set, S; Shock Absorber, Front; Strut; Absorber Assembly, Shock, Front Passenger Side; Absorber Assembly, Shock, Front Driver Side
- Manufacturer Note: MARK 48510-0C200,COLD AREA SPEC
- Replaces: 48510-09Q50, 48510-09Q80, 48510-09R20, 48510-09895


Toyota Shock Absorber, Rear Part Number: 48531-A9014
$57.47 MSRP: $79.99You Save: $22.52 (29%)Ships in 1-2 Business DaysProduct Specifications- Other Name: Absorber, Shock, Rear; Suspension Kit; Strut Assembly; Shock Set; Complete Strut; Shock; Absorber Assembly, Shock, Rear Passenger Side; Absorber Assembly, Shock, Rear Driver Side
- Manufacturer Note: MARK 48531-AE014
- Position: Rear
- Replaces: 48531-A9013

Toyota Strut, Front Passenger Side Part Number: 48510-80638
$152.62 MSRP: $216.05You Save: $63.43 (30%)Ships in 1-2 Business DaysProduct Specifications- Other Name: Absorber Set, Shock; Suspension Strut, Front Right; Shock Absorber
- Position: Front Passenger Side
- Replaces: 48510-80284

Toyota Shock Absorber, Rear Part Number: 48531-0E110
$50.42 MSRP: $70.18You Save: $19.76 (29%)Ships in 1-2 Business DaysProduct Specifications- Other Name: Absorber, Shock, Rear; Shock Absorber, Rear; Suspension Shock Absorber; Shock; Absorber Assembly, Shock, Rear Passenger Side; Absorber Assembly, Shock, Rear Driver Side
- Manufacturer Note: MARK 48531-0E110
- Position: Rear

Toyota Strut, Front Passenger Side Part Number: 48510-80637
$138.29 MSRP: $195.76You Save: $57.47 (30%)Ships in 1-3 Business DaysProduct Specifications- Other Name: Absorber Set, Shock; Suspension Strut, Front Right; Shock Absorber
- Position: Front Passenger Side
- Replaces: 48510-80287
| Page 1 of 53 |Next >
1-20 of 1052 Results
Toyota Shock Absorber
OEM parts deliver unmatched quality you can rely on. They pass extensive quality control inspections. Toyota produces them to the official factory specifications. This process helps prevent defects and imperfections. So you can get exceptional lifespan and a flawless fit. Need new OEM Toyota Shock Absorber? You'll love our wide selection of genuine options. Shop in minutes and skip the hunt. Our prices are unbeatable, you'll save time and money. It's easy to shop and find the right piece. Our committed customer service team gives professional help from start to finish. Every part includes a manufacturer's warranty. We ship quickly, your parts will arrive fast at your door.
Toyota Shock Absorber softens out the jolts on the road, transforming the hard bumps into soft pulses such that the occupants remain stable and reassured. Toyota operates lean factories which reduce wastage, give employees power to enable their vehicles to shake off daily abuse, continue being cost effective mile after mile, and allow families to roll on even when the roads get nasty. The TNGA platform allows Toyota to trim down and reduce centers of gravity, broaden stances, and enhance steering, making even shopping trips joyful without bruising wallets at the fuel pump. Toyota extends the options of hybrids and crams better Hybrid Synergy Drive into compacts, sedans, and SUVs that boot up silently, sail through traffic, and reduce tailpipe emissions without carats on the behalf of the driver. Toyota maintains the confidence level since its machines absorb the mileage, resist corrosion, ride well, overcome adverse weather, and sell second hand without any difficulty years after. Shock Absorber transforms vile upward energy in potholes into oil passage heat, operating in conjunction with coil springs to prevent chassis bouncing before the rattling dashboard or losing valuable contact by the tires. Shock Absorber models begin with twin-tube gas products to provide normal balance and upgrade to mono-tube products that dissipate heat more efficiently and can be installed in any orientation to provide sharper response. Position-sensitive valving or magnetorheological fluid Shock Absorber is stiffer in corners but in straight runs, providing a trade-off between control and comfort. Shock Absorber wears are gradual hence a rapid bouncing examination or a leakage announcement notifies early trouble and handles sharp.
Toyota Shock Absorber Parts and Q&A
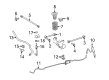
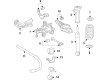
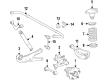
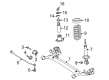
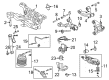
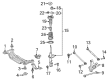
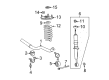
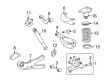
- Q: How to Remove and Install the Rear Shock Absorber on a Toyota Highlander?A:In order to detach the strut assembly on the 2013 model and the earlier Highlander and 2009 and the earlier RX350, you have to first take off the interior trim that conceals the upper mounting bolts for the strut. Wrench on the lug nuts of the rear wheel, and then pull up the rear of your vehicle and support it with jackstands after which you can remove the wheel. Disconnect the brake hose and the wheel speed sensor on the strut; remove the stabilizer bar link. Place the axle carrier on the stand with the aid of the floor jack and then slacken the strut to axle carrier bolt nuts. For the year models 2004 and above with electronic modulated air suspension, using the line fitting tool removed the air hose at the strut assembly. In the event that the separation of the strut is needed the damper shaft nut does not require total removal but only requires slackening. The other mounting points are three other bolts which hold the struts to the body top of the axle carrier, other mounting points are two bolts which hold the lower end of the strut to the axle carrier; to replace the strut one has to first unbolt the three nuts which are at the upper side where the struts are mounted to the body then you lower the axle carrier, next remove the two bolts holding the strut to the axle carrier then take For test, it is necessary to decide whether the strut assembly requires disassembling for replacing the strut or coil spring-as on the 2004 and later Lexus models with modulated air suspension, a dysfunctional strut assembly would need replacing. For installation, standing where the assembly belongs, an assistant should fit it into the fenderwell, run the mounting studs through the body holes and screw on the nuts but not very tightly. Seat the axle carrier and get it bearing on the strut lower bracket then tighten the bolts and nuts accordingly to the torque specifications. Secure the link of the stabilizer bar to the strut bracket, then install the hydraulic brake hose bracket and the wiring harness of the wheel speed sensor, then secure the wheel and tighten the lug nuts and subsequently lower the vehicle and again tighten the lug nuts to the recommended torque. Last of all, torque the three upper strut mounting nuts to the set torque and install any interior trim over the mounting fasteners.
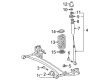
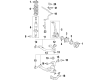
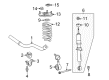
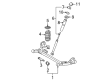
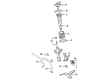
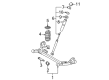
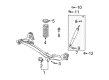
- Q: How to replace a rear shock absorber on Toyota Rav4?A:Loosen the wheel lug nuts, raise the vehicle, and support it securely on jackstands while blocking the front wheels to prevent rolling, then remove the wheel. Support the rear suspension arm "B" with a floor jack and a board to protect it from damage, raising the jack slightly to relieve spring pressure from the shock absorber lower mount, approximately 1.5 to 2 inches. From underneath the vehicle, remove the lower two bolts from the shock absorber bracket, followed by the upper mounting bolt. Take out the shock absorber, then remove the lower mounting bracket and separate the shock absorber from it, ensuring to install the bracket on the replacement shock absorber. For installation, reverse the removal steps and tighten the mounting fasteners, raising the lower arm with a floor jack to simulate normal ride height before tightening the shock absorber-to-lower mounting bracket fasteners.


Related Toyota Parts
 Toyota CV Joint
 Toyota Sway Bar Link
 Toyota Bellhousing
 Toyota Coil Springs
 Toyota CV Boot
 Toyota Axle Shaft
 Toyota Control Arm Shaft Kit
 Toyota Lateral Link
 Toyota Leaf Spring Shackle
 Toyota Shock and Strut Boot
 Toyota Sway Bar Bracket
 Toyota Sway Bar Bushing
Browse Toyota Shock Absorber by Models
Tacoma 4Runner Camry Tundra Corolla RAV4 Highlander Prius Sienna Land Cruiser Pickup FJ Cruiser 86 Sequoia T100 Avalon Celica Supra Yaris Matrix MR2 Solara Venza GR86 Echo C-HR Cressida Grand Highlander Paseo Previa Prius C Prius Prime bZ4X Corolla Cross Corolla iM Crown Crown Signia GR Corolla Mirai MR2 Spyder Prius V Starlet Tercel Van Yaris iA Prius Plug-In GR Supra Prius AWD-e RAV4 Prime