×
ToyotaParts- Hello
- Login or Register
- Quick Links
- Live Chat
- Track Order
- Parts Availability
- RMA
- Help Center
- Contact Us
- Shop for
- Toyota Parts
- Scion Parts
My Garage
My Account
Cart
OEM Toyota Yaris Shock Absorber
Suspension Shock Absorber- Select Vehicle by Model
- Select Vehicle by VIN
Select Vehicle by Model
orMake
Model
Year
Select Vehicle by VIN
For the most accurate results, select vehicle by your VIN (Vehicle Identification Number).
12 Shock Absorbers found


Toyota Yaris Shock Absorber Part Number: 48530-80554
$70.61 MSRP: $99.12You Save: $28.51 (29%)Ships in 1-3 Business Days

Toyota Yaris Shock Absorber, Rear Part Number: 48530-WB010
$65.52 MSRP: $91.97You Save: $26.45 (29%)Ships in 1-3 Business Days

Toyota Yaris Shock Absorber Part Number: 48530-52J20
$47.43 MSRP: $66.02You Save: $18.59 (29%)Ships in 1-3 Business Days
Toyota Yaris Shock Absorber Part Number: 48530-52G20
$51.85 MSRP: $72.17You Save: $20.32 (29%)Ships in 1-3 Business Days
Toyota Yaris Strut, Front Driver Side Part Number: 48520-52511
$124.66 MSRP: $176.47You Save: $51.81 (30%)Ships in 1-3 Business DaysToyota Yaris Strut, Passenger Side Part Number: 48510-52F92
$140.87 MSRP: $199.42You Save: $58.55 (30%)Ships in 1-2 Business DaysToyota Yaris Shock Absorber Part Number: 48530-52G10
$49.22 MSRP: $68.51You Save: $19.29 (29%)Ships in 1-3 Business DaysToyota Yaris Shock Absorber, Rear Part Number: 48530-0DA11
$54.36 MSRP: $75.67You Save: $21.31 (29%)Toyota Yaris Shock Absorber, Rear Part Number: 48530-0DA41
$60.78 MSRP: $85.31You Save: $24.53 (29%)Ships in 1-3 Business DaysToyota Yaris Shock Absorber, Rear Part Number: 48530-80345
$81.75 MSRP: $114.75You Save: $33.00 (29%)Ships in 1-2 Business DaysToyota Yaris Strut, Passenger Side Part Number: 48510-0DA31
$119.60 MSRP: $169.31You Save: $49.71 (30%)Ships in 1-3 Business Days
Toyota Yaris Absorber Assembly, Shock Part Number: 48520-52492
$141.69 MSRP: $200.58You Save: $58.89 (30%)Ships in 1-2 Business Days
Toyota Yaris Shock Absorber
Choose genuine Shock Absorber that pass strict quality control tests. You can trust the top quality and lasting durability. Shopping for OEM Shock Absorber for your Toyota Yaris? Our website is your one-stop destination. We stock an extensive selection of genuine Toyota Yaris parts. The price is affordable so you can save more. It only takes minutes to browse and find the exact fit. Easily add to cart and check out fast. Our hassle-free return policy will keep you stress-free. We process orders quickly for swift delivery. Your parts will arrive faster, so you can get back on the road sooner.
Toyota Yaris Shock Absorber Parts and Q&A
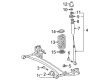
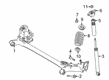
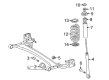
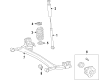
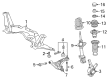
- Q: How to install the rear shock absorber on Toyota Yaris?A:The first step when installing the rear shock absorber involves setting up both the rear suspension support assembly along with the rear suspension support stopper. You should tighten the rear shock absorber after setting up a jack underneath the axle beam with a wooden block between the jack and the rear axle spring seat to stop damage from occurring. Slowly jack up the axle beam before using both bolt and nut to provisionally fasten the shock absorber to the axle beam from its lower side. Locate the suspension support next to the cushion retainer before installing a new lower nut that requires tightening to 15 to 18 mm (0.591 to 0.709 in.). Position the piston rod while you torque a brand-new upper nut to reach 25 Nm (250 kgf-cm, 18 ft-lbf). Fit the rear shock absorber cap and rear absorber cap of the hatchback. When working on the sedan fixed seat type implement the rear seatback assembly followed by the rear seat cushion cover pad sub-assembly. Fasten the rear wheel to 103 Nm with the specified torque values 1,050 kgf-cm and 76 ft-lbf. Reposition the stability of the suspension after lowering the vehicle with the jack while letting it experience multiple bouncing motions. Secure the shock absorber bolt until it reaches 49 Nm of torque as measured by 500 kgf-cm or 36 ft-lbf. Test the wheel alignment of the rear wheel as the final stage.
- Q: How to remove the front shock absorber with coil spring on Toyota Yaris?A:The first step to remove the front shock absorber with coil spring is disconnecting the negative battery cable from the terminal. Start by removing the front wiper arm head cap followed by both front wiper arm with blade assembly on each side. The hatchback requires elimination of the hood to cowl top seal and the sedan needs complete removal of cowl side ventilator sub-assembly from both left and right sides. The next step involves removing the cowl top ventilator louver sub-assembly together with the left louver item targeted for the hatchback model. The steps involve the removal of the front Wiper Motor and link as well as the cowl to register duct sub-assembly for hatchback and the front air shutter seal for sedan models. Then remove the outer cowl top panel together with the front wheel. The front stabilizer link assembly requires removal of the nut so you can disconnect it from the shock absorber using hexagon socket wrench 6 to secure the stud in case the ball joins turn with the nut. Perform the front flexible hose separation that requires a bolt removal procedure which applies to both ABS and non-ABS systems. You must remove the front suspension support dust cover followed by taking off the 2 nuts and 2 bolts to detach the front shock absorber with coil spring from the steering knuckle while fixing the shock absorber rod with a socket hexagon wrench 6 to remove the nut before removing No. 2 suspension support and the front shock absorber with coil spring from the vehicle.


Related Toyota Yaris Parts
 Toyota Yaris Control Arm
 Toyota Yaris Control Arm Bushing
 Toyota Yaris Crossmember Bushing
 Toyota Yaris Front Cross-Member
 Toyota Yaris Shock and Strut Boot
 Toyota Yaris Steering Knuckle
 Toyota Yaris Strut Mounts
 Toyota Yaris Sway Bar Bracket
 Toyota Yaris Sway Bar Bushing
 Toyota Yaris Sway Bars
 Toyota Yaris Trailing Arm Bushing
 Toyota Yaris Transfer Case Bearing