- Hello
- Login or Register
- Quick Links
- Live Chat
- Track Order
- Parts Availability
- RMA
- Help Center
- Contact Us
- Shop for
- Toyota Parts
- Scion Parts

Popular OEM Toyota Yaris Parts
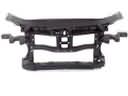
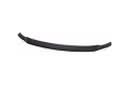
- Body & Hardware Parts View More >
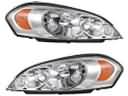
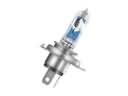
- Electrical Parts View More >
- Engine Parts View More >
- Air & Fuel Delivery Parts View More >
- Belts & Cooling Parts View More >
- Steering Parts View More >
- Suspension Parts View More >
- Emission Control & Exhaust Parts View More >
- A/C & Heating Parts View More >
- Charging & Starting Parts View More >
- Brakes Parts View More >
- Transmission Parts View More >


Why Buy Genuine Toyota Yaris Parts From ToyotaPartsNow.com
ToyotaPartsNow.com highlights the reliability of OEM Toyota Yaris parts right at your fingertips. Our skilled staff assists customers in selecting the right Toyota Yaris parts and provides expert help with any unique part requests. At ToyotaPartsNow.com, we make all Toyota Yaris parts available to you quickly and efficiently through our fast order and reliable ship process. Our service is designed to make finding the correct Toyota Yaris parts fast and easy whether you are an amateur or a professional. We offer access to a broad inventory that includes a wide range of Toyota years and variants. Affordable prices, quick processing and professional service are also our specialty to ensure your car remains in top condition with OEM Toyota Yaris parts. You can feel confident shopping with us because all Toyota Yaris parts you purchase from our store are of genuine quality and built to last.
After its release in 1999 the Toyota Yaris has experienced multiple changes by taking over the Starlet and Tercel while offering multiple body designs between a 4-door sedan along with 3/5-door hatchback variations. The original generation produced until 2005 combined the XP10 platform with the hatchback model which originated from the Japanese Toyota Vitz. Toyota carried forward the Yaris name from 2005 through 2013 for its second-generation product range while constructing its hatchback model from the XP90 platform. The Yaris sedan transitioned during the 2019 model year from the Yaris iA name when it acquired new grille inserts and additional trim selections. The Yaris engines come with a standard 1.5-liter inline-4 engine along with 106 horsepower output that achieves refined efficiency alongside performance-based capabilities. Both transmission options for the vehicle consist of a 6-speed manual as well as a 6-speed automatic which enables smooth gear changes and agile driving characteristics. The Yaris excels for city driving through its compact dimensions which create agile handling without compromising stability on elevated speeds. Every component of the Toyota Yaris depends on original Toyota replacement parts for durability because all components must satisfy safety and performance criteria during extensive testing procedures. Potential customers can find complete OEM parts selection through Toyota Yaris which provides manufacturer warranty protection together with a simple return policy to ensure worry-free ownership.
The Toyota Yaris can sometimes have problems with its engine, transmission, and drivetrain. One of these is unwanted vibration; a broken Toyota Yaris engine mount is often the cause, like on manual transmission vehicles. The car shakes when you speed up or change gears, and you usually need to replace the Toyota Yaris engine mount to fix the issue. The next problem is the Check Engine Light coming on, which is often accompanied by code P0713 associated with automatic-transmission models. It is this code that there is an issue with the Toyota Yaris axle fluid temperature sensor that might require a fitting of a revised axle wire harness to correct the problem. Fluid leaks of the AWD transfer case or rear differential may show up with the Yaris, which is usually combined with a burnt smell. The issue that might appear here is the Toyota Yaris transfer case output seals hardening and breaking and resealing them or replace them and refill the gear oil. If you spot these problems early and fix them, they shouldn't affect the Toyota Yaris's performance or comfort. To maintain the vehicle, it is necessary to have it inspected regularly and the worn parts replaced on time.
Toyota Yaris Parts and Q&A
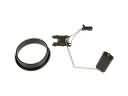
- Q: How to check and replace the Cabin Air Filter located behind the glove box on Toyota Yaris?A:Air conditioning filter is found at the back of the glove box and this stops dust entry into the vehicle. In order to replace it, disconnect the glove box, pull out the filter cover and check the filter. Wipe off, keeping the arrow upwards. Daily cleaning is needed to make sure that it is efficient and has free air flow.
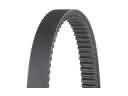
- Q: How to install the water pump assembly and related components on Toyota Yaris?A:Installation of the water pump assembly requires 2 Nuts and 3 bolts with a new gasket having 11 Nm torque. Install the pulley temporarily and then tighten it, with a special tool, to 15 Nm. Fit engine mounting insulator, generator assembly and V belt. Plug the negative battery cable, fill with coolant and verify leakages.
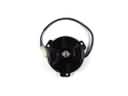
- Q: How to remove and install the alternator on Toyota Yaris?A:In order to take out the alternator, disconnection of the negative battery terminal, engine under cover RH, and fan belt. Disassemble the generator by taking off the terminal cap, connector, and bolts. To install, all the steps are reversed and all components have to be correctly torqued then the battery can be reattached.


