×
ToyotaParts- Hello
- Login or Register
- Quick Links
- Live Chat
- Track Order
- Parts Availability
- RMA
- Help Center
- Contact Us
- Shop for
- Toyota Parts
- Scion Parts
My Garage
My Account
Cart
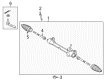
OEM Toyota Yaris Rack And Pinion
Steering Gear- Select Vehicle by Model
- Select Vehicle by VIN
Select Vehicle by Model
orMake
Model
Year
Select Vehicle by VIN
For the most accurate results, select vehicle by your VIN (Vehicle Identification Number).
8 Rack And Pinions found


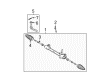
Toyota Yaris Steering Gear Part Number: 45510-52141
$626.62 MSRP: $918.32You Save: $291.70 (32%)Ships in 1-2 Business Days
Toyota Yaris Steering Gear Part Number: 45510-WB005
$326.60 MSRP: $466.31You Save: $139.71 (30%)Ships in 1-3 Business Days
Toyota Yaris Steering Gear Part Number: 45510-WB006
$476.48 MSRP: $698.29You Save: $221.81 (32%)Ships in 1-2 Business Days
Toyota Yaris Steering Gear Part Number: 45510-52351
$585.19 MSRP: $857.61You Save: $272.42 (32%)Ships in 1-3 Business Days
Toyota Yaris Steering Gear Part Number: 45500-0D280
$571.88 MSRP: $838.10You Save: $266.22 (32%)Ships in 1-3 Business DaysToyota Yaris Steering Gear Part Number: 45500-0D290
$720.53 MSRP: $1055.94You Save: $335.41 (32%)Ships in 1-3 Business DaysToyota Yaris Steering Gear Part Number: 45500-0D271
$645.24 MSRP: $945.60You Save: $300.36 (32%)Ships in 1-3 Business DaysToyota Yaris Steering Gear Part Number: 45510-52370
$552.39 MSRP: $809.54You Save: $257.15 (32%)
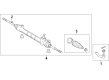
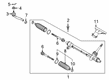
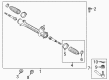
Toyota Yaris Rack And Pinion
Choose genuine Rack And Pinion that pass strict quality control tests. You can trust the top quality and lasting durability. Shopping for OEM Rack And Pinion for your Toyota Yaris? Our website is your one-stop destination. We stock an extensive selection of genuine Toyota Yaris parts. The price is affordable so you can save more. It only takes minutes to browse and find the exact fit. Easily add to cart and check out fast. Our hassle-free return policy will keep you stress-free. We process orders quickly for swift delivery. Your parts will arrive faster, so you can get back on the road sooner.
Toyota Yaris Rack And Pinion Parts and Q&A
- Q: How to remove the power Rack And Pinion from a sedan on Toyota Yaris?A:The first step for removing the power rack and pinion from a sedan involves positioning the front wheels straight ahead then disconnecting the negative terminal battery cable. As the second step you should take out the 4 bolts which hold the hood in place. The first step requires removing the front wiper arm head caps then continuing with front wiper arm and blade assemblies from both left and right sides. For removal of the power rack and pinion you need to take away both cowl side ventilator sub-assemblies together with cowl top ventilator louver sub-assembly and front Wiper Motor and link. Process next by taking off the front air shutter seal and then detach the cowl top panel outer. Remove the column hole cover silencer sheet by unfastening the floor carpet and its 2 clips. Properly secure the steering wheel assembly using a seat belt to keep the spiral cable safe and mark the sliding yoke of the steering intermediate shaft assembly and power rack and pinion before unbolt A and unfasten B to separate the steering intermediate shaft assembly. The process to remove the No. 1 steering column hole cover sub-assembly requires unfastening clip A and peeling clip B off its body attachment. Begin by removing the front wheel and proceeding with removal of both tie rod end sub-assemblies and front stabilizer link assemblies and front suspension lower arms from both sides. Engine suspension will start with removing the radio setting condenser connection bolt and the air-fuel ratio sensor wiring bracket. The suspension process requires using engine hanger (Part No.: 12281-21010) installed with bolt (Part No.: 91642-81025) torqued to 40 Nm (408 kgf-cm, 30 ft-lbf). An engine sling device and chain block sustain the engine assembly while technicians follow steps to eliminate the front suspension crossmember sub-assembly by loosening the engine moving control rod then using a transmission jack to stabilize the crossmember followed by removing the 6 bolts. You can remove the power rack and pinion after taking out the 2 bolts and 2 nuts making sure the nuts stay still throughout the operation.

Related Toyota Yaris Parts
 Toyota Yaris Steering Column
 Toyota Yaris Steering Wheel
 Toyota Yaris Ignition Switch
 Toyota Yaris Drag Link
 Toyota Yaris Rack and Pinion Boot
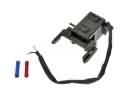 Toyota Yaris Shift Interlock Solenoid
 Toyota Yaris Steering Column Cover
 Toyota Yaris Steering Gear Box
 Toyota Yaris Steering Shaft
 Toyota Yaris Tie Rod End
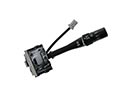 Toyota Yaris Windshield Wiper Switch