×
ToyotaParts- Hello
- Login or Register
- Quick Links
- Live Chat
- Track Order
- Parts Availability
- RMA
- Help Center
- Contact Us
- Shop for
- Toyota Parts
- Scion Parts
My Garage
My Account
Cart
OEM Toyota Celica Shock Absorber
Suspension Shock Absorber- Select Vehicle by Model
- Select Vehicle by VIN
Select Vehicle by Model
orMake
Model
Year
Select Vehicle by VIN
For the most accurate results, select vehicle by your VIN (Vehicle Identification Number).
42 Shock Absorbers found


Toyota Celica Strut, Front Passenger Side Part Number: 48510-80324
$126.42 MSRP: $178.96You Save: $52.54 (30%)Ships in 1-3 Business Days


Toyota Celica Shock Absorber, Rear Passenger Side Part Number: 48530-80331
$100.12 MSRP: $140.54You Save: $40.42 (29%)Ships in 1-3 Business DaysToyota Celica Strut, Front Driver Side Part Number: 48520-80101
$126.42 MSRP: $178.96You Save: $52.54 (30%)Ships in 1-3 Business Days

Toyota Celica Strut, Driver Side Part Number: 48520-20751
$126.18 MSRP: $178.63You Save: $52.45 (30%)

Toyota Celica Strut, Passenger Side Part Number: 48510-20751
Toyota Celica Shock Absorber Part Number: 48530-80079
$117.18 MSRP: $164.49You Save: $47.31 (29%)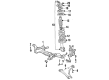
Toyota Celica Shock, Front Passenger Side Part Number: 48510-80219
$116.15 MSRP: $163.99You Save: $47.84 (30%)
Toyota Celica Strut, Rear Driver Side Part Number: 48540-29025
$140.28 MSRP: $198.59You Save: $58.31 (30%)


Toyota Celica Shock Absorber, Rear Part Number: 48531-19796

Toyota Celica Shock Absorber, Rear Part Number: 48531-19846


Toyota Celica Strut Assembly Part Number: 48520-12461
Toyota Celica Shock, Front Driver Side Part Number: 48520-80045


Toyota Celica Shock Absorber, Driver Side Part Number: 48520-20383

Toyota Celica Shock Absorber, Passenger Side Part Number: 48510-20393
Toyota Celica Strut, Driver Side Part Number: 48520-20631
Toyota Celica Strut, Passenger Side Part Number: 48510-20631
Toyota Celica Strut Assembly, Driver Side Part Number: 48520-12522
| Page 1 of 3 |Next >
1-20 of 42 Results
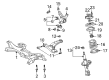
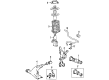
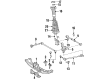
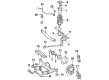
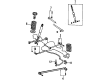
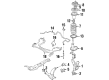
Toyota Celica Shock Absorber
Choose genuine Shock Absorber that pass strict quality control tests. You can trust the top quality and lasting durability. Shopping for OEM Shock Absorber for your Toyota Celica? Our website is your one-stop destination. We stock an extensive selection of genuine Toyota Celica parts. The price is affordable so you can save more. It only takes minutes to browse and find the exact fit. Easily add to cart and check out fast. Our hassle-free return policy will keep you stress-free. We process orders quickly for swift delivery. Your parts will arrive faster, so you can get back on the road sooner.
Shock Absorber is among the critical components of Toyota Celica vehicles mainly applied in the suspension system to complement the functions of struts. These components enabling bouncing decrease and eliminate shock impulses by transforming the kinetic energy to heat. Up to date, Celica models have incorporated in its production; both twin tube and mono tube shock absorbers although enclosing different hydraulic operating mechanisms to suit different road handling. There are more sophisticated designs like Position Sensitive Damping (PSD) as well as Acceleration Sensitive Damping (ASD) that add to the sensitivity of the shock absorbers; technologies like the electorheological and magnetorheological systems enable semi active as well as adaptive suspension systems to balance the comfort as well as control factors.
Toyota Celica Shock Absorber Parts and Q&A
- Q: How to Service and Repair a Shock Absorber on Toyota Celica?A:Service the suspension strut by first taking off the front wheel after tightening it to 103 Nm torque (1,050 kgf-cm, 76 ft. lbs.). First disconnect the ABS speed sensor wire harness clamps from the shock absorber by removing the bolt while tightening it to 8.0 Nm (82 kgf-cm, 71 inch lbs.). Next disconnect the flexible hose from the shock absorber bracket by loosening the bolt which should be mounted at 19 Nm (192 kgf-cm, 14 ft. lbs.). The stabilizer bar link gets disconnected from the shock absorber through nut removal followed by torque application at 44 Nm (449 kgf-cm, 32 ft. lbs.) but if the Ball Joint turns with the nut implementation a hexagon (5 mm) wrench should hold the stud. The first step for the shock absorber with coil spring is to lower the torque on its 2 lower side nuts to 153 Nm (1,560 kgf-cm, 113 ft. lbs.) while leaving the bolts in place. The shock absorber maintenance process involves first untightening three upper side nuts with 39 Nm torque (400 kgf-cm, 29 ft. lbs.) then removing the lower side nuts and bolts while applying engine oil to the threads before installing. The removal sequence ends with taking out the shock absorber with coil spring. The installation procedure should be performed the exact reverse of removal and verify front wheel alignment after the system installation is complete.

Related Toyota Celica Parts
 Toyota Celica Control Arm
 Toyota Celica Ball Joint
 Toyota Celica Coil Springs
 Toyota Celica Axle Shaft
 Toyota Celica Bump Stop
 Toyota Celica Coil Spring Insulator
 Toyota Celica Control Arm Bracket
 Toyota Celica Crossmember Bushing
 Toyota Celica Lateral Link
 Toyota Celica Strut Mounts
 Toyota Celica Sway Bars
 Toyota Celica Trailing Arm Bushing
Browse Toyota Celica Shock Absorber by Years
2005
2004
2003
2002
2001
2000
1999
1998
1997
1996
1995
1994
1993
1992
1991
1990
1989
1988
1987
1986
1985
1984