×
ToyotaParts- Hello
- Login or Register
- Quick Links
- Live Chat
- Track Order
- Parts Availability
- RMA
- Help Center
- Contact Us
- Shop for
- Toyota Parts
- Scion Parts
My Garage
My Account
Cart
OEM Toyota Celica Axle Shaft
Car Axle Shaft- Select Vehicle by Model
- Select Vehicle by VIN
Select Vehicle by Model
orMake
Model
Year
Select Vehicle by VIN
For the most accurate results, select vehicle by your VIN (Vehicle Identification Number).
79 Axle Shafts found

Toyota Celica Axle Assembly, Front Driver Side Part Number: 43420-20483
$387.31 MSRP: $567.61You Save: $180.30 (32%)
Toyota Celica Axle Assembly, Driver Side Part Number: 43420-20581
$396.85 MSRP: $581.60You Save: $184.75 (32%)Ships in 1-3 Business Days
Toyota Celica Axle Assembly, Driver Side Part Number: 43420-20571
$397.36 MSRP: $582.35You Save: $184.99 (32%)Ships in 1-3 Business Days
Toyota Celica Axle Assembly, Driver Side Part Number: 43420-20550
$397.36 MSRP: $582.35You Save: $184.99 (32%)Ships in 1-3 Business Days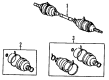
Toyota Celica Axle Assembly, Driver Side Part Number: 43420-20440
$405.21 MSRP: $593.84You Save: $188.63 (32%)Ships in 1-3 Business DaysToyota Celica Axle Assembly, Driver Side Part Number: 43420-20400
$405.21 MSRP: $593.84You Save: $188.63 (32%)Ships in 1-3 Business DaysToyota Celica Axle Assembly, Driver Side Part Number: 43420-20540
$417.20 MSRP: $611.42You Save: $194.22 (32%)Ships in 1-3 Business Days
Toyota Celica Axle Assembly, Passenger Side Part Number: 43410-20600
$449.01 MSRP: $658.03You Save: $209.02 (32%)Ships in 1-3 Business DaysToyota Celica Axle Assembly, Passenger Side Part Number: 43410-20781
$449.71 MSRP: $659.06You Save: $209.35 (32%)Ships in 1-3 Business DaysToyota Celica Axle Assembly, Passenger Side Part Number: 43410-20771
$450.60 MSRP: $660.35You Save: $209.75 (32%)Ships in 1-3 Business DaysToyota Celica Axle Assembly, Passenger Side Part Number: 43410-20760
$450.95 MSRP: $660.87You Save: $209.92 (32%)Ships in 1-3 Business Days
Toyota Celica Axle Assembly, Passenger Side Part Number: 43410-20800
$468.03 MSRP: $685.90You Save: $217.87 (32%)Ships in 1-3 Business Days
Toyota Celica CV Joints, Driver Side Part Number: 43470-19688
$194.79 MSRP: $278.12You Save: $83.33 (30%)Ships in 1-3 Business Days
Toyota Celica Shaft & Joint Assembly Part Number: 43470-29725
$237.85 MSRP: $339.59You Save: $101.74 (30%)Ships in 1-3 Business Days
Toyota Celica Axle Assembly Part Number: 42340-20012
$245.37 MSRP: $350.33You Save: $104.96 (30%)Ships in 1-3 Business Days


Toyota Celica Axle Assembly, Passenger Side Part Number: 43410-20610
Toyota Celica Axle Assembly, Driver Side Part Number: 43420-20560
Toyota Celica Axle Assembly, Driver Side Part Number: 43420-20390
$405.21 MSRP: $593.84You Save: $188.63 (32%)Toyota Celica Axle Assembly, Driver Side Part Number: 43420-20490
$237.60 MSRP: $339.24You Save: $101.64 (30%)
| Page 1 of 4 |Next >
1-20 of 79 Results
Toyota Celica Axle Shaft
Choose genuine Axle Shaft that pass strict quality control tests. You can trust the top quality and lasting durability. Shopping for OEM Axle Shaft for your Toyota Celica? Our website is your one-stop destination. We stock an extensive selection of genuine Toyota Celica parts. The price is affordable so you can save more. It only takes minutes to browse and find the exact fit. Easily add to cart and check out fast. Our hassle-free return policy will keep you stress-free. We process orders quickly for swift delivery. Your parts will arrive faster, so you can get back on the road sooner.
Toyota Celica Axle Shaft Parts and Q&A
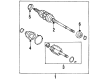
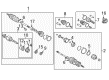
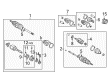
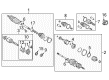
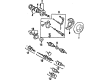
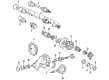
- Q: How to remove and install the axle shaft on Toyota Celica?A:Before removing or installing the axle shaft the hub bearing requires support through Special Service Tool: 09608-16042 (09608-02021 or 09608-02041) to handle vehicle weight. After you disconnect the drive shaft from the axle hub on vehicles equipped with ABS maintain the ABS speed sensor rotor serrations undamaged. Before starting the procedure, disconnect and remove the front wheel whose torque specification requires 103 Nm (1,050 kgf-cm, 76 ft. lbs.). Next, remove the engine under the cover. To uninstall the drive shaft lock nut Special Service Tool: 09930-00010 and a hammer become essential while applying the brake for removing the nut that should be torqued to 216 Nm (2,200 kgf-cm, 159 ft. lbs.). After removing the nut that should be torqued to 49 Nm (500 kgf-cm, 36 ft. lbs.), an adjustment of up to 60 Nm could be necessary when the hole alignment for a new cotter pin proves inaccessible during installation. The mechanic must use Special Service Tool: 09610-20012 to separate the tie rod end. To disconnect the lower Ball Joint from the lower suspension arm remove both nuts and bolt which should be torqued to a value of 142 Nm (1,450 kgf-cm, 105 ft. lbs.). Use an approach that protects the boot and ABS speed sensor rotor when you detach the drive shaft from its connection at the axle hub by striking it with a plastic hammer. To remove the RH drive shaft disconnect the two bolts from the center bearing bracket before pulling out the assembly with the center bearing case which should be torqued to 64 Nm (650 kgf-cm, 47 ft. lbs.) while protecting the oil seal and dust cover from damage. Use Special Service Tool 09520-01010, 09520-24010 (09520-32040) to take out the LH drive shaft with constant attention to the oil seal and dust cover protection. Follow these steps for installation by spreading gear oil across the inboard joint shaft and differential case sliding surfaces while mounting the snap ring with its opening facing downward. Also validate that the inboard joint shaft touches the pinion shaft with 2 - 3 mm (0.08 - 0.12 inch) axial movement and that manual removal of the drive shaft is impossible. Removing the snap ring from the inboard joint shaft requires a screwdriver before finishing the installation by working backward while verifying the ABS speed sensor signal and front wheel alignment.
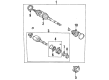
- Q: How to service and repair the axle shaft on Toyota Celica?A:The service process for the axle shaft begins with drive shaft teardown for both M/T 1ZZ-FE and 2ZZ-GE engines where you should check outboard joint play and verify inboard joint sliding motion and inspect the boots for damage. The inboard and outboard joint boot clamps need screwdriver and side cutter tools to remove them before extracting the dynamic damper clamp for M/T models. Swing the inboard joint boot toward the outboard joint before applying matchmarks to the shafts without punching and taking off the snap ring to free the inboard joint shaft. Detach the 6 balls from the outboard joint shaft by marking parts during disassembly as well as using a snap ring expander to separate the inner race and cage from the brass bar and sliding the cage. The 1ZZ-FE engine (A/T) requires same procedure when removing the inboard joint shaft and tripod by ensuring the roller remains undamaged during installation. To access the inboard joint shaft start by using Special Service Tool: 09950-00020 with a press to remove the dust cover. Alternately for the RH side remove the transaxle side dust cover and center bearing with suitable maintenance tools. When you rebuild the assemblies you should install a fresh dust cover together with an outer snap ring for the LH side and a center bearing with snap rings for the RH side using Special Service Tools 09950-60010, 09951-00650, 09950-70010, 09951-07150 and 09710-30021. The installation of new boots and clamps requires a greasing procedure (110 g outboard and 180 g inboard) before aligning matchmarks for the 1ZZ-FE engine (A/T). The installation of dynamic damper along with setting the distance to 155.0 plus or minus 2.0 mm should be done on M/T models. The final step involves verification of drive shaft assembly as well as functional checks.


Related Toyota Celica Parts
 Toyota Celica CV Joint
 Toyota Celica Sway Bar Link
 Toyota Celica Axle Beam Mount
 Toyota Celica Bump Stop
 Toyota Celica Coil Spring Insulator
 Toyota Celica Crossmember Bushing
 Toyota Celica Lateral Link
 Toyota Celica Shock Absorber
 Toyota Celica Suspension Strut Rod
 Toyota Celica Sway Bar Bracket
 Toyota Celica Sway Bar Bushing
 Toyota Celica Sway Bars
Browse Toyota Celica Axle Shaft by Years
2005
2004
2003
2002
2001
2000
1999
1998
1997
1996
1995
1994
1993
1992
1991
1990
1989
1988
1987
1986
1985
1984