×
ToyotaParts- Hello
- Login or Register
- Quick Links
- Live Chat
- Track Order
- Parts Availability
- RMA
- Help Center
- Contact Us
- Shop for
- Toyota Parts
- Scion Parts
My Garage
My Account
Cart
OEM Toyota Highlander Shock Absorber
Suspension Shock Absorber- Select Vehicle by Model
- Select Vehicle by VIN
Select Vehicle by Model
orMake
Model
Year
Select Vehicle by VIN
For the most accurate results, select vehicle by your VIN (Vehicle Identification Number).
74 Shock Absorbers found


Toyota Highlander Shock Absorber, Rear Part Number: 48531-0E290
$50.78 MSRP: $70.68You Save: $19.90 (29%)Ships in 1-3 Business Days
Toyota Highlander Shock Absorber, Rear Part Number: 48531-0E110
$50.42 MSRP: $70.18You Save: $19.76 (29%)Ships in 1-2 Business Days

Toyota Highlander Strut, Rear Passenger Side Part Number: 48530-80432
$143.93 MSRP: $203.74You Save: $59.81 (30%)Ships in 1-3 Business Days


Toyota Highlander Strut, Rear Passenger Side Part Number: 48530-80430
$148.16 MSRP: $209.73You Save: $61.57 (30%)Ships in 1-3 Business Days


Toyota Highlander Strut, Front Driver Side Part Number: 48520-8Z138
$140.99 MSRP: $199.59You Save: $58.60 (30%)Ships in 1-3 Business Days
Toyota Highlander Strut, Front Driver Side Part Number: 48520-8Z167
$141.58 MSRP: $200.42You Save: $58.84 (30%)Ships in 1-3 Business Days

Toyota Highlander Strut, Rear Driver Side Part Number: 48540-80004
$153.80 MSRP: $217.72You Save: $63.92 (30%)Ships in 1-3 Business Days
Toyota Highlander Strut, Front Passenger Side Part Number: 48510-8Z306
$159.67 MSRP: $226.03You Save: $66.36 (30%)Ships in 1-3 Business Days

Toyota Highlander Strut, Rear Passenger Side Part Number: 48530-49195
$166.60 MSRP: $235.85You Save: $69.25 (30%)Ships in 1-3 Business Days

Toyota Highlander Strut, Rear Passenger Side Part Number: 48530-A9720
$164.49 MSRP: $232.85You Save: $68.36 (30%)
Toyota Highlander Strut, Rear Driver Side Part Number: 48540-A9370
$165.08 MSRP: $233.68You Save: $68.60 (30%)Ships in 1-3 Business Days
Toyota Highlander Strut, Front Driver Side Part Number: 48520-8Z169
$141.58 MSRP: $200.42You Save: $58.84 (30%)Ships in 1-3 Business Days
Toyota Highlander Strut, Front Driver Side Part Number: 48520-8Z136
$143.81 MSRP: $203.58You Save: $59.77 (30%)Ships in 1-3 Business Days
Toyota Highlander Strut, Rear Driver Side Part Number: 48540-80008
$143.93 MSRP: $203.74You Save: $59.81 (30%)Ships in 1-3 Business Days
Toyota Highlander Strut, Rear Driver Side Part Number: 48540-80007
$142.99 MSRP: $202.41You Save: $59.42 (30%)Ships in 1-3 Business Days
Toyota Highlander Strut, Rear Passenger Side Part Number: 48530-80431
$142.99 MSRP: $202.41You Save: $59.42 (30%)Ships in 1-3 Business Days
Toyota Highlander Strut, Rear Driver Side Part Number: 48540-80006
$148.16 MSRP: $209.73You Save: $61.57 (30%)Ships in 1-3 Business Days

Toyota Highlander Strut, Front Passenger Side Part Number: 48510-8Z278
$154.97 MSRP: $219.38You Save: $64.41 (30%)Ships in 1-3 Business Days

Toyota Highlander Strut, Rear Driver Side Part Number: 48540-49295
$160.85 MSRP: $227.70You Save: $66.85 (30%)Ships in 1-3 Business Days
Toyota Highlander Strut, Front Driver Side Part Number: 48520-8Z168
$141.11 MSRP: $199.75You Save: $58.64 (30%)
| Page 1 of 4 |Next >
1-20 of 74 Results
Toyota Highlander Shock Absorber
Choose genuine Shock Absorber that pass strict quality control tests. You can trust the top quality and lasting durability. Shopping for OEM Shock Absorber for your Toyota Highlander? Our website is your one-stop destination. We stock an extensive selection of genuine Toyota Highlander parts. The price is affordable so you can save more. It only takes minutes to browse and find the exact fit. Easily add to cart and check out fast. Our hassle-free return policy will keep you stress-free. We process orders quickly for swift delivery. Your parts will arrive faster, so you can get back on the road sooner.
Toyota Highlander Shock Absorber Parts and Q&A
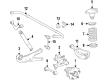
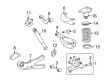
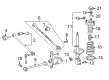
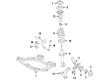
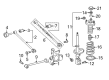
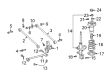
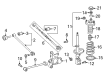
- Q: How to install the rear shock absorber on Toyota Highlander?A:You start by adding the recessed part of the rear lower coil spring insulator to the rear shock absorber assembly unit. After that, install the rear No. 1 spring bumper to the shock absorber assembly. Afterward you should install the rear No. 1 spring bumper to the assembly. After temporary compression of the coil spring with Special Service Tools 09727-30021, 09727-00010, 09727-00021, and 09727-00031 use the tools to install the spring onto the shock absorber assembly. Avoid using an impact wrench for tool safety. The process requires you to position the cutout on the protrusion of the suspension assembly while also inserting the rear support with shock absorber collar and attaching the rear support to rear shock absorber nut. Place the rear coil spring with its end correctly positioned in the insulator's depression while keeping the stud bolt should be angled at 3.5 degrees outward within a range of plus or minus 5 degrees. When installing the rear shock absorber along with coil spring for both 2WD and 4WD vehicles, first apply torque of 58 Nm to three nuts and then tighten two bolts and two nuts to 290 Nm while simultaneously ensuring the bolts maintain their position during nut installation. Lastly, fully tighten the rear support to rear shock absorber nut with 55 Nm torque. Secure the rear No. 1 suspension support cover after adding a disconnected rear stabilizer link assembly onto the shock absorber with coil spring through a tightened nut (torque to 39 Nm) while using a hexagon wrench if the ball joint becomes difficult to turn. The installation process for rear speed sensor wire requires a bolt that needs to be fastened with 5.0 Nm torque for both 2WD and 4WD applications. The rear flexible hose installation requires a bolt on the shock absorber with 19 Nm torque setting and must avoid hose twisting for both car types. To complete the task you should first install deck side trim and deck side trim covers before torquing the rear wheel to 103 Nm while checking and aligning the rear wheel.
- Q: How to remove the rear shock absorber on Toyota Highlander?A:Begin the shock absorber removal by taking off the rear wheel before removing the deck side trim cover and then the deck side trim. The rear flexible hose and the rear shock absorber with coil spring need their bolt removed for 2WD separation followed by separate action on the rear speed sensor wire. The rear flexible hose along with the rear speed sensor require the same procedure for 4WD assembly. After the engine stop, you must detach the rear stabilizer link assembly from the rear shock absorber with coil spring by taking out the nut. Keep in mind that if the ball joint moves with the nut you need to use a 5 mm hexagon wrench to lock the stud bolt in place. Pry the back No. 1 suspension support cover open by releasing its 4 clamps. The rear axle carrier sub-assembly should be supported by placing a wooden block under a jack to avoid dust cover damage. Maintain the nut on the rear shock absorber but loosen it until the desired amount of rotation during both 2WD and 4WD operations. Unfasten two bolts and two nuts which separate the rear shock absorber with coil spring from its position on the rear axle carrier sub-assembly while ensuring the bolts stay still during operation before disassembling the three nuts and the rear shock absorber with coil spring alongside disconnecting the rear speed sensor and rear flexible hose. The rear shock absorber with coil spring attachment requires installation of bolt and nut following the illustration and vise placement at a position of 28 mm (1.1 in.) which applies to both 2WD and 4WD. The technician should compress the rear coil spring using Special Service Tool: 09727-30021, 09727-00010, 09727-00021, and 09727-00031 without applying force via an impact wrench for tool protection. The front coil spring should reach maximum compression before proceeding to remove the rear support to rear shock absorber nut then the rear support to rear shock absorber collar. After removing the Special Service Tool users should take out the rear suspension support assembly followed by the rear coil spring. Complete the process by taking out the rear No. 1 spring bumper with the rear lower coil spring insulator from the rear shock absorber assembly.


Related Toyota Highlander Parts
 Toyota Highlander Control Arm
 Toyota Highlander Axle Shaft
 Toyota Highlander Ball Joint
 Toyota Highlander Bump Stop
 Toyota Highlander Coil Spring Insulator
 Toyota Highlander Control Arm Bolt
 Toyota Highlander Lateral Link
 Toyota Highlander Rear Crossmember
 Toyota Highlander Suspension Strut Rod
 Toyota Highlander Sway Bar Bushing
 Toyota Highlander Trailing Arm
 Toyota Highlander Wheel Seal
Browse Toyota Highlander Shock Absorber by Years
2025
2024
2023
2022
2021
2020
2019
2018
2017
2016
2015
2014
2013
2012
2011
2010
2009
2008
2007
2006
2005
2004
2003
2002
2001