×
ToyotaParts- Hello
- Login or Register
- Quick Links
- Live Chat
- Track Order
- Parts Availability
- RMA
- Help Center
- Contact Us
- Shop for
- Toyota Parts
- Scion Parts
My Garage
My Account
Cart
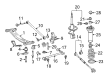
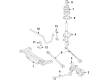
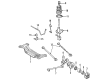
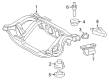
OEM Toyota Highlander Rear Crossmember
Rear Suspension Crossmember- Select Vehicle by Model
- Select Vehicle by VIN
Select Vehicle by Model
orMake
Model
Year
Select Vehicle by VIN
For the most accurate results, select vehicle by your VIN (Vehicle Identification Number).
9 Rear Crossmembers found

Toyota Highlander Suspension Crossmember, Rear Part Number: 51206-0E014
$465.57 MSRP: $682.29You Save: $216.72 (32%)
Toyota Highlander Suspension Crossmember, Rear Part Number: 51206-0E015
$686.66 MSRP: $1006.31You Save: $319.65 (32%)Ships in 1-3 Business Days
Toyota Highlander Member Sub-Assembly, Rear Suspension Part Number: 51206-48020
$784.35 MSRP: $1149.49You Save: $365.14 (32%)Ships in 1-3 Business Days
Toyota Highlander Suspension Crossmember, Rear Part Number: 51206-0E020
$918.20 MSRP: $1345.64You Save: $427.44 (32%)Ships in 1-3 Business Days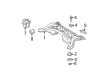
Toyota Highlander Suspension Crossmember, Rear Part Number: 51206-48022
$1181.86 MSRP: $1732.03You Save: $550.17 (32%)Ships in 1-3 Business Days
Toyota Highlander Member Sub-Assembly, Rear Suspension Part Number: 51206-48050
$1251.44 MSRP: $1834.00You Save: $582.56 (32%)Ships in 1-3 Business Days
Toyota Highlander Suspension Crossmember, Rear Part Number: 51206-0E082
$1261.09 MSRP: $1848.14You Save: $587.05 (32%)Ships in 1-3 Business Days
Toyota Highlander Suspension Crossmember, Rear Part Number: 51206-0E043
$1224.31 MSRP: $1794.25You Save: $569.94 (32%)Ships in 1-3 Business Days

Toyota Highlander Member, Rear Floor Cross Part Number: 57663-0E010
$290.31 MSRP: $414.49You Save: $124.18 (30%)Ships in 1-3 Business Days
Toyota Highlander Rear Crossmember
Choose genuine Rear Crossmember that pass strict quality control tests. You can trust the top quality and lasting durability. Shopping for OEM Rear Crossmember for your Toyota Highlander? Our website is your one-stop destination. We stock an extensive selection of genuine Toyota Highlander parts. The price is affordable so you can save more. It only takes minutes to browse and find the exact fit. Easily add to cart and check out fast. Our hassle-free return policy will keep you stress-free. We process orders quickly for swift delivery. Your parts will arrive faster, so you can get back on the road sooner.
The Toyota Highlander Rear Crossmember functions as a vital structural component which maintains superior reliability while enabling outstanding performance. Rear Crossmembers of Toyota Highlander which support engine and transmission weight ensure stability for all Highlander variants including models with five or seven seating options. The vital chassis frame design supports the installation of key components that add to safety standards and maintains operational perfection. The Toyota Highlander Rear Crossmember functions across multiple trim levels including hybrid versions thus demonstrating the flexibility that allows it to adapt for different engine systems and operational needs. The hybrid prototypes employ a distinctive electrical integration system because hybrid technology needs powerful Rear Crossmembers to function properly. The Toyota Highlander Rear Crossmember excels in the automotive market by providing long-lasting performance that reduces occurrences of bending and rust-related damage which could lead to vehicle misalignment. Proper maintenance of the car relies on this component to protect its reputation as a reliable vehicle. As a demonstration of its dedication to quality engineering Toyota offers the the automaker model Rear Crossmember which delivers better driving stability and safety performance thus becoming drivers' preferred choice for dependable SUVs.
Toyota Highlander Rear Crossmember Parts and Q&A
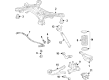
- Q: How to install the Rear Crossmember on Toyota Highlander?A:When installing the 2WD rear suspension member first secure the LH and RH stud bolts about 17 Nm (173 kgf-cm, 12 ft-lbf). Two different sizes of hole plugs need to be installed into the rear suspension member sub-assembly. Use a press while operating Special Service Tool: 09950-70010 09951-07100 to completely install the new LH rear suspension member body mounting front cushion. When placing the cushion you must avoid both deforming the member and leaving any gap between the sub-assembly and the cushion. Repetitions should be made for the RH side as well. After fitting the LH side rear suspension member body mounting rear cushion provisionally, install it using the same equipment and technique and verify complete clearance absence. Apply the identical installation steps to the RH side. Position the rear suspension member on the jack which sits above wooden blocks below the vehicle and then lift it. Screw and torque the rear suspension member together with its rear lower suspension member stoppers LH and RH through 4 nuts where Nut A receives 55 Nm (561 kgf-cm, 40 ft-lbf) and Nut B gets 38 Nm (387 kgf-cm, 28 ft-lbf), then use 2 bolts torqued to 55 Nm (561 kgf-cm, 40 ft-lbf). The installation of exhaust pipe clamp bracket sub-assembly requires 3 bolts to join with the exhaust pipe clamp. The suspension needs stabilization as you put the temporary rear No. 1 and No. 2 suspension arm assemblies on both LH and RH sides. Both sides need full tightness installation of their rear No. 1 and No. 2 suspension arm assemblies. At the conclusion of the procedure install both rear stabilizer bar assemblies followed by the rear stabilizer link assemblies for the entire vehicle side. Complete the installation by torqueing the rear wheels to 103 Nm (1,050 kgf-cm, 76 ft-lbf) and attaching the spare wheel carrier lock cover followed by the spare tire then lower spare wheel carrier hinge cover and the deck trim service hole cover prior to mounting the rear mat alongside the tonneau cover assembly and No. 2 and No. 3 deck board sub-assemblies that lead to the deck board assembly installation while performing an inspection and adjustment of the rear wheel alignment.
- Q: How to remove the Rear Crossmember on Toyota Highlander?A:The removal process for 2WD rear suspension member starts with the elimination of the deck board assembly followed by No. 3 sub-assembly with tonneau cover and No. 2 sub-assembly with tonneau cover and tonneau cover assembly and rear mat. Start with the sequence of removing the deck trim service hole cover and ending with the rear wheels after removing the spare wheel carrier lock cover and spare tire and lower spare wheel carrier hinge cover. You need to separate rear stabilizer link assemblies from left and right sides before removing the rear stabilizer bar along with both rear No. 2 suspension arm assemblies. First detach the exhaust pipe clamp bracket sub-assembly by splitting the exhaust pipe clamp and extracting the three bolts. Use a jack with two wooden blocks to support the rear suspension member after which you need to remove the four nuts, two bolts and four rear lower suspension member stoppers before lowering it down to remove the member without damaging vehicle body parts or other components. Special Service Tools 09527-17011 09950-70010 together with a press should be used to remove the rear suspension member body mounting front cushion LH from the sub-assembly while providing support to the sub-assembly during the pressing operation. Use the same tools and supporting methods to uninstall the rear suspension member body mounting front cushion RH and rear suspension member body mounting rear cushions from all sides. Close the process by taking out three hole plugs from the rear suspension member sub-assembly as well as removing stud bolts on both the left and right sides.


Related Toyota Highlander Parts
 Toyota Highlander Control Arm
 Toyota Highlander Bump Stop
 Toyota Highlander Coil Springs
 Toyota Highlander Lateral Link
 Toyota Highlander Shock Absorber
 Toyota Highlander Strut Mounts
 Toyota Highlander Sway Bar Bracket
 Toyota Highlander Sway Bar Bushing
 Toyota Highlander Sway Bar Link
 Toyota Highlander Sway Bars
 Toyota Highlander Trailing Arm
 Toyota Highlander Wheel Seal