×
ToyotaParts- Hello
- Login or Register
- Quick Links
- Live Chat
- Track Order
- Parts Availability
- RMA
- Help Center
- Contact Us
- Shop for
- Toyota Parts
- Scion Parts
My Garage
My Account
Cart
OEM 2008 Toyota Highlander Rear Crossmember
Rear Suspension Crossmember- Select Vehicle by Model
- Select Vehicle by VIN
Select Vehicle by Model
orMake
Model
Year
Select Vehicle by VIN
For the most accurate results, select vehicle by your VIN (Vehicle Identification Number).
3 Rear Crossmembers found

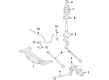
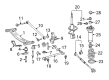
2008 Toyota Highlander Suspension Crossmember, Rear
Part Number: 51206-0E020$891.42 MSRP: $1306.38You Save: $414.96 (32%)Ships in 1-3 Business DaysProduct Specifications- Other Name: Member Sub-Assembly, Rear; Suspension Subframe Crossmember, Rear; Crossmember; Member Sub-Assembly, Rear Suspension
- Position: Rear
- Replaces: 51206-48040
- Part Name Code: 51206A
- Item Weight: 36.90 Pounds
- Item Dimensions: 49.4 x 26.6 x 12.6 inches
- Condition: New
- Fitment Type: Direct Replacement
- SKU: 51206-0E020
- Warranty: This genuine part is guaranteed by Toyota's factory warranty.

2008 Toyota Highlander Suspension Crossmember, Rear
Part Number: 51206-0E014$451.95 MSRP: $662.33You Save: $210.38 (32%)Product Specifications- Other Name: Member Sub-Assembly, Rear; Suspension Subframe Crossmember, Rear; Crossmember; Member Sub-Assembly, Rear Suspension
- Position: Rear
- Replaces: 51206-48031, 51206-0E013, 51206-0E011, 51206-48032, 51206-48030, 51206-48070, 51206-0E012, 51206-48071
- Part Name Code: 51206A
- Item Weight: 26.80 Pounds
- Item Dimensions: 48.9 x 27.3 x 12.9 inches
- Condition: New
- Fitment Type: Direct Replacement
- SKU: 51206-0E014
- Warranty: This genuine part is guaranteed by Toyota's factory warranty.


2008 Toyota Highlander Member Sub-Assembly, Rear Suspension
Part Number: 51206-48050$1214.89 MSRP: $1780.44You Save: $565.55 (32%)Ships in 1-3 Business DaysProduct Specifications- Other Name: Member Sub-Assembly, Rear
- Position: Rear
- Part Name Code: 51206A
- Item Weight: 39.40 Pounds
- Item Dimensions: 48.5 x 25.9 x 13.2 inches
- Condition: New
- Fitment Type: Direct Replacement
- SKU: 51206-48050
- Warranty: This genuine part is guaranteed by Toyota's factory warranty.
2008 Toyota Highlander Rear Crossmember
Looking for affordable OEM 2008 Toyota Highlander Rear Crossmember? Explore our comprehensive catalogue of genuine 2008 Toyota Highlander Rear Crossmember. All our parts are covered by the manufacturer's warranty. Plus, our straightforward return policy and speedy delivery service ensure an unparalleled shopping experience. We look forward to your visit!
2008 Toyota Highlander Rear Crossmember Parts Q&A
- Q: How to remove the Rear Crossmember on 2008 Toyota Highlander?A: The process of removing the rear suspension member on 2WD vehicles begins with removing the deck board assembly and continuing with taking off the No. 3 and No. 2 deck board sub-assemblies and tonneau cover assembly. Starting with the removal of the rear mat then proceed to take out the deck trim service hole cover followed by the lower spare wheel carrier hinge cover after which you should remove the spare tire and spare wheel carrier lock cover. The next procedure involves removing the rear wheels followed by dividing the rear stabilizer link assemblies from both sides before taking out the rear stabilizer bar. The technician must proceed by disassembling the rear No. 2 suspension arm assemblies on both sides before continuously working on the rear No. 1 suspension arm assemblies with a standard procedure applied to both sides. In this step separate the exhaust pipe clamp before removing the bracket assembly through removal of its three bolts. Place the rear suspension member on wooden blocks with a jack while you remove its four nuts along with two bolts and four rear lower suspension member stoppers before lowering the member. Proceed with the removal of the rear suspension member by protecting both the vehicle body and other parts from potential damage. Special Service Tools 09527-17011 09950-70010 together with a press are needed to detach the rear suspension member body mounting front cushion LH from the rear suspension member sub-assembly while supporting the assembly through pressing. The same method should be applied to remove the rear suspension member body mounting front cushion RH. To remove the rear suspension member body mounting rear cushion from the LH side of the vehicle use Special Service Tool: 09527-17011 09950-70010 and a press which requires the user to support the sub-assembly when pressing. Then execute the exact procedure for the RH side. Start by removing the three hole plugs from the rear suspension member sub-assembly where some hole plugs are in different sizes before unfastening both sides' stud bolts using the established procedure each time.
Related 2008 Toyota Highlander Parts
 2008 Toyota Highlander Control Arm
 2008 Toyota Highlander Axle Shaft
 2008 Toyota Highlander Bump Stop
 2008 Toyota Highlander Coil Springs
 2008 Toyota Highlander Crossmember Bushing
 2008 Toyota Highlander Lateral Link
 2008 Toyota Highlander Shock Absorber
 2008 Toyota Highlander Shock And Strut Mount
 2008 Toyota Highlander Suspension Strut Rod
 2008 Toyota Highlander Sway Bar Bushing
 2008 Toyota Highlander Sway Bar Kit
 2008 Toyota Highlander Wheel Seal