×
ToyotaParts- Hello
- Login or Register
- Quick Links
- Live Chat
- Track Order
- Parts Availability
- RMA
- Help Center
- Contact Us
- Shop for
- Toyota Parts
- Scion Parts
My Garage
My Account
Cart
OEM Toyota Highlander Suspension Strut Rod
- Select Vehicle by Model
- Select Vehicle by VIN
Select Vehicle by Model
orMake
Model
Year
Select Vehicle by VIN
For the most accurate results, select vehicle by your VIN (Vehicle Identification Number).
7 Suspension Strut Rods found


Toyota Highlander Trailing Arm, Rear Part Number: 48780-0E020
$131.24 MSRP: $185.78You Save: $54.54 (30%)Ships in 1-3 Business Days


Toyota Highlander Trailing Arm, Rear Part Number: 48780-48081
$133.70 MSRP: $189.27You Save: $55.57 (30%)Ships in 1-3 Business Days


Toyota Highlander Trailing Arm, Rear Part Number: 48780-48070
$114.34 MSRP: $160.50You Save: $46.16 (29%)Ships in 1-3 Business Days
Toyota Highlander Rod Assembly, Strut, Rear Part Number: 48780-48050
$122.78 MSRP: $173.80You Save: $51.02 (30%)Ships in 1-3 Business Days
Toyota Highlander Rod Assembly, Strut, Rear Part Number: 48780-0E010
$128.65 MSRP: $182.12You Save: $53.47 (30%)Ships in 1-3 Business DaysToyota Highlander Trailing Arm, Rear Part Number: 48780-48010
$131.00 MSRP: $185.45You Save: $54.45 (30%)Ships in 1-3 Business Days
Toyota Highlander Trailing Arm, Rear Part Number: 48780-48020
$138.52 MSRP: $196.09You Save: $57.57 (30%)Ships in 1-3 Business Days
Toyota Highlander Suspension Strut Rod
Choose genuine Suspension Strut Rod that pass strict quality control tests. You can trust the top quality and lasting durability. Shopping for OEM Suspension Strut Rod for your Toyota Highlander? Our website is your one-stop destination. We stock an extensive selection of genuine Toyota Highlander parts. The price is affordable so you can save more. It only takes minutes to browse and find the exact fit. Easily add to cart and check out fast. Our hassle-free return policy will keep you stress-free. We process orders quickly for swift delivery. Your parts will arrive faster, so you can get back on the road sooner.
Toyota Highlander Suspension Strut Rod Parts and Q&A
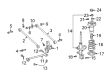
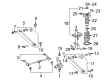
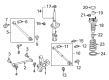
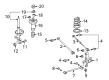
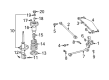
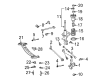
- Q: How to service and repair the rear Suspension Strut Rod on Toyota Highlander?A:The first step for servicing or repairing the rear strut rod requires removal of the rear wheel. A jack should support the rear axle carrier until you remove the bolt and nut which separates the Parking Brake Cable. Your goal should be disconnecting the strut rod at the front side by first removing its bolt and nut yet being cautious about the nut movement throughout this step. After extracting the rear axle carrier strut rod you need to shield its nut from rotation. The installation process begins by fixing the strut rod on the rear side with bolt and nut but keeping it loosely secured. Position the rear axle carrier while connecting the front side strut rod to its bolt and nut with the nut held in place during bolts temporary tightening. Stabilize the suspension by supporting the rear axle carrier with a wood block while using load to position the installed bolt of suspension arm assembly No. 1 so it points straight across the rear axle hub for FF or points straight across the rear Drive Shaft assembly for 4WD. The suspension assembly needs full tightening by using a torque wrench to apply 80 Nm torque force (816 kgf-cm and 59 ft. lbs.) equally to both bolts. Fasten the parking brake cable with its bolt and nut before tightening the bolt to 39 Nm (400 kgf-cm, 29 ft. lbs.) and the nut to 6.0 Nm (61 kgf-cm, 53 inch lbs.). You should install the rear wheel before tightening it to 103 Nm (1,050 kgf-cm, 76 ft. lbs.) and examining the rear wheel alignment.
- Q: How to replace the Suspension Strut Rod assembly on the LH side on Toyota Highlander?A:The LH side strut rod replacement begins with wheel removal. First support the rear axle carrier before you remove the bolt, nut and disconnect the Parking Brake Cable. Disassemble the strut rod from the front aspect by removing its bolt and nut and disconnecting it by fixing the nut when you remove the bolt. Proceed by taking out the bolt, nut and strut rod from the rear axle carrier then reposition the nut before unthreading the bolt. Secure the temporary strut rod installation by attaching it to the rear position and inserting the inner bolt then tightening it to a secure level. Sustain the rear axle carrier and fasten the strut rod on the inner side with a torque setting of 113 Nm (1,150 kgf-cm and 83 ft. lbs.). Check the suspension stability by using a wood block to lift the rear axle carrier while ensuring the 2WD bolt of suspension arm assembly No. 1 faces horizontally at the center of the axle hub and 4WD models have their rear Drive Shaft in level alignment. The rear suspension is completed by using a torque wrench to tighten the strut rod assembly to 123 Nm (1,250 kgf-cm, 91 ft. lbs.) followed by installing the brake cable assembly using a bolt with nut that should be torqued to 5.0 Nm (51 kgf-cm, 44 inch lbs.). The rear wheel requires torque installation to 103 Nm along with a subsequent check of the wheel alignment status.


Related Toyota Highlander Parts
 Toyota Highlander Control Arm
 Toyota Highlander Axle Shaft
 Toyota Highlander Bump Stop
 Toyota Highlander Coil Springs
 Toyota Highlander Lateral Link
 Toyota Highlander Rear Crossmember
 Toyota Highlander Shock Absorber
 Toyota Highlander Strut Mounts
 Toyota Highlander Sway Bar Bushing
 Toyota Highlander Sway Bars
 Toyota Highlander Trailing Arm
 Toyota Highlander Wheel Seal