×
ToyotaParts- Hello
- Login or Register
- Quick Links
- Live Chat
- Track Order
- Parts Availability
- RMA
- Help Center
- Contact Us
- Shop for
- Toyota Parts
- Scion Parts
My Garage
My Account
Cart
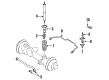
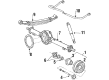
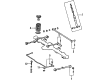
OEM Toyota Land Cruiser Shock Absorber
Suspension Shock Absorber- Select Vehicle by Model
- Select Vehicle by VIN
Select Vehicle by Model
orMake
Model
Year
Select Vehicle by VIN
For the most accurate results, select vehicle by your VIN (Vehicle Identification Number).
31 Shock Absorbers found


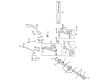
Toyota Land Cruiser Shock Absorber, Front Part Number: 48511-69585
$59.26 MSRP: $82.49You Save: $23.23 (29%)Ships in 1-3 Business Days

Toyota Land Cruiser Shock Absorber Part Number: 48531-69835
$65.52 MSRP: $91.97You Save: $26.45 (29%)

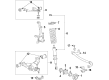
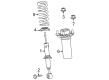
Toyota Land Cruiser Shock Absorber Part Number: 48510-69395
$166.02 MSRP: $235.02You Save: $69.00 (30%)Ships in 1-3 Business Days
Toyota Land Cruiser Shock Absorber Part Number: 48510-69127
$234.97 MSRP: $335.49You Save: $100.52 (30%)Ships in 1-3 Business Days

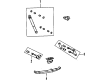
Toyota Land Cruiser Absorber Assembly, Shock, Rear Passenger Side Part Number: 48530-69145
$271.20 MSRP: $387.22You Save: $116.02 (30%)Ships in 1-3 Business Days

Toyota Land Cruiser Shock Absorber Part Number: 48530-69495
$54.00 MSRP: $75.17You Save: $21.17 (29%)Ships in 1-2 Business Days
Toyota Land Cruiser Shock Absorber Part Number: 48530-69435
$54.00 MSRP: $75.17You Save: $21.17 (29%)Ships in 1-3 Business Days
Toyota Land Cruiser Shock Absorber Part Number: 48531-69557
$65.52 MSRP: $91.97You Save: $26.45 (29%)

Toyota Land Cruiser Shock Absorber, Rear Part Number: 48531-69417
$66.82 MSRP: $93.80You Save: $26.98 (29%)Ships in 1-2 Business Days

Toyota Land Cruiser Shock Absorber Part Number: 48511-69066
$21.27 MSRP: $29.61You Save: $8.34 (29%)Ships in 1-3 Business Days


Toyota Land Cruiser Shock Absorber, Front Part Number: 48511-69435
$59.14 MSRP: $82.32You Save: $23.18 (29%)Ships in 1-3 Business Days
Toyota Land Cruiser Shock Absorber Part Number: 48511-69386
$59.14 MSRP: $82.32You Save: $23.18 (29%)
Toyota Land Cruiser Absorber Assembly, Shock Part Number: 48510-80C54
$160.61 MSRP: $227.36You Save: $66.75 (30%)Ships in 1-2 Business DaysToyota Land Cruiser Shock Absorber Part Number: 48510-80824
$168.48 MSRP: $238.51You Save: $70.03 (30%)Ships in 1-3 Business DaysToyota Land Cruiser Absorber Assembly, Shock Part Number: 48510-69815
$242.54 MSRP: $346.29You Save: $103.75 (30%)Ships in 1-2 Business Days

Toyota Land Cruiser Shock Absorber Part Number: 48531-69047
$23.58 MSRP: $32.81You Save: $9.23 (29%)

Toyota Land Cruiser Shock Absorber Part Number: 48511-69036

Toyota Land Cruiser Shock Absorber Part Number: 48531-69065


Toyota Land Cruiser Shock, Rear Part Number: 48531-69147
| Page 1 of 2 |Next >
1-20 of 31 Results
Toyota Land Cruiser Shock Absorber
Choose genuine Shock Absorber that pass strict quality control tests. You can trust the top quality and lasting durability. Shopping for OEM Shock Absorber for your Toyota Land Cruiser? Our website is your one-stop destination. We stock an extensive selection of genuine Toyota Land Cruiser parts. The price is affordable so you can save more. It only takes minutes to browse and find the exact fit. Easily add to cart and check out fast. Our hassle-free return policy will keep you stress-free. We process orders quickly for swift delivery. Your parts will arrive faster, so you can get back on the road sooner.
Toyota Land Cruiser Shock Absorber Parts and Q&A
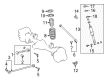
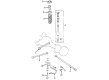
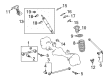
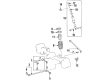
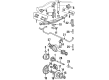
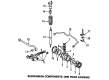
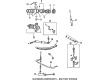
- Q: How to install the rear shock absorber assembly on Toyota Land Cruiser?A:The first step to install the rear shock absorber assembly involves installing the rear shock absorber assembly temporarily to the LH side with a lower bracket secured to the shock absorber while Special Service Tool: 09922-10010 maintains shock absorber position for subsequent attachment of a nut to both the rear shock absorber assembly and upper bracket followed by attaching the lower bracket to the shock absorber using a bolt. Position the lower shock absorber section on the RH side with its attached bolt. The technician needs to install the rear lateral control rod assembly with bolt and nut for a temporary arrangement. Put the vehicle on a stable suspension status by tightening rear wheels at 131 Nm (1336 kgf-cm, 97 ft-lbf) while lowering it multiple times before wheel removal. First repeatedly tighten each bolt while adjusting the rear shock absorber nut on the LH side until it reaches 53 Nm (540 kgf-cm, 39 ft-lbf) then continue the same procedure on the RH side with a bolt torque of 98 Nm (999 kgf-cm, 72 ft-lbf). Fasten the rear lateral control rod assembly nut to reach a torque setting of 150 Nm (1530 kgf-cm, 111 ft-lbf). Secure the bolt attaching the No. 3 parking brake cable assembly at 13 Nm (127 kgf-cm, 9 ft-lbf). Subsequently connect the No. 2 parking brake cable assembly with the bolt at an identical torque. Install the rear wheel by applying 131 Nm (1336 kgf-cm, 97 ft-lbf) torque then assemble the rear axle breather hose sub-assembly to the housing while measuring the vehicle height. Complete the stabilizer control accessibility by using the accumulator housing shutter valve to seal the system then install the stabilizer control valve protector.
- Q: How to remove the rear shock absorber on Toyota Land Cruiser?A:The first step for removing the rear shock absorber involves removing both the stabilizer control valve protector and opening the stabilizer control with the accumulator housing shutter valve. The next step involves removing the rear wheel then disconnecting the No. 3 Parking Brake Cable assembly by removing its bolt. The same method must be applied to separate the No. 2 parking brake cable assembly. As a first step disconnect the rear axle breather hose from the rear axle housing assembly while supporting the assembly with a jack situated on a wooden block for safety. Dismantle the assembly of rear lateral control rod by removing a bolt and a nut to separate it from the frame. Remove the bolt positioned on the lower part of the shock absorber to disconnect it from the axle housing on the right-hand side. To detach the lower bolt on the left shock absorber position use Special Service Tool: 09922-10010 to stabilize the rear shock absorber mechanism. Remove all components beginning with the nut which leads to the removal of upper bracket and shock absorber assembly and continuing to the extraction of the lower bracket from the shock absorber.


Related Toyota Land Cruiser Parts
 Toyota Land Cruiser Coil Springs
 Toyota Land Cruiser Control Arm
 Toyota Land Cruiser Axle Beam Mount
 Toyota Land Cruiser Camber and Alignment Kit
 Toyota Land Cruiser Coil Spring Insulator
 Toyota Land Cruiser Differential Mount
 Toyota Land Cruiser Strut Housing
 Toyota Land Cruiser Sway Bar Bracket
 Toyota Land Cruiser Sway Bar Bushing
 Toyota Land Cruiser Sway Bar Link
 Toyota Land Cruiser Sway Bars
 Toyota Land Cruiser Transfer Case Output Shaft Snap Ring
Browse Toyota Land Cruiser Shock Absorber by Years
2025
2024
2021
2020
2019
2018
2017
2016
2015
2014
2013
2011
2010
2009
2008
2007
2006
2005
2004
2003
2002
2001
2000
1999
1998
1997
1996
1995
1994
1993
1992
1991
1990
1989
1988
1987
1986
1985
1984