×
ToyotaParts- Hello
- Login or Register
- Quick Links
- Live Chat
- Track Order
- Parts Availability
- RMA
- Help Center
- Contact Us
- Shop for
- Toyota Parts
- Scion Parts
My Garage
My Account
Cart
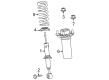
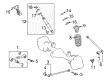
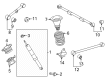
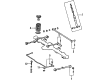
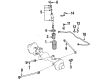
OEM Toyota Land Cruiser Coil Springs
Strut Spring- Select Vehicle by Model
- Select Vehicle by VIN
Select Vehicle by Model
orMake
Model
Year
Select Vehicle by VIN
For the most accurate results, select vehicle by your VIN (Vehicle Identification Number).
36 Coil Springs found


Toyota Land Cruiser Coil Spring, Rear Driver Side Part Number: 48231-6A690
$261.53 MSRP: $373.41You Save: $111.88 (30%)Ships in 1-3 Business Days
Toyota Land Cruiser Coil Spring, Rear Passenger Side Part Number: 48231-6A680
$255.36 MSRP: $364.59You Save: $109.23 (30%)Ships in 1-3 Business Days

Toyota Land Cruiser Coil Spring, Rear Passenger Side Part Number: 48231-60F31
$175.53 MSRP: $248.49You Save: $72.96 (30%)Ships in 1-3 Business Days

Toyota Land Cruiser Coil Spring, Front Part Number: 48131-60D21
$206.89 MSRP: $295.40You Save: $88.51 (30%)Ships in 1-3 Business Days

Toyota Land Cruiser Coil Spring, Front Passenger Side Part Number: 48131-6A570
$155.21 MSRP: $219.71You Save: $64.50 (30%)

Toyota Land Cruiser Coil Spring, Driver Side Part Number: 48131-6A480
$172.01 MSRP: $243.50You Save: $71.49 (30%)Ships in 1-3 Business Days
Toyota Land Cruiser Spring, Coil, Front Part Number: 48131-60S91
$122.07 MSRP: $172.81You Save: $50.74 (30%)Ships in 1-2 Business DaysToyota Land Cruiser Coil Spring, Driver Side Part Number: 48131-60C81
$166.84 MSRP: $236.18You Save: $69.34 (30%)Ships in 1-3 Business Days
Toyota Land Cruiser Coil Spring, Rear Passenger Side Part Number: 48231-60E50
$175.44 MSRP: $250.48You Save: $75.04 (30%)Ships in 1-3 Business Days
Toyota Land Cruiser Spring, Coil, Rear Part Number: 48231-60N50
$180.45 MSRP: $257.64You Save: $77.19 (30%)Ships in 1-2 Business DaysToyota Land Cruiser Coil Spring, Rear Driver Side Part Number: 48231-60E40
$186.27 MSRP: $265.95You Save: $79.68 (30%)Ships in 1-3 Business DaysToyota Land Cruiser Spring, Coil, Rear Part Number: 48231-60N30
$287.28 MSRP: $410.17You Save: $122.89 (30%)Ships in 1-2 Business Days
Toyota Land Cruiser Coil Spring, Rear Driver Side Part Number: 48231-6A780
$140.64 MSRP: $199.09You Save: $58.45 (30%)
Toyota Land Cruiser Coil Spring, Rear Passenger Side Part Number: 48231-6A770
$130.77 MSRP: $185.11You Save: $54.34 (30%)
Toyota Land Cruiser Coil Spring, Rear Passenger Side Part Number: 48231-60A20
$154.85 MSRP: $219.22You Save: $64.37 (30%)

Toyota Land Cruiser Coil Spring, Rear Driver Side Part Number: 48231-60B11
$174.83 MSRP: $247.49You Save: $72.66 (30%)


Toyota Land Cruiser Coil Spring, Rear Driver Side Part Number: 48231-60E21
$187.32 MSRP: $267.45You Save: $80.13 (30%)


Toyota Land Cruiser Coil Spring, Passenger Side Part Number: 48131-60D40
$178.47 MSRP: $254.81You Save: $76.34 (30%)
| Page 1 of 2 |Next >
1-20 of 36 Results
Toyota Land Cruiser Coil Springs
Choose genuine Coil Springs that pass strict quality control tests. You can trust the top quality and lasting durability. Shopping for OEM Coil Springs for your Toyota Land Cruiser? Our website is your one-stop destination. We stock an extensive selection of genuine Toyota Land Cruiser parts. The price is affordable so you can save more. It only takes minutes to browse and find the exact fit. Easily add to cart and check out fast. Our hassle-free return policy will keep you stress-free. We process orders quickly for swift delivery. Your parts will arrive faster, so you can get back on the road sooner.
Toyota Land Cruiser Coil Springs Parts and Q&A
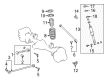
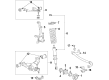
- Q: How to remove and replace the coil springs on Toyota Land Cruiser?A:The coil spring replacement begins by repeating procedures on RH along with LH until reaching the next step which focuses on the left-hand side. The first step is to remove the stabilizer control valve protector. The stabilizer control requires opening while using the accumulator housing shutter valve. You should start by removing the front wheel then proceeding to take away the front fender splash shield sub-assembly LH and finally remove the front fender splash shield sub-assembly RH. Continue the procedure by taking out the No. 1 engine under cover sub-assembly. Widen the front No. 1 stabilizer bracket LH by unstowing its two bolts before repeating the procedure for the front No. 1 stabilizer bracket RH. The removal process begins with extracting two stabilizer link assembly LH bolts followed by the nut and link before proceeding to extract the stabilizer link assembly RH bolts along with its nut and link while using a 6 mm hexagon wrench to secure the stud if the ball joint rotates with the nut. No driving or handling the vehicle while disconnecting the skid control sensor wire and Steering Knuckle left-hand side. The removal process of the front Shock Absorber with coil spring LH requires beginning with the shock absorber lower-side nut removal followed by maintenance of bolt placement to keep the item from falling before completing the operation with four nut removals and the shock absorber final extraction using the bolt.
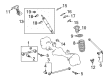
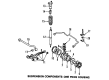
- Q: How to install the rear coil springs and related components on Toyota Land Cruiser?A:Start the rear coil spring installation with frame attachment of the hollow spring followed by placement of the coil spring on the LH side. Place the coil spring on the LH side correctly so the coil spring end faces its appropriate position before reinstalling it if necessary. The lower sides of both rear Shock Absorber assembly LH and RH need temporary installation using bolts. Convert the need for the rear lateral control rod assembly by securing it in place provisionally. Preinstall the rear flexible hose before suspending the vehicle suspension and tightening both rear shock absorber assembly LH and RH bolts to 98Nm (999 kgf-cm, 72 ft-lbf). Install the rear stabilizer end bracket with 2 bolts which must reach a torque of 30 Nm (306 kgf-cm, 22 ft-lbf) followed by connecting the rear stabilizer link assembly between the ball joint dust cover protector and stabilizer bar at a nut torque of 100 Nm (1020 kgf-cm, 74 ft-lbf). A 6 mm hexagon wrench can securely hold the stud bolt when the ball joint moves with the nut. A jack should lift the stabilizer Control Arm if the rear stabilizer control cylinder extends to make room for stabilizer link installation. Construct the connections between both the rear axle breather hose sub-assembly and the No. 3 and No. 2 Parking Brake Cables. Fasten the rear wheel with bolt torque set at 131 Nm (1336 kgf-cm, 97 ft-lbf). You must start by filling the brake fluid reservoir and performing Brake Line bleeding and reservoir fluid level check followed by a search for brake fluid leaks. First measure the vehicle height before closing the stabilizer control along with the accumulator housing shutter valve and placing the stabilizer control valve protector into position.


Related Toyota Land Cruiser Parts
 Toyota Land Cruiser Axle Beam Mount
 Toyota Land Cruiser Axle Shaft
 Toyota Land Cruiser Ball Joint
 Toyota Land Cruiser CV Boot
 Toyota Land Cruiser CV Joint
 Toyota Land Cruiser Front Cross-Member
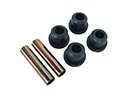 Toyota Land Cruiser Leaf Spring Bushing
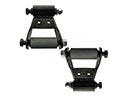 Toyota Land Cruiser Leaf Spring Shackle
 Toyota Land Cruiser Steering Knuckle
 Toyota Land Cruiser Strut Mounts
 Toyota Land Cruiser Sway Bar Link
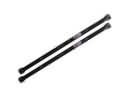 Toyota Land Cruiser Torsion Bar