×
ToyotaParts- Hello
- Login or Register
- Quick Links
- Live Chat
- Track Order
- Parts Availability
- RMA
- Help Center
- Contact Us
- Shop for
- Toyota Parts
- Scion Parts
My Garage
My Account
Cart
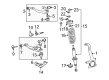
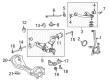
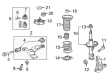
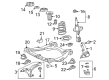
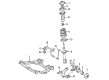
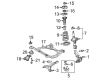
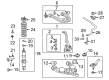
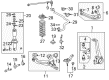
OEM Toyota Steering Knuckle
Front Steering Knuckle- Select Vehicle by Model
- Select Vehicle by VIN
Select Vehicle by Model
orMake
Model
Year
Select Vehicle by VIN
For the most accurate results, select vehicle by your VIN (Vehicle Identification Number).
263 Steering Knuckles found


Toyota Knuckle, Steering, Passenger Side Part Number: 43201-60020
$812.31 MSRP: $1190.45You Save: $378.14 (32%)Ships in 1-3 Business DaysProduct Specifications- Other Name: Knuckle Sub-Assembly, Steering; Knuckle
- Position: Passenger Side


Toyota Knuckle, Driver Side Part Number: 43212-42060
$302.07 MSRP: $431.29You Save: $129.22 (30%)Ships in 1-3 Business DaysProduct Specifications- Other Name: Knuckle, Steering, Left; Steering Knuckle, Front Left; Knuckle, Steering, Driver Side
- Manufacturer Note: W(ABS)
- Position: Driver Side


Toyota Knuckle, Steering, Driver Side Part Number: 43212-60200
$412.11 MSRP: $603.95You Save: $191.84 (32%)Ships in 1-2 Business DaysProduct Specifications- Other Name: Knuckle, Steering, Left; Steering Knuckle; Knuckle
- Position: Driver Side
- Replaces: 43212-60170


Toyota Knuckle, Driver Side Part Number: 43212-AA010
$269.10 MSRP: $384.21You Save: $115.11 (30%)Ships in 1-3 Business DaysProduct Specifications- Other Name: Knuckle, Steering, Left; Steering Knuckle, Front Left; Suspension Knuckle Assembly; Knuckle, Steering, Driver Side
- Position: Driver Side
- Replaces: 43212-58010


Toyota Knuckle, Driver Side Part Number: 43212-04050
$350.02 MSRP: $512.96You Save: $162.94 (32%)Ships in 1-3 Business DaysProduct Specifications- Other Name: Knuckle, Steering, Left; Steering Knuckle, Front Left, Left; Knuckle, Steering, Driver Side; Steering Knuckle
- Position: Driver Side


Toyota Knuckle, Passenger Side Part Number: 43211-60200
$420.28 MSRP: $615.92You Save: $195.64 (32%)Ships in 1-2 Business DaysProduct Specifications- Other Name: Knuckle, Steering, Right; Steering Knuckle, Front Right, Right; Knuckle, Steering, Passenger Side; Steering Knuckle
- Position: Passenger Side
- Replaces: 43211-60170


Toyota Knuckle, Driver Side Part Number: 43212-60230
$609.03 MSRP: $892.54You Save: $283.51 (32%)Ships in 1-3 Business DaysProduct Specifications- Other Name: Knuckle, Steering, Left; Knuckle, Steering, Driver Side
- Position: Driver Side


Toyota Knuckle, Driver Side Part Number: 43212-06260
$280.87 MSRP: $401.02You Save: $120.15 (30%)Ships in 1-3 Business DaysProduct Specifications- Other Name: Knuckle, Steering, Left; Steering Knuckle, Front Left, Left; Knuckle, Steering, Driver Side
- Position: Driver Side
- Replaces: 43212-33130


Toyota Knuckle, Driver Side Part Number: 43212-12260
$289.49 MSRP: $413.32You Save: $123.83 (30%)Ships in 1-3 Business DaysProduct Specifications- Other Name: Knuckle, Steering, Left; Steering Knuckle, Front Left; Knuckle, Steering, Driver Side
- Position: Driver Side


Toyota Knuckle, Passenger Side Part Number: 43211-AA010
$293.57 MSRP: $419.14You Save: $125.57 (30%)Ships in 1-3 Business DaysProduct Specifications- Other Name: Knuckle, Steering; Steering Knuckle, Front Right; Suspension Knuckle Assembly; Knuckle, Steering, Passenger Side; Steering Knuckle
- Position: Passenger Side
- Replaces: 43211-58010


Toyota Knuckle, Driver Side Part Number: 43212-02390
$244.99 MSRP: $349.79You Save: $104.80 (30%)Ships in 1-3 Business DaysProduct Specifications- Other Name: Knuckle, Steering, Left; Steering Knuckle, Front Left, Left; Knuckle, Steering, Driver Side
- Position: Driver Side
- Replaces: 43212-47040


Toyota Knuckle, Passenger Side Part Number: 43211-06260
$278.89 MSRP: $398.19You Save: $119.30 (30%)Ships in 1-2 Business DaysProduct Specifications- Other Name: Knuckle, Steering, Right; Steering Knuckle, Front Right, Right; Knuckle, Steering, Passenger Side
- Position: Passenger Side
- Replaces: 43211-33130


Toyota Knuckle, Driver Side Part Number: 43212-0T010
$322.34 MSRP: $460.23You Save: $137.89 (30%)Ships in 1-2 Business DaysProduct Specifications- Other Name: Knuckle, Steering, Left; Steering Knuckle, Front Left; Knuckle, Steering, Driver Side
- Position: Driver Side


Toyota Knuckle, Passenger Side Part Number: 43211-0T010
$322.34 MSRP: $460.23You Save: $137.89 (30%)Ships in 1-3 Business DaysProduct Specifications- Other Name: Knuckle, Steering; Steering Knuckle, Front Right; Knuckle, Steering, Passenger Side
- Position: Passenger Side


Toyota Knuckle, Steering, Passenger Side Part Number: 43211-58020
$356.04 MSRP: $521.77You Save: $165.73 (32%)Ships in 1-3 Business DaysProduct Specifications- Other Name: Knuckle, Steering, Right; Knuckle
- Position: Passenger Side


Toyota Knuckle, Steering, Driver Side Part Number: 43212-0E010
$372.61 MSRP: $546.06You Save: $173.45 (32%)Ships in 1-3 Business DaysProduct Specifications- Other Name: Knuckle, Steering, Left; Knuckle
- Position: Driver Side
- Replaces: 43212-48010


Toyota Knuckle, Driver Side Part Number: 43212-60240
$406.89 MSRP: $596.29You Save: $189.40 (32%)Ships in 1-2 Business DaysProduct Specifications- Other Name: Knuckle, Steering, Left; Knuckle, Steering, Driver Side
- Position: Driver Side


Toyota Knuckle, Driver Side Part Number: 43202-34030
$521.41 MSRP: $764.13You Save: $242.72 (32%)Ships in 1-3 Business DaysProduct Specifications- Other Name: Knuckle Sub-Assembly, Steering; Steering Knuckle, Front Left; Knuckle, Steering, Driver Side
- Position: Driver Side


Toyota Knuckle, Driver Side Part Number: 43202-35061
$541.50 MSRP: $793.57You Save: $252.07 (32%)Ships in 1-3 Business DaysProduct Specifications- Other Name: Knuckle Sub-Assembly, Steering; Steering Knuckle, Front Left; Knuckle, Steering, Driver Side
- Position: Driver Side
- Replaces: 43202-35060


Toyota Knuckle, Passenger Side Part Number: 43201-35071
$542.18 MSRP: $794.57You Save: $252.39 (32%)Ships in 1-3 Business DaysProduct Specifications- Other Name: Knuckle Sub-Assembly, Steering; Steering Knuckle, Front Right; Knuckle, Steering, Passenger Side
- Position: Passenger Side
- Replaces: 43201-35070
| Page 1 of 14 |Next >
1-20 of 263 Results
Toyota Steering Knuckle
OEM parts deliver unmatched quality you can rely on. They pass extensive quality control inspections. Toyota produces them to the official factory specifications. This process helps prevent defects and imperfections. So you can get exceptional lifespan and a flawless fit. Need new OEM Toyota Steering Knuckle? You'll love our wide selection of genuine options. Shop in minutes and skip the hunt. Our prices are unbeatable, you'll save time and money. It's easy to shop and find the right piece. Our committed customer service team gives professional help from start to finish. Every part includes a manufacturer's warranty. We ship quickly, your parts will arrive fast at your door.
Toyota Steering Knuckle connects steering to wheels and converts the steering input into a fine and steady movement. Toyota wins credibility by cutting costs, driving hybrid power, and manufacturing vehicles that remain firm after years of rough roads in all weather conditions. Toyota is using its TNGA platform to trim center of gravity and refine handling without adding fat to its cost sheet, so that each of its models feels more agile. Toyota expands the hybrid options, packing efficient engines into tiny hatches, spacious crossovers, and durable pickups, showing that efficiency does not necessarily kill fun. Toyota continues to repeat itself with rapidity, thus drivers experience fewer breakdowns and more miles per gallon with each update, and the values are high. Steering Knuckle is the pivotal point between the tie-rod ends and control arms and the hub where the severe vertical jerks and lateral forces of a sharp turn are met. Depending on the drive layout and load requirements, Steering Knuckle could have tapered roller bearings or receive a sealed bolt-on unit, which also changes unsprung weight. It is important to ensure Steering Knuckle longevity. The Steering Knuckle requires power checks on the bore and spindle to prevent wear that causes the steering to shake off wheel alignment as it is ignored and tires shred and rotors bend sooner.
Toyota Steering Knuckle Parts and Q&A
- Q: How to install the steering knuckle on Toyota Highlander?A:Begin steerable knuckle installation by using tools 09950-60020 and 09951-00810 as well as a press to install a new hub bearing into the knuckle. According to the installation steps you must first install the front disc brake dust cover followed by the front axle hub sub-assembly and then the front axle hub hole snap ring and finally the No. 1 front wheel bearing dust deflector. The installation order should include front lower ball joint followed by front axle assembly and front drive shaft assembly next to front lower suspension arm. The installation order begins with the front tie rod assembly followed by the combination of the front disc and caliper assembly which then allows the front axle hub nut installation. The front disc brake caliper needs separation first before eliminating the front disc from its position. The inspection of front axle hub bearing looseness and runout should be completed before reinstallation of the front disc and front disc brake caliper assembly and front speed sensor placement. Suppose you stake the front axle hub nut while installing the front wheel using a proper torque of 103 Nm (1050 kgf-cm, 76 ft-lbf). Animators should complete the examination and adjustment of front wheel alignment while also verifying speed sensor signals.
- Q: How to remove the steering knuckle on the LH side on Toyota Tundra?A:The first step for removing the LH side steering knuckle requires disconnecting the battery cable from the negative terminal while waiting at least 90 seconds to stop Air Bag and seat belt pretensioner activation. First disconnect the front axle hub sub-assembly LH before removing the clip along with bolt from the front speed sensor LH then separate the speed sensor from the steering knuckle. The steering knuckle tie rod end sub-assembly LH is disconnected using Special Service Tool: 09610-20012 and the procedure involves first removing the cotter pin and nut followed by separating the tie rod end from the steering knuckle while guarding the front disc brake dust cover, ball joint dust cover, as well as steering knuckle. Proceed to disconnect the front lower ball joint attachment by disconnecting it from the LH side. The lower arm of the front suspension requires a jack as support before removing the clip and nut so that you can disconnect the upper ball joint from the steering knuckle by using Special Service Tool 09628-62011 followed by steering knuckle removal. There are distinctive tools required for this installation process, a screwdriver and hammer to remove the knuckle grease retainer cap LH for 2WD models and the steering knuckle oil seal LH using the same tools for 4WD models.


Related Toyota Parts
 Toyota Ball Joint
 Toyota Sway Bar Link
 Toyota Coil Springs
 Toyota Camber and Alignment Kit
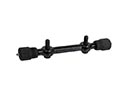 Toyota Control Arm Shaft Kit
 Toyota Front Cross-Member
 Toyota Leaf Spring
 Toyota Leaf Spring Bushing
 Toyota Radius Arm Bushing
 Toyota Shock and Strut Boot
 Toyota Strut Housing
 Toyota Suspension Strut Rod
Browse Toyota Steering Knuckle by Models
Tacoma 4Runner Camry Tundra Corolla RAV4 Highlander Prius Sienna Land Cruiser Pickup FJ Cruiser 86 Sequoia T100 Avalon Celica Supra Yaris Matrix MR2 Solara Venza GR86 Echo C-HR Grand Highlander Paseo Previa Prius C Prius Prime bZ4X Corolla Cross Corolla iM Crown Crown Signia GR Corolla Mirai MR2 Spyder Prius V Tercel Van Yaris iA Prius Plug-In GR Supra Prius AWD-e RAV4 Prime