×
ToyotaParts- Hello
- Login or Register
- Quick Links
- Live Chat
- Track Order
- Parts Availability
- RMA
- Help Center
- Contact Us
- Shop for
- Toyota Parts
- Scion Parts
My Garage
My Account
Cart
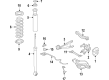
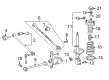
OEM Toyota Coil Springs
Strut Spring- Select Vehicle by Model
- Select Vehicle by VIN
Select Vehicle by Model
orMake
Model
Year
Select Vehicle by VIN
For the most accurate results, select vehicle by your VIN (Vehicle Identification Number).
1264 Coil Springs found


Toyota Coil Spring, Rear Part Number: 48231-35150
$129.00 MSRP: $182.62You Save: $53.62 (30%)Ships in 1-3 Business DaysProduct Specifications- Other Name: Spring, Coil, Rear; Coil Spring, Rear; Coil Spring Kit Rear; Coil Spring Set; Coil Springs; Spring; Spring, Coil, Rear Passenger Side; Spring, Coil, Rear Driver Side
- Manufacturer Note: W(265/70R16 TIRE)
- Position: Rear


Toyota Coil Spring, Front Part Number: 48131-AB060
$74.05 MSRP: $103.94You Save: $29.89 (29%)Ships in 1-3 Business DaysProduct Specifications- Other Name: Spring, Coil, Front; Coil Spring, Front; Coil Springs; Spring; Spring, Front Coil, Passenger Side; Spring, Front Coil, Driver Side
- Manufacturer Note: L=309.5
- Position: Front


Toyota Coil Spring, Rear Part Number: 48231-AB010
$78.67 MSRP: $110.43You Save: $31.76 (29%)Ships in 1-3 Business DaysProduct Specifications- Other Name: Spring, Coil, Rear; Coil Spring, Rear; Coil Spring Kit Rear; Coil Spring Set; Coil Springs; Spring; Spring, Coil, Rear Passenger Side; Spring, Coil, Rear Driver Side
- Position: Rear


Toyota Coil Spring, Rear Part Number: 48231-52C01
$98.58 MSRP: $138.37You Save: $39.79 (29%)Ships in 1-2 Business DaysProduct Specifications- Other Name: Spring, Coil, Rear; Coil Spring, Rear, Rear Left, Rear Right; Coil Springs; Spring; Spring, Coil, Rear Passenger Side; Spring, Coil, Rear Driver Side
- Position: Rear
- Replaces: 48231-52C00


Toyota Coil Spring, Rear Driver Side Part Number: 48231-6A690
$261.53 MSRP: $373.41You Save: $111.88 (30%)Ships in 1-3 Business DaysProduct Specifications- Other Name: Spring, Coil, Rear; Coil Spring, Rear Left; Coil Spring Rear; Coil Springs; Spring; Spring, Coil, Rear Driver Side
- Manufacturer Note: H=504,GREEN & PINK PAINTED
- Position: Rear Driver Side


Toyota Coil Spring, Driver Side Part Number: 48131-35670
$153.80 MSRP: $217.72You Save: $63.92 (30%)Ships in 1-3 Business DaysProduct Specifications- Other Name: Spring, Coil, Front; Coil Spring, Front Left; Coil Springs; Spring; Spring, Front Coil, Driver Side
- Position: Driver Side


Toyota Coil Spring, Rear Part Number: 48231-35321
$166.49 MSRP: $235.68You Save: $69.19 (30%)Ships in 1-3 Business DaysProduct Specifications- Other Name: Spring, Coil, Rear; Coil Spring, Rear; Coil Spring Kit Rear; Coil Spring Set; Coil Springs; Spring; Spring, Coil, Rear Passenger Side; Spring, Coil, Rear Driver Side
- Position: Rear
- Replaces: 48231-35320


Toyota Coil Spring, Front Part Number: 48131-06G60
$82.11 MSRP: $115.25You Save: $33.14 (29%)Ships in 1-3 Business DaysProduct Specifications- Other Name: Spring, Coil, Front; Coil Spring, Front; Coil Springs; Spring; Spring, Front Coil, Passenger Side; Spring, Front Coil, Driver Side
- Position: Front

Toyota Coil Spring, Passenger Side Part Number: 48131-35660
$116.47 MSRP: $163.49You Save: $47.02 (29%)Ships in 1-3 Business DaysProduct Specifications- Other Name: Spring, Coil, Front; Coil Spring, Front, Front Right; Coil Springs; Spring; Spring, Front Coil, Passenger Side
- Position: Passenger Side

Toyota Coil Spring, Rear Passenger Side Part Number: 48231-6A680
$255.36 MSRP: $364.59You Save: $109.23 (30%)Ships in 1-3 Business DaysProduct Specifications- Other Name: Spring, Coil, Rear; Coil Spring, Rear Right; Coil Springs; Spring; Spring, Coil, Rear Passenger Side
- Manufacturer Note: H=498,GREEN&GREEN PAINTED
- Position: Rear Passenger Side


Toyota Coil Spring, Front Part Number: 48131-06G70
$78.67 MSRP: $110.43You Save: $31.76 (29%)Ships in 1-2 Business DaysProduct Specifications- Other Name: Spring, Coil, Front; Coil Spring, Front; Coil Springs; Spring; Spring, Front Coil, Passenger Side; Spring, Front Coil, Driver Side
- Position: Front


Toyota Coil Spring, Rear Part Number: 48231-AF030
$168.84 MSRP: $239.01You Save: $70.17 (30%)Product Specifications- Other Name: Spring, Coil, Rear; Coil Spring, Rear; Coil Springs; Spring; Spring, Coil, Rear Passenger Side; Spring, Coil, Rear Driver Side
- Position: Rear


Toyota Coil Spring, Passenger Side Part Number: 48131-35400
$186.04 MSRP: $265.62You Save: $79.58 (30%)Ships in 1-3 Business DaysProduct Specifications- Other Name: Spring, Coil, Front; Coil Spring, Front Left, Front Right; Coil Spring Kit Front; Coil Spring Set; Coil Springs; Spring; Spring, Front Coil, Passenger Side
- Manufacturer Note: L=368.0,W(265/70R16 TIRE)
- Position: Passenger Side
- Replaces: 48131-35140


Toyota Coil Spring, Driver Side Part Number: 48131-AF320
$230.66 MSRP: $329.33You Save: $98.67 (30%)Ships in 1-3 Business DaysProduct Specifications- Other Name: Spring, Coil, Front; Coil Springs; Spring, Front Coil, Driver Side
- Position: Driver Side

Toyota Coil Spring, Passenger Side Part Number: 48131-AF310
$230.66 MSRP: $329.33You Save: $98.67 (30%)Ships in 1-3 Business DaysProduct Specifications- Other Name: Spring, Coil, Front; Coil Springs; Spring, Front Coil, Passenger Side
- Position: Passenger Side


Toyota Coil Spring, Rear Part Number: 48231-02C90
$60.78 MSRP: $85.31You Save: $24.53 (29%)Ships in 1-3 Business DaysProduct Specifications- Other Name: Spring, Coil, Rear; Coil Spring, Rear; Coil Springs; Spring; Spring, Coil, Rear Passenger Side; Spring, Coil, Rear Driver Side
- Position: Rear


Toyota Coil Spring, Rear Part Number: 48231-12D70
$67.77 MSRP: $95.12You Save: $27.35 (29%)Ships in 1-3 Business DaysProduct Specifications- Other Name: Spring, Coil, Rear; Coil Spring, Rear; Coil Springs; Spring; Spring, Coil, Rear Passenger Side; Spring, Coil, Rear Driver Side
- Position: Rear

Toyota Coil Spring, Front Part Number: 48131-06G50
$82.11 MSRP: $115.25You Save: $33.14 (29%)Ships in 1-3 Business DaysProduct Specifications- Other Name: Spring, Coil, Front; Coil Spring, Front; Coil Springs; Spring; Spring, Front Coil, Passenger Side; Spring, Front Coil, Driver Side
- Position: Front

Toyota Coil Spring, Rear Part Number: 48231-35420
$122.07 MSRP: $172.81You Save: $50.74 (30%)Product Specifications- Other Name: Spring, Coil, Rear; Coil Spring, Rear, Rear Left, Rear Right; Coil Spring Kit Rear; Coil Spring Set; Coil Springs; Spring; Spring, Coil, Rear Passenger Side; Spring, Coil, Rear Driver Side
- Position: Rear


Toyota Coil Spring, Rear Part Number: 48231-48470
$123.48 MSRP: $174.80You Save: $51.32 (30%)Ships in 1-3 Business DaysProduct Specifications- Other Name: Spring, Coil, Rear; Coil Spring, Rear; Coil Springs; Spring; Spring, Coil, Rear Passenger Side; Spring, Coil, Rear Driver Side
- Position: Rear
| Page 1 of 64 |Next >
1-20 of 1264 Results
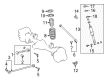
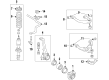
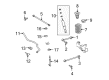
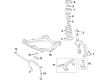
Toyota Coil Springs
OEM parts deliver unmatched quality you can rely on. They pass extensive quality control inspections. Toyota produces them to the official factory specifications. This process helps prevent defects and imperfections. So you can get exceptional lifespan and a flawless fit. Need new OEM Toyota Coil Springs? You'll love our wide selection of genuine options. Shop in minutes and skip the hunt. Our prices are unbeatable, you'll save time and money. It's easy to shop and find the right piece. Our committed customer service team gives professional help from start to finish. Every part includes a manufacturer's warranty. We ship quickly, your parts will arrive fast at your door.
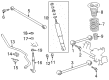
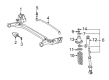
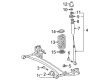
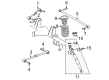
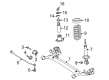
The Coil Springs of Toyota dampen road shocks and maintain the vehicle at the same level and predictably. By combining lean manufacturing with unrelenting adjustments, removing waste, and responding to hiccups quicker than competitors, Toyota has gained its name, making prices fair and reliability high. Customers are supporting Toyota due to the hybrid technologies such as the new Hybrid Synergy Drive creeping into compacts, SUVs, and even trucks where it provides vehicles with good mileage without compelling owners to give up on real-world hauling or pace. The Toyota platform is also based on the TNGA, which reduces the center of gravity, stiffens structures, and injects more desirable steering feel into each of the instruments, with town runabouts and giant family carriers. The current release of the extended-range RAV4 plug-in is an indication that Toyota is combining battery power with long-range durability, transforming eco technology into something that drivers can count on during commuting and traveling. Coil Springs in the suspension hold the vehicle mass, compress when going over potholes, then bounce back to original height and keep the wheels stationary and cabins from that teeth-rattling bang that comes after a serious bottom-out. When the Coil Springs are sagging, leaning, or squeaking, drivers are alerted by the irregular wear patterns on tires and the nose-down attitude, which suggests that it is time to replace the old steel with new before the car becomes uncontrollable. Replacement Coil Springs are available in linear, progressive, or dual rate allowing owners to choose crisp sport feel, smooth cruise attitude, or load-ready stiffness without tearing the rest of the suspension apart. Adjustable coilovers include height adjustable Coil Springs to allow those who want a certain stance to do so, but without the expense of complete chassis re-engineering.
Toyota Coil Springs Parts and Q&A
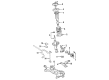
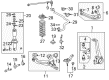
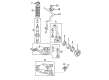
- Q: What Should You Do if the Coil Springs and Shock Absorber Shows Signs of Wear on a 2003-2009 Toyota 4Runner?A:If the shocks or coil springs show signs of wear such as leaking fluid, loss of damping capability, or physical damage like chips or cracks, consider all options before starting any work, as these components are not individually serviceable and must be replaced if issues arise. Complete assemblies may be available on an exchange basis, which can save time and effort, so check the cost and availability of parts prior to disassembling the vehicle. Begin by loosening the front wheel lug nuts, raising the vehicle securely on jackstands, and removing the front wheels. Next, detach the stabilizer bar while keeping the links connected to the steering knuckle. From underneath, remove the nut and bolt attaching the lower end of the shock absorber to the lower control arm, taking care not to damage the driveaxle on 4WD models. Then, remove the three nuts that attach the upper end of the shock to the frame bracket, ensuring not to touch the damper rod nut unless the spring is compressed. After that, take out the shock absorber/coil spring assembly, possibly needing to pry down on the lower control arm. Inspect the shock absorber and coil spring for any damage, and if either is worn, replace it. If installing new complete units, proceed accordingly; otherwise, secure the assembly in a bench vise, protecting the shock bodies, and install a spring compressor to relieve pressure from the spring seat. Remove the damper rod nut while holding the damper rod, then take off the components above the spring, noting their order. Set aside the compressed spring assembly in a safe location and inspect all rubber parts, washers, and suspension support for damage, replacing any that are compromised. Reassembly follows the reverse order of disassembly, ensuring the coil spring is seated correctly and the damper rod nut is tightened to the specified torque before releasing spring tension. Finally, installation is the reverse of removal, with all fasteners tightened to the appropriate torque, and the lug nuts also tightened accordingly.
- Q: How to remove and install front Coil Springs and Shock Absorber on 1995 through 2004 Toyota Tacoma?A:If the shock absorber and coil spring assemblies require replacement, simply put, new complete assemblies could be installed for efficiency, but if one wishes to replace shocks or springs, one would have to disassemble the assemblies. However, complete assemblies may be only slightly more expensive than the individual part therefore before making the final decision compare local costs. First immobilise the front wheel nut, lift the car securely on jack stands and finally, withdraw the front wheels. From the underneath side of the car you remove the nut and bolt that fixes the lower end of the shock absorber to the lower control arm. Subsequently, there are three nuts turning off, the nuts at considerable end of the linkage for the shock to the frame bracket with no touch on the damper rod nut. In the front suspension system, you have to first reduce the shock absorber and coil spring assembly and examine carefully the shock for leakage and dents and if the coil spring has any chips or cracks. If any of the respective components are worn or damaged then the same should be replaced with fresh ones. When reusing old shock absorbers, use the assembly to clamp in a bench vise with soft jaws and should not be over-tightened. Proceed to accommodate the spring compressor in to compress a spring in a way that will allow it to wobbled. Loosen the damper rod with a wrench and unscrew the damper rod nut next, then remove the upper retainer, upper cushion, and suspension support; finally take off the compressed spring assembly. Break the lower retainers and cushion by releasing all the clips that hold it, check that all cushions are not damage and if so replace them. Disassemble in a reverse manner, starting from the removal of the shock absorber; ensure the coil spring is seated properly before loosening the damper rod nut to the recommended torque value then you release the tension in the coil spring. Last of all, place the assembly in the reverse of its dismantling putting in all the bolts and screws in their appropriate tightness.


Related Toyota Parts
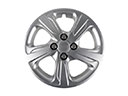 Toyota Wheel Cover
 Toyota Ball Joint
 Toyota Axle Beam Mount
 Toyota Camber and Alignment Kit
 Toyota Coil Spring Insulator
 Toyota Control Arm Bolt
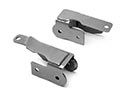 Toyota Control Arm Bracket
 Toyota Leaf Spring Bushing
 Toyota Leaf Spring Shackle
 Toyota Rear Crossmember
 Toyota Sway Bar Bushing
 Toyota Sway Bars
Browse Toyota Coil Springs by Models
Tacoma 4Runner Camry Tundra Corolla RAV4 Highlander Prius Sienna Land Cruiser FJ Cruiser 86 Sequoia Avalon Celica Supra Yaris Matrix MR2 Solara Venza GR86 Echo C-HR Cressida Grand Highlander Paseo Previa Prius C Prius Prime bZ4X Corolla Cross Corolla iM Crown Crown Signia GR Corolla Mirai MR2 Spyder Prius V Starlet Tercel Van Yaris iA Prius Plug-In GR Supra Prius AWD-e RAV4 Prime