×
ToyotaParts- Hello
- Login or Register
- Quick Links
- Live Chat
- Track Order
- Parts Availability
- RMA
- Help Center
- Contact Us
- Shop for
- Toyota Parts
- Scion Parts
My Garage
My Account
Cart
OEM Toyota Camry Coil Springs
Strut Spring- Select Vehicle by Model
- Select Vehicle by VIN
Select Vehicle by Model
orMake
Model
Year
Select Vehicle by VIN
For the most accurate results, select vehicle by your VIN (Vehicle Identification Number).
149 Coil Springs found


Toyota Camry Coil Spring, Front Part Number: 48131-06G60
$82.11 MSRP: $115.25You Save: $33.14 (29%)Ships in 1-3 Business Days

Toyota Camry Coil Spring, Front Part Number: 48131-06G70
$78.67 MSRP: $110.43You Save: $31.76 (29%)Ships in 1-2 Business Days
Toyota Camry Coil Spring, Front Part Number: 48131-06G50
$82.11 MSRP: $115.25You Save: $33.14 (29%)Ships in 1-3 Business Days

Toyota Camry Coil Spring, Driver Side Part Number: 48132-06190
$79.15 MSRP: $111.09You Save: $31.94 (29%)Ships in 1-3 Business Days
Toyota Camry Coil Spring, Passenger Side Part Number: 48131-06F70
$81.52 MSRP: $114.42You Save: $32.90 (29%)Ships in 1-3 Business Days

Toyota Camry Coil Spring, Rear Part Number: 48231-AA080
$86.02 MSRP: $120.74You Save: $34.72 (29%)Ships in 1-3 Business Days


Toyota Camry Coil Spring, Front Part Number: 48131-06861
$94.67 MSRP: $132.89You Save: $38.22 (29%)Ships in 1-3 Business Days

Toyota Camry Coil Spring, Front Part Number: 48131-AA331
$99.29 MSRP: $139.37You Save: $40.08 (29%)Ships in 1-3 Business Days

Toyota Camry Coil Spring, Front Part Number: 48131-AC020
$100.19 MSRP: $140.63You Save: $40.44 (29%)Ships in 1-3 Business Days


Toyota Camry Coil Spring, Front Part Number: 48131-06881
$103.91 MSRP: $145.86You Save: $41.95 (29%)Ships in 1-3 Business Days


Toyota Camry Coil Spring, Rear Part Number: 48231-06521
$108.77 MSRP: $152.68You Save: $43.91 (29%)Ships in 1-3 Business Days

Toyota Camry Coil Spring, Front Part Number: 48131-AA351
$116.24 MSRP: $163.16You Save: $46.92 (29%)Ships in 1-3 Business Days
Toyota Camry Coil Spring, Rear Part Number: 48231-06550
$62.56 MSRP: $87.81You Save: $25.25 (29%)Ships in 1-3 Business Days
Toyota Camry Coil Spring, Front Part Number: 48131-33C50
$81.99 MSRP: $115.09You Save: $33.10 (29%)Ships in 1-3 Business Days
Toyota Camry Coil Spring, Driver Side Part Number: 48132-06040
$88.15 MSRP: $123.74You Save: $35.59 (29%)Ships in 1-3 Business DaysToyota Camry Coil Spring, Passenger Side Part Number: 48131-06C80
$88.15 MSRP: $123.74You Save: $35.59 (29%)Ships in 1-3 Business Days
Toyota Camry Coil Spring, Rear Part Number: 48231-06890
$96.57 MSRP: $135.55You Save: $38.98 (29%)Ships in 1-2 Business Days
Toyota Camry Coil Spring, Front Part Number: 48131-33770
$118.71 MSRP: $168.05You Save: $49.34 (30%)Ships in 1-3 Business Days

Toyota Camry Coil Spring, Rear Part Number: 48231-06391

Toyota Camry Coil Spring, Rear Part Number: 48231-33651
$107.94 MSRP: $151.52You Save: $43.58 (29%)
| Page 1 of 8 |Next >
1-20 of 149 Results
Toyota Camry Coil Springs
Choose genuine Coil Springs that pass strict quality control tests. You can trust the top quality and lasting durability. Shopping for OEM Coil Springs for your Toyota Camry? Our website is your one-stop destination. We stock an extensive selection of genuine Toyota Camry parts. The price is affordable so you can save more. It only takes minutes to browse and find the exact fit. Easily add to cart and check out fast. Our hassle-free return policy will keep you stress-free. We process orders quickly for swift delivery. Your parts will arrive faster, so you can get back on the road sooner.
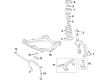
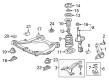
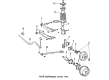
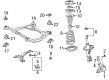
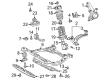
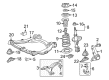
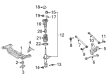
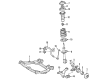
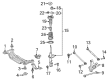
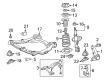
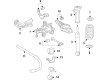
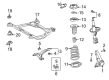
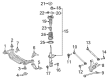
Coil Springs are among the vital parts in the suspension system of the Toyota Camry and are the flexible structures that offer the car's body and load fundamental support. They damp the impacts of the irregularities of the road surfaces through strong elastic distortion and reactivation of the stowed energy so that the wheels can move relative to the body. The coil springs work in accordance to the amount of stiffness, and the extent of coil travel, both of which are regulated depending on the design of the springs or its hardness. For the years of production, the camry vehicles have applied various coil springs; in particular, compression springs that depend on compressive forces. Original coil springs fitted at the factory may wear off and therefore warrant a change to modified springs. Coil springs that can be changed by the dealers allow the height and the stiffness of the car to be increased or decreased depending on whether the driver wants to race the car or drive it more comfortably.
Toyota Camry Coil Springs Parts and Q&A
- Q: How to overhaul the shock absorber with coil springs on Toyota Camry?A:The overhaul process for Shock Absorber with coil spring starts with removing the front wheel then disconnecting the front stabilizer link assembly LH by untightening its nut. When the Ball Joint connects to the turning nut apply hexagon (6 mm) wrench to the stud. The next step requires loosening the lock nut of the front shock absorber with coil spring but only do so if you need to dismantle the shock absorber assembly front LH. Before proceeding with shock absorber overhaul, disconnect front flexible hose No. 1 with Speed Sensor front LH on models equipped with ABS but separate only front flexible hose No. 1 when ABS is not present. Detach the two bolts and nuts found on the lower front shock absorber with coil spring by stopping the rotation of the bolt but continue nut unfastening before removing the three upper-side nuts to extract the shock absorber assembly preserving both washers from potential falling when a front suspension upper brace center exists. The front shock absorber with coil spring installation requires securing two nuts and a bolt to the bracket at the lower side before placing it in a vise. Use Special Service Tool: 09727-30021 to squeeze the front coil spring LH without impact wrenches to prevent tool damage while removing the front suspension support sub-assembly LH, front suspension support bearing LH, front coil spring seat upper LH, front coil spring insulator upper LH, front coil spring LH, front spring bumper LH, as well as front coil spring insulator upper LH. Check the shock absorber assembly front LH by compressing then extending its rod to detect any irregular resistance or strange sounds; replace the shock absorber with an authentic new one if such issues occur. When disposing of the shock absorber assembly front LH you must drain the gas inside by drilling a hole into the cylinder after extending the shock absorber rod while being mindful of flying chip particles. The installation process starts with the front coil spring insulator lower LH placed onto the shock absorber assembly front LH followed by the front spring bumper LH installation onto the piston rod. Install the front coil spring LH into the shock absorber assembly front LH with the lower end positioned inside the spring lower seat gap before adding the front coil spring insulator upper LH and front coil spring seat upper LH which should have the mark directed outward. Fit the front suspension support bearing LH and mount the front suspension support sub-assembly LH outward with its mark visible before tightening the lock nut temporarily. Follow the provided illustration to install the front shock absorber with coil spring by screwing three upper nuts with 80 Nm torque (816 kgf-cm, 59 ft. lbs.) and keep watch for two washers that may fall if a front suspension upper brace center exists. Install two bolts and two nuts to the lower side using 210 Nm torque (2,141 kgf-cm, 155 ft. lbs.) while torquing the nut to stop the bolt from rotating until lock nut reaches 49 Nm (500 kgf-cm, 36 ft. lbs.). The installation of the front flexible hose No. 1 follows with 18.8 Nm (192 kgf-cm, 14 ft. lbs.) torque whether the model has ABS or not. The front stabilizer link assembly LH installation requires a torque of 74 Nm (755 kgf-cm, 55 inch lbs.) while using a hexagon (6 mm) wrench on the stud to prevent ball joint movement before applying torque. After stabilizer link assembly installation, install the front wheel at 103 Nm (1,050 kgf-cm, 76 ft. lbs.) followed by front wheel alignment check and adjustment.

Related Toyota Camry Parts
 Toyota Camry Control Arm
 Toyota Camry Ball Joint
 Toyota Camry Control Arm Bushing
 Toyota Camry Sway Bar Link
 Toyota Camry Axle Beam Mount
 Toyota Camry Coil Spring Insulator
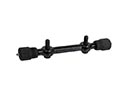 Toyota Camry Control Arm Shaft Kit
 Toyota Camry Shock and Strut Boot
 Toyota Camry Strut Housing
 Toyota Camry Strut Mounts
 Toyota Camry Sway Bar Bracket
 Toyota Camry Wheel Seal