×
ToyotaParts- Hello
- Login or Register
- Quick Links
- Live Chat
- Track Order
- Parts Availability
- RMA
- Help Center
- Contact Us
- Shop for
- Toyota Parts
- Scion Parts
My Garage
My Account
Cart
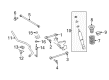
OEM Toyota 4Runner Coil Springs
Strut Spring- Select Vehicle by Model
- Select Vehicle by VIN
Select Vehicle by Model
orMake
Model
Year
Select Vehicle by VIN
For the most accurate results, select vehicle by your VIN (Vehicle Identification Number).
56 Coil Springs found


Toyota 4Runner Coil Spring, Rear Part Number: 48231-35150
$129.00 MSRP: $182.62You Save: $53.62 (30%)Ships in 1-3 Business Days


Toyota 4Runner Coil Spring, Passenger Side Part Number: 48131-35400
$186.04 MSRP: $265.62You Save: $79.58 (30%)Ships in 1-3 Business Days
Toyota 4Runner Coil Spring, Rear Part Number: 48231-35210
$129.00 MSRP: $182.62You Save: $53.62 (30%)Ships in 1-3 Business Days

Toyota 4Runner Coil Spring, Passenger Side Part Number: 48131-35461
$157.91 MSRP: $223.54You Save: $65.63 (30%)Ships in 1-3 Business Days
Toyota 4Runner Coil Spring, Driver Side Part Number: 48131-35481
$160.02 MSRP: $226.53You Save: $66.51 (30%)Ships in 1-3 Business Days
Toyota 4Runner Coil Spring, Driver Side Part Number: 48131-35471
$160.02 MSRP: $226.53You Save: $66.51 (30%)Ships in 1-3 Business Days


Toyota 4Runner Coil Spring, Rear Part Number: 48231-35281
$103.79 MSRP: $145.69You Save: $41.90 (29%)Ships in 1-3 Business Days
Toyota 4Runner Coil Spring, Rear Part Number: 48231-35200
$106.40 MSRP: $149.35You Save: $42.95 (29%)Ships in 1-3 Business Days
Toyota 4Runner Coil Spring, Passenger Side Part Number: 48131-35451
$109.96 MSRP: $154.34You Save: $44.38 (29%)Ships in 1-3 Business Days
Toyota 4Runner Coil Spring, Rear Part Number: 48231-35340
$122.07 MSRP: $172.81You Save: $50.74 (30%)Ships in 1-3 Business Days
Toyota 4Runner Coil Spring, Front Part Number: 48131-35580
$133.12 MSRP: $188.44You Save: $55.32 (30%)Ships in 1-3 Business Days
Toyota 4Runner Coil Spring, Rear Part Number: 48231-35450
$137.82 MSRP: $195.10You Save: $57.28 (30%)Ships in 1-3 Business Days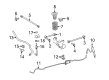
Toyota 4Runner Coil Spring, Rear Part Number: 48231-35370
$133.70 MSRP: $189.28You Save: $55.58 (30%)Ships in 1-3 Business Days
Toyota 4Runner Spring, Coil, Rear Part Number: 48231-35470
$141.02 MSRP: $199.64You Save: $58.62 (30%)Ships in 1-2 Business DaysToyota 4Runner Spring, Coil, Rear Part Number: 48231-35480
$148.16 MSRP: $209.73You Save: $61.57 (30%)Ships in 1-2 Business Days
Toyota 4Runner Coil Spring, Rear Part Number: 48231-35460
$151.68 MSRP: $214.72You Save: $63.04 (30%)Ships in 1-3 Business Days

Toyota 4Runner Coil Spring, Rear Part Number: 48231-35190

Toyota 4Runner Coil Spring, Rear Part Number: 48231-35250

Toyota 4Runner Coil Spring, Front Part Number: 48131-35120
Toyota 4Runner Coil Spring, Rear Part Number: 48231-35130
$97.51 MSRP: $136.88You Save: $39.37 (29%)Ships in 1-2 Business Days
| Page 1 of 3 |Next >
1-20 of 56 Results
Toyota 4Runner Coil Springs
Choose genuine Coil Springs that pass strict quality control tests. You can trust the top quality and lasting durability. Shopping for OEM Coil Springs for your Toyota 4Runner? Our website is your one-stop destination. We stock an extensive selection of genuine Toyota 4Runner parts. The price is affordable so you can save more. It only takes minutes to browse and find the exact fit. Easily add to cart and check out fast. Our hassle-free return policy will keep you stress-free. We process orders quickly for swift delivery. Your parts will arrive faster, so you can get back on the road sooner.
Toyota 4Runner Coil Springs Parts and Q&A
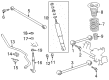
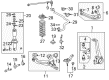
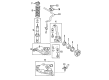
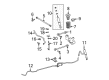
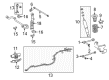
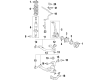
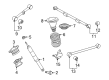
- Q: How to remove and inspect a coil springs and shock absorber on Toyota 4Runner?A:The coil spring should be removed while maintaining the rear axle housing in position with a jack and supporting the frame with stands. The first step involves removing the wheel by tightening it to 110 Nm (1,150 kgf-cm, 83 ft. lbs.). A 13 Nm (130 kgf-cm, 9 ft. lbs.) torque should be used to detach the parking brake cable bracket from the rear axle housing. You should disconnect the rear Shock Absorber by first applying 64 Nm (650 kgf-cm, 47 ft. lbs.) torque to remove the bolt and two washers and two bushings along with turning the shock absorber and holding the nut to pull out the three retainers and two cushions and the shock absorber with a torque of 20 Nm (200 kgf-cm, 14 ft. lbs.). Unfasten the stabilizer bar brackets while also separating the lateral control rod from the frame structure. Lower the rear axle housing while avoiding the brake line and take out the coil spring by ensuring correct positioning of the coil spring end. During inspection the shock absorber operation should be verified by pushing it while monitoring for smooth stroke pull with no unusual resistance or noise. Fully compress gas-filled shock absorbers to check the constant speed return after release; these types include engraved informational markings on the shell surface. Drilling a 2 - 3 mm (0.079 - 0.118 inch) hole at the correct location on a gas-filled shock absorber permits the gas release while chip debris should be handled carefully since the gas is colorless, odorless and contains no poisonous substances. Shock absorber installation follows the exact opposite steps of the removal process.
- Q: How to install the rear coil springs and connect the associated components on Toyota 4Runner?A:Start rear coil spring installation by putting the coil spring rear LH into the axle housing of the rear while positioning its lower end inside the spring lower seat gap. After installing the Shock Absorber assembly rear LH bolt you should first temporarily tighten it. Fully tighten the shock absorber assembly rear LH bolt to reach 98 Nm (1,000 kgf-cm, 72 ft-lbf) after stabilizing the suspension. Complete the connection of the rear brake tube flexible hose by installing 2 clips to the 2 flexible hoses and joining brake tubes to the flexible hose using a union nut wrench while tightening the components to 15 Nm (155 kgf-cm, 11 ft-lbf). You must add brake fluid to the reservoir before performing the brake line bleeding and checking the reservoir fluid level and inspecting for leakage of brake fluid. Install the rear wheel by tightening its bolts to 112 Nm (1,137 kgf-cm, 83 ft-lbf).


Related Toyota 4Runner Parts
 Toyota 4Runner CV Boot
 Toyota 4Runner Sway Bar Link
 Toyota 4Runner Coil Spring Insulator
 Toyota 4Runner Sway Bars
 Toyota 4Runner Axle Beam Mount
 Toyota 4Runner Axle Shaft
 Toyota 4Runner Camber and Alignment Kit
 Toyota 4Runner Control Arm Shaft Kit
 Toyota 4Runner Lateral Link
 Toyota 4Runner Leaf Spring Shackle
 Toyota 4Runner Sway Bar Bracket
 Toyota 4Runner Wheel Seal