×
ToyotaParts- Hello
- Login or Register
- Quick Links
- Live Chat
- Track Order
- Parts Availability
- RMA
- Help Center
- Contact Us
- Shop for
- Toyota Parts
- Scion Parts
My Garage
My Account
Cart
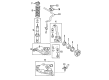
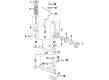
OEM 2005 Toyota 4Runner Coil Springs
Strut Spring- Select Vehicle by Model
- Select Vehicle by VIN
Select Vehicle by Model
orMake
Model
Year
Select Vehicle by VIN
For the most accurate results, select vehicle by your VIN (Vehicle Identification Number).
9 Coil Springs found


2005 Toyota 4Runner Coil Spring, Driver Side
Part Number: 48131-35481$155.32 MSRP: $219.88You Save: $64.56 (30%)Ships in 1-3 Business DaysProduct Specifications- Other Name: Spring, Coil, Front; Coil Spring, Front Left; Coil Springs; Spring; Spring, Front Coil, Driver Side
- Position: Driver Side
- Replaces: 48131-35480
- Part Name Code: 48132
- Item Weight: 7.20 Pounds
- Item Dimensions: 15.8 x 7.1 x 5.9 inches
- Condition: New
- Fitment Type: Direct Replacement
- SKU: 48131-35481
- Warranty: This genuine part is guaranteed by Toyota's factory warranty.

2005 Toyota 4Runner Coil Spring, Driver Side
Part Number: 48131-35471$155.32 MSRP: $219.88You Save: $64.56 (30%)Ships in 1-3 Business DaysProduct Specifications- Other Name: Spring, Coil, Front; Coil Spring, Front Left; Coil Springs; Spring; Spring, Front Coil, Driver Side
- Position: Driver Side
- Replaces: 48131-35470
- Part Name Code: 48132
- Item Weight: 6.70 Pounds
- Item Dimensions: 15.9 x 6.9 x 5.8 inches
- Condition: New
- Fitment Type: Direct Replacement
- SKU: 48131-35471
- Warranty: This genuine part is guaranteed by Toyota's factory warranty.

2005 Toyota 4Runner Coil Spring, Passenger Side
Part Number: 48131-35461$153.21 MSRP: $216.89You Save: $63.68 (30%)Ships in 1-3 Business DaysProduct Specifications- Other Name: Spring, Coil, Front; Coil Spring, Front Right; Coil Springs; Spring; Spring, Front Coil, Passenger Side
- Position: Passenger Side
- Replaces: 48131-35460
- Part Name Code: 48131
- Item Weight: 6.70 Pounds
- Item Dimensions: 15.8 x 6.9 x 5.9 inches
- Condition: New
- Fitment Type: Direct Replacement
- SKU: 48131-35461
- Warranty: This genuine part is guaranteed by Toyota's factory warranty.

2005 Toyota 4Runner Coil Spring, Passenger Side
Part Number: 48131-35451$106.76 MSRP: $149.85You Save: $43.09 (29%)Ships in 1-3 Business DaysProduct Specifications- Other Name: Spring, Coil, Front; Coil Spring, Front Right; Coil Springs; Spring; Spring, Front Coil, Passenger Side
- Position: Passenger Side
- Replaces: 48131-35450
- Part Name Code: 48131
- Item Weight: 6.70 Pounds
- Item Dimensions: 15.9 x 7.1 x 6.0 inches
- Condition: New
- Fitment Type: Direct Replacement
- SKU: 48131-35451
- Warranty: This genuine part is guaranteed by Toyota's factory warranty.


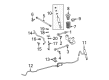
2005 Toyota 4Runner Coil Spring, Rear
Part Number: 48231-35281$100.71 MSRP: $141.37You Save: $40.66 (29%)Ships in 1-3 Business DaysProduct Specifications- Other Name: Spring, Coil, Rear; Coil Spring, Rear; Coil Spring Kit Rear; Coil Spring Set; Coil Springs; Spring; Spring, Coil, Rear Passenger Side; Spring, Coil, Rear Driver Side
- Manufacturer Note: REAR AIR SUSPENTION
- Position: Rear
- Replaces: 48231-35280
- Item Weight: 6.90 Pounds
- Item Dimensions: 17.3 x 11.0 x 5.8 inches
- Condition: New
- Fitment Type: Direct Replacement
- SKU: 48231-35281
- Warranty: This genuine part is guaranteed by Toyota's factory warranty.
2005 Toyota 4Runner Coil Spring, Driver Side
Part Number: 48131-35521$106.76 MSRP: $149.85You Save: $43.09 (29%)Ships in 1-3 Business DaysProduct Specifications- Other Name: Spring, Coil, Front; Coil Spring, Front Left; Coil Springs; Spring; Spring, Front Coil, Driver Side
- Position: Driver Side
- Replaces: 48131-35520
- Part Name Code: 48132
- Item Weight: 6.90 Pounds
- Item Dimensions: 15.5 x 6.9 x 5.8 inches
- Condition: New
- Fitment Type: Direct Replacement
- SKU: 48131-35521
- Warranty: This genuine part is guaranteed by Toyota's factory warranty.
2005 Toyota 4Runner Coil Spring, Passenger Side
Part Number: 48131-35501$105.57 MSRP: $148.19You Save: $42.62 (29%)Ships in 1-3 Business DaysProduct Specifications- Other Name: Spring, Coil, Front; Coil Spring, Front Right; Coil Springs; Spring; Spring, Front Coil, Passenger Side
- Position: Passenger Side
- Replaces: 48131-35500
- Part Name Code: 48131
- Item Weight: 6.90 Pounds
- Item Dimensions: 16.2 x 6.9 x 5.7 inches
- Condition: New
- Fitment Type: Direct Replacement
- SKU: 48131-35501
- Warranty: This genuine part is guaranteed by Toyota's factory warranty.
2005 Toyota 4Runner Coil Spring, Driver Side
Part Number: 48131-35531$108.30 MSRP: $152.02You Save: $43.72 (29%)Product Specifications- Other Name: Spring, Coil, Front; Coil Spring, Front Left; Coil Springs; Spring; Spring, Front Coil, Driver Side
- Position: Driver Side
- Replaces: 48131-35530
- Part Name Code: 48132
- Item Weight: 6.90 Pounds
- Item Dimensions: 15.9 x 7.1 x 5.9 inches
- Condition: New
- Fitment Type: Direct Replacement
- SKU: 48131-35531
- Warranty: This genuine part is guaranteed by Toyota's factory warranty.
2005 Toyota 4Runner Coil Spring, Passenger Side
Part Number: 48131-35511$106.76 MSRP: $149.85You Save: $43.09 (29%)Product Specifications- Other Name: Spring, Coil, Front; Coil Spring, Front Right; Coil Springs; Spring; Spring, Front Coil, Passenger Side
- Position: Passenger Side
- Replaces: 48131-35510
- Part Name Code: 48131
- Item Weight: 6.80 Pounds
- Item Dimensions: 16.1 x 7.0 x 5.9 inches
- Condition: New
- Fitment Type: Direct Replacement
- SKU: 48131-35511
- Warranty: This genuine part is guaranteed by Toyota's factory warranty.
2005 Toyota 4Runner Coil Springs
Looking for affordable OEM 2005 Toyota 4Runner Coil Springs? Explore our comprehensive catalogue of genuine 2005 Toyota 4Runner Coil Springs. All our parts are covered by the manufacturer's warranty. Plus, our straightforward return policy and speedy delivery service ensure an unparalleled shopping experience. We look forward to your visit!
2005 Toyota 4Runner Coil Springs Parts Q&A
- Q: How to replace the rear coil springs on 2005 Toyota 4Runner?A: Regarding the replacement of the rear coil spring you should start by taking off the rear wheel. Before continuation start by supporting the rear axle housing until you can remove the bolt separating the shock absorber assembly rear LH from the rear axle. Use Special Service Tool: 09023-00101 to disconnect the rear brake tube flexible hose after placing the collected brake fluid in a container. The hoses require removal of their two clips. Stretch out the rear axle housing with extreme care to prevent both brake line damage and parking brake cable injury; after that extract the coil spring rear LH. Place the new coil spring rear LH into the rear axle housing where the lower end rests in the gap of the spring lower seat. Reposition the shock absorber assembly rear LH while securing its bolt loosely. Full stability of the suspension system allows you to tighten the shock absorber assembly rear LH bolt to 98 Nm (1,000 kgf-cm, 72 ft. lbs.). Use Special Service Tool: 09023-00101 to attach the brake tubes to the flexible hose while torquing them to 15 Nm (155 kgf-cm, 11 ft. lbs.). After that, install the 2 clips which hold the 2 flexible hoses together onto the rear brake tube flexible hose. You should start by filling the reservoir of brake fluid then perform the bleeding on brake lines while checking the fluid amount and looking for leakage before ending the task. Finish by putting on the rear wheel and securing it with torque force of 112 Nm (1,137 kgf-cm, 83 ft. lbs.).
Related 2005 Toyota 4Runner Parts
 2005 Toyota 4Runner CV Joint
 2005 Toyota 4Runner Sway Bar Link
 2005 Toyota 4Runner Alignment Bolt
 2005 Toyota 4Runner Axle Shaft
 2005 Toyota 4Runner Control Arm Bushing
 2005 Toyota 4Runner Lateral Link
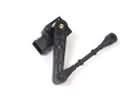 2005 Toyota 4Runner Ride Height Sensor
 2005 Toyota 4Runner Shock And Strut Mount
 2005 Toyota 4Runner Strut Housing
 2005 Toyota 4Runner Sway Bar Bracket
 2005 Toyota 4Runner Sway Bar Kit
 2005 Toyota 4Runner Wheel Seal