×
ToyotaParts- Hello
- Login or Register
- Quick Links
- Live Chat
- Track Order
- Parts Availability
- RMA
- Help Center
- Contact Us
- Shop for
- Toyota Parts
- Scion Parts
My Garage
My Account
Cart
OEM 2005 Toyota 4Runner Axle Shaft
Car Axle Shaft- Select Vehicle by Model
- Select Vehicle by VIN
Select Vehicle by Model
orMake
Model
Year
Select Vehicle by VIN
For the most accurate results, select vehicle by your VIN (Vehicle Identification Number).
2 Axle Shafts found


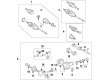
2005 Toyota 4Runner Axle Assembly
Part Number: 43430-60061$419.71 MSRP: $615.09You Save: $195.38 (32%)Ships in 1 Business DayProduct Specifications- Other Name: CV Axle Assembly, Front Left, Front Right; CV Axle Assembly; GSP Cv Axle; Axle Shaft
- Replaced by: 43430-60062
- Item Weight: 24.50 Pounds
- Item Dimensions: 31.3 x 5.2 x 5.4 inches
- Condition: New
- SKU: 43430-60061
- Warranty: This genuine part is guaranteed by Toyota's factory warranty.


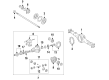
2005 Toyota 4Runner Axle Shaft, Rear
Part Number: 42311-60240$477.48 MSRP: $699.76You Save: $222.28 (32%)Ships in 1-3 Business DaysProduct Specifications- Other Name: Shaft, Rear Axle; Drive Axle Shaft, Rear; Axle Shafts; Shaft, Rear Axle, Passenger Side; Shaft, Rear Axle, Driver Side
- Position: Rear
- Item Weight: 16.10 Pounds
- Item Dimensions: 29.3 x 9.0 x 7.8 inches
- Condition: New
- Fitment Type: Direct Replacement
- SKU: 42311-60240
- Warranty: This genuine part is guaranteed by Toyota's factory warranty.
2005 Toyota 4Runner Axle Shaft
Looking for affordable OEM 2005 Toyota 4Runner Axle Shaft? Explore our comprehensive catalogue of genuine 2005 Toyota 4Runner Axle Shaft. All our parts are covered by the manufacturer's warranty. Plus, our straightforward return policy and speedy delivery service ensure an unparalleled shopping experience. We look forward to your visit!
2005 Toyota 4Runner Axle Shaft Parts Q&A
- Q: How to replace the rear axle shaft assembly on 2005 Toyota 4Runner?A: The replacement of the rear axle shaft assembly starts with wheel removal and speed sensor rear LH before separating the rear disc brake caliper assembly LH and removing the rear disc. Start the replacement by removing in sequence the parking brake shoe return tension spring followed by the parking brake shoe strut compression spring then the parking brake shoe strut LH and finally the parking brake shoe. The 4 nuts and integrated O-ring must be removed to separate the rear axle shaft with backing plate. Special Service Tool: 09308-00010 should be employed for removing the rear axle shaft LH oil seal followed by using a snap ring expander to take out the rear axle shaft snap ring. The technician will use Special Service Tool: 09521-25011 and a press to remove the rear axle shaft LH. The rear axle bearing assembly LH requires removal of its inner rear axle bearing retainer along with the plate washer of the shaft. Use a hammer to eliminate the parking brake plate's four nuts from the rear axle housing bolts after attaching them to the bolts. Ensure the reuse of these nuts is prohibited during the removal process of the rear axle bearing assembly. Service Tool 09650-17011 allows you to uninstall the 6 hub bolts after removing the rear axle hub & bearing assembly LH and the rear axle LH hub bolt. Remove the brake drum oil deflector LH and its gasket LH before grinding the rear axle bearing inner race surface to create space for removing the rear axle bearing oil seal by chiseling. Check the shaft for maximum runout that should match 1.5 mm (0.0591 inch) for the shaft while the flange should not exceed 0.05 mm (0.0020 inch); replace if damaged parts appear. Add new deflector gaskets to the rear axle shaft while placing the notches in proper alignment before passing six bolts through the axle hub before installing the hub bolt and tightening the hub bolt nut. Install the rear axle hub & bearing assembly LH by placing the backing plate on the rear axle bearing assembly followed by tightening the four parking brake plate to rear axle housing bolts with two socket wrenches under a press operation. Begin by adding the rear axle shaft plate washer to the rear axle shaft LH after which you should install the new rear axle bearing retainer inner LH. Install the rear axle shaft LH using Special Service Tool: 09521-25011 along with a press until it fits into the rear axle bearing assembly LH. Follow installation of a new rear axle shaft snap ring with a snap ring expander. Professional Service Tools 09950-60020 (09951-00770) and 09950-70010 (09951-07150) together with a hammer will be needed for installing the new axle shaft oil seal on the rear axle shaft LH. Position the rear axle shaft backing plate together with a new O-ring while using 4 nuts to torque at 123 Nm (1,254 kgf-cm, 91 ft. lbs.). After installation of the parking brake shoe and parking brake shoe strut LH and parking brake shoe strut compression spring and parking brake shoe return tension spring, continue with the rear disc and rear disc brake caliper assembly LH. The process requires reconnection of the speed sensor rear LH followed by brake fluid filling of the reservoir before bleeding the master cylinder and brake lines. Then inspect the reservoir brake fluid and look for leaks before reinstalling the rear wheel with proper torque of 112 Nm (1,142 kgf-cm, 83 ft. lbs.). Inspect the parking brake lever travel then adjust it before verifying the ABS speed sensor signal performance.
Related 2005 Toyota 4Runner Parts
 2005 Toyota 4Runner Ball Joint
 2005 Toyota 4Runner CV Joint
 2005 Toyota 4Runner Shock Absorber
 2005 Toyota 4Runner Steering Knuckle
 2005 Toyota 4Runner Sway Bar Link
 2005 Toyota 4Runner Alignment Bolt
 2005 Toyota 4Runner Bump Stop
 2005 Toyota 4Runner Control Arm Bushing
 2005 Toyota 4Runner Shock And Strut Mount
 2005 Toyota 4Runner Strut Housing
 2005 Toyota 4Runner Sway Bar Bushing
 2005 Toyota 4Runner Wheel Seal