×
ToyotaParts- Hello
- Login or Register
- Quick Links
- Live Chat
- Track Order
- Parts Availability
- RMA
- Help Center
- Contact Us
- Shop for
- Toyota Parts
- Scion Parts
My Garage
My Account
Cart
OEM 2005 Toyota 4Runner Shock Absorber
Suspension Shock Absorber- Select Vehicle by Model
- Select Vehicle by VIN
Select Vehicle by Model
orMake
Model
Year
Select Vehicle by VIN
For the most accurate results, select vehicle by your VIN (Vehicle Identification Number).
11 Shock Absorbers found


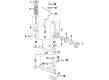
2005 Toyota 4Runner Shock Absorber
Part Number: 48510-69675$164.96 MSRP: $233.52You Save: $68.56 (30%)Ships in 1-3 Business DaysProduct Specifications- Other Name: Absorber Assembly, Shock; Suspension Shock Absorber; Shock; Strut
- Replaces: 48510-80269, 48510-80086, 48510-80533, 48510-80329, 48510-80270, 48510-69525, 48510-69555, 48510-80087, 48510-80328
- Item Weight: 5.70 Pounds
- Item Dimensions: 26.6 x 8.5 x 7.7 inches
- Condition: New
- SKU: 48510-69675
- Warranty: This genuine part is guaranteed by Toyota's factory warranty.


2005 Toyota 4Runner Shock Absorber
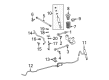
Part Number: 48530-80371$66.35 MSRP: $93.13You Save: $26.78 (29%)Ships in 1-3 Business DaysProduct Specifications- Other Name: Absorber Set, Shock; Rear Shock Absorber; Suspension Kit; Strut Assembly; Complete Strut; Shock; Absorber Assembly, Shock, Rear Passenger Side; Absorber Assembly, Shock, Rear Driver Side
- Manufacturer Note: MARK 48530-35072
- Replaces: 48530-80299, 48530-80087
- Item Weight: 1.40 Pounds
- Item Dimensions: 25.6 x 6.6 x 5.9 inches
- Condition: New
- Fitment Type: Direct Replacement
- SKU: 48530-80371
- Warranty: This genuine part is guaranteed by Toyota's factory warranty.

2005 Toyota 4Runner Shock Absorber
Part Number: 48530-80372$65.16 MSRP: $91.47You Save: $26.31 (29%)Ships in 1-2 Business DaysProduct Specifications- Other Name: Absorber Set, Shock; Rear Shock Absorber; Suspension Kit; Strut Assembly; Complete Strut; Shock; Absorber Assembly, Shock, Rear Passenger Side; Absorber Assembly, Shock, Rear Driver Side
- Manufacturer Note: MARK 48530-35082
- Replaces: 48530-80300, 48530-80088
- Item Weight: 1.40 Pounds
- Item Dimensions: 26.4 x 6.8 x 5.9 inches
- Condition: New
- Fitment Type: Direct Replacement
- SKU: 48530-80372
- Warranty: This genuine part is guaranteed by Toyota's factory warranty.


2005 Toyota 4Runner Shock Absorber, Front Passenger Side
Part Number: 48510-80230$231.94 MSRP: $331.16You Save: $99.22 (30%)Ships in 1 Business DayProduct Specifications- Other Name: Absorber Set, Front Right-Hand; Suspension Shock/Strut Kit; Complete Strut; Strut; Absorber Assembly, Shock, Front Passenger Side
- Position: Front Passenger Side
- Replaces: 48510-80089
- Part Name Code: 48510
- Item Weight: 9.60 Pounds
- Item Dimensions: 27.1 x 8.5 x 7.4 inches
- Condition: New
- Fitment Type: Direct Replacement
- SKU: 48510-80230
- Warranty: This genuine part is guaranteed by Toyota's factory warranty.


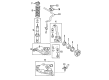
2005 Toyota 4Runner Shock Absorber, Front Passenger Side
Part Number: 48510-80229$231.94 MSRP: $331.16You Save: $99.22 (30%)Ships in 1-3 Business DaysProduct Specifications- Other Name: Absorber Set, Front Right-Hand; Suspension Shock/Strut Kit; Complete Strut; Absorber Assembly, Shock, Front Passenger Side
- Position: Front Passenger Side
- Replaces: 48510-80088
- Part Name Code: 48510
- Item Weight: 9.30 Pounds
- Item Dimensions: 26.4 x 8.5 x 7.7 inches
- Condition: New
- Fitment Type: Direct Replacement
- SKU: 48510-80229
- Warranty: This genuine part is guaranteed by Toyota's factory warranty.


2005 Toyota 4Runner Shock Absorber, Front Driver Side
Part Number: 48520-39885$225.42 MSRP: $321.85You Save: $96.43 (30%)Ships in 1 Business DayProduct Specifications- Other Name: Absorber Set, Front Left-Hand; Suspension Shock/Strut Kit; Complete Strut; Strut; Absorber Assembly, Shock, Front Driver Side
- Position: Front Driver Side
- Replaces: 48520-39535
- Part Name Code: 48520
- Item Weight: 9.70 Pounds
- Item Dimensions: 27.1 x 8.4 x 7.7 inches
- Condition: New
- Fitment Type: Direct Replacement
- SKU: 48520-39885
- Warranty: This genuine part is guaranteed by Toyota's factory warranty.


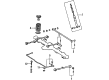
2005 Toyota 4Runner Shock Absorber, Rear Driver Side
Part Number: 48540-39445$420.17 MSRP: $615.76You Save: $195.59 (32%)Ships in 1-3 Business DaysProduct Specifications- Other Name: Absorber Assembly, Shock; Rear Left Shock Absorber; Suspension Kit; Strut Assembly; Shock Set; Strut Kit.; Absorber Assembly, Shock, Rear Driver Side
- Position: Rear Driver Side
- Part Name Code: 48540
- Item Weight: 7.40 Pounds
- Item Dimensions: 26.4 x 6.6 x 5.9 inches
- Condition: New
- Fitment Type: Direct Replacement
- SKU: 48540-39445
- Warranty: This genuine part is guaranteed by Toyota's factory warranty.


2005 Toyota 4Runner Shock Absorber, Rear Driver Side
Part Number: 48540-39455$404.96 MSRP: $593.47You Save: $188.51 (32%)Ships in 1-3 Business DaysProduct Specifications- Other Name: Absorber Assembly, Shock; Rear Left Shock Absorber; Suspension Kit; Strut Assembly; Shock Set; Strut Kit.; Shock; Absorber Assembly, Shock, Rear Driver Side
- Position: Rear Driver Side
- Part Name Code: 48540
- Item Weight: 6.90 Pounds
- Item Dimensions: 25.6 x 6.8 x 5.7 inches
- Condition: New
- Fitment Type: Direct Replacement
- SKU: 48540-39455
- Warranty: This genuine part is guaranteed by Toyota's factory warranty.

2005 Toyota 4Runner Shock Absorber, Rear Passenger Side
Part Number: 48530-80089$416.42 MSRP: $610.27You Save: $193.85 (32%)Ships in 1-3 Business DaysProduct Specifications- Other Name: Absorber Assembly, Shock; Rear Right Shock Absorber; Suspension Kit; Strut Assembly; Shock Set; Strut Kit; Shock; Absorber Assembly, Shock, Rear Passenger Side
- Position: Rear Passenger Side
- Part Name Code: 48530
- Item Weight: 6.50 Pounds
- Item Dimensions: 26.4 x 6.7 x 5.7 inches
- Condition: New
- Fitment Type: Direct Replacement
- SKU: 48530-80089
- Warranty: This genuine part is guaranteed by Toyota's factory warranty.
2005 Toyota 4Runner Shock Absorber, Front Driver Side
Part Number: 48520-39875$225.42 MSRP: $321.85You Save: $96.43 (30%)Ships in 1-3 Business DaysProduct Specifications- Other Name: Absorber Set, Front Left-Hand; Suspension Shock/Strut Kit; Complete Strut; Absorber Assembly, Shock, Front Driver Side
- Position: Front Driver Side
- Replaces: 48520-39525
- Part Name Code: 48520
- Item Weight: 10.00 Pounds
- Item Dimensions: 26.9 x 8.4 x 7.6 inches
- Condition: New
- Fitment Type: Direct Replacement
- SKU: 48520-39875
- Warranty: This genuine part is guaranteed by Toyota's factory warranty.
- Product Specifications
- Other Name: Absorber Assembly, Shock; Rear Right Shock Absorber; Suspension Kit; Strut Assembly; Shock Set; Strut Kit; Shock; Absorber Assembly, Shock, Rear Passenger Side
- Position: Rear Passenger Side
- Part Name Code: 48530
- Item Weight: 7.10 Pounds
- Item Dimensions: 26.1 x 6.8 x 5.8 inches
- Condition: New
- Fitment Type: Direct Replacement
- SKU: 48530-80090
- Warranty: This genuine part is guaranteed by Toyota's factory warranty.
2005 Toyota 4Runner Shock Absorber
Looking for affordable OEM 2005 Toyota 4Runner Shock Absorber? Explore our comprehensive catalogue of genuine 2005 Toyota 4Runner Shock Absorber. All our parts are covered by the manufacturer's warranty. Plus, our straightforward return policy and speedy delivery service ensure an unparalleled shopping experience. We look forward to your visit!
2005 Toyota 4Runner Shock Absorber Parts Q&A
- Q: How to overhaul the front shock absorber with coil spring on 2005 Toyota 4Runner?A: Please initiate front shock absorber with coil spring overhaul by first taking off the front disc wheel before breaking the front stabilizer link assembly apart on each side through hexagon (6 mm) wrench nut removal and steering knuckle detachment. The first step includes taking out the front shock absorber with coil spring after front stabilizer bracket removal of the stabilizer bar. You will need to remove all necessary bolts along with nuts and washers throughout the process. When working on models without REAS it is essential to loosen the nut while disconnecting the tube yet preserve the absorber hoses and flare nuts in their position. When removing the shock absorbers from vehicles equipped with REAS you should raise the vehicle to stretch the shocks prior to starting the task. The removal process for the front shock absorber nut requires Special Service Tool: 09727-30021 (09727-00010, 09727-00031), 09727-00060 with precision to compress the coil spring but avoid using an impact wrench for this step. Next conduct the removal process on the front suspension support sub-assembly together with the front coil spring following the removal of shock absorber cushion retainers and cushions. The task requires Special Service Tool: 09710-22021 (09710-01071, 09710-01081) and a press to both remove and install the absorber bush. Inspect the shock absorber assembly to check for any irregular resistance when tested and change it if signs exist. Use the special service tool to connect and compress the new absorber bush with the front coil spring before installation. The shock absorber assembly turns back to service by putting the cushions in place followed by suspension support installation and support nut torquing to 25 Nm with no use of impact tools. Fitting initially adjust the front shock absorber with coil spring by having the coil spring bottom face the rear of the vehicle before completing final component tightening according to specified torque specifications. Bounce the vehicle to stabilize the suspension before you check and adjust the front wheel alignment if necessary. To dispose of shock absorber assemblies, first extend the piston rod until it reaches the maximum position before securing it. Then use a drill to puncture the gas chamber while protecting the drill from flying debris. Before disposal of models with REAS the operator needs to follow protocol by slow nut rotation to let oil and pressure dissipate.
Related 2005 Toyota 4Runner Parts
 2005 Toyota 4Runner CV Boot
 2005 Toyota 4Runner Coil Springs
 2005 Toyota 4Runner Steering Knuckle
 2005 Toyota 4Runner Sway Bar Link
 2005 Toyota 4Runner Alignment Bolt
 2005 Toyota 4Runner Axle Shaft
 2005 Toyota 4Runner Bump Stop
 2005 Toyota 4Runner Lateral Link
 2005 Toyota 4Runner Ride Height Sensor
 2005 Toyota 4Runner Shock And Strut Mount
 2005 Toyota 4Runner Strut Housing
 2005 Toyota 4Runner Sway Bar Bushing