×
ToyotaParts- Hello
- Login or Register
- Quick Links
- Live Chat
- Track Order
- Parts Availability
- RMA
- Help Center
- Contact Us
- Shop for
- Toyota Parts
- Scion Parts
My Garage
My Account
Cart
OEM 2004 Toyota 4Runner Shock Absorber
Suspension Shock Absorber- Select Vehicle by Model
- Select Vehicle by VIN
Select Vehicle by Model
orMake
Model
Year
Select Vehicle by VIN
For the most accurate results, select vehicle by your VIN (Vehicle Identification Number).
11 Shock Absorbers found


2004 Toyota 4Runner Shock Absorber
Part Number: 48530-80371$66.35 MSRP: $93.13You Save: $26.78 (29%)Ships in 1-3 Business DaysProduct Specifications- Other Name: Absorber Set, Shock; Rear Shock Absorber; Suspension Kit; Strut Assembly; Complete Strut; Shock; Absorber Assembly, Shock, Rear Passenger Side; Absorber Assembly, Shock, Rear Driver Side
- Manufacturer Note: MARK 48530-35072
- Replaces: 48530-80299, 48530-80087
- Item Weight: 1.40 Pounds
- Item Dimensions: 25.6 x 6.6 x 5.9 inches
- Condition: New
- Fitment Type: Direct Replacement
- SKU: 48530-80371
- Warranty: This genuine part is guaranteed by Toyota's factory warranty.

2004 Toyota 4Runner Shock Absorber
Part Number: 48530-80372$65.16 MSRP: $91.47You Save: $26.31 (29%)Ships in 1-2 Business DaysProduct Specifications- Other Name: Absorber Set, Shock; Rear Shock Absorber; Suspension Kit; Strut Assembly; Complete Strut; Shock; Absorber Assembly, Shock, Rear Passenger Side; Absorber Assembly, Shock, Rear Driver Side
- Manufacturer Note: MARK 48530-35082
- Replaces: 48530-80300, 48530-80088
- Item Weight: 1.40 Pounds
- Item Dimensions: 26.4 x 6.8 x 5.9 inches
- Condition: New
- Fitment Type: Direct Replacement
- SKU: 48530-80372
- Warranty: This genuine part is guaranteed by Toyota's factory warranty.


2004 Toyota 4Runner Shock Absorber
Part Number: 48510-69675$164.96 MSRP: $233.52You Save: $68.56 (30%)Ships in 1-3 Business DaysProduct Specifications- Other Name: Absorber Assembly, Shock; Suspension Shock Absorber; Shock; Strut
- Replaces: 48510-80269, 48510-80086, 48510-80533, 48510-80329, 48510-80270, 48510-69525, 48510-69555, 48510-80087, 48510-80328
- Item Weight: 5.70 Pounds
- Item Dimensions: 26.6 x 8.5 x 7.7 inches
- Condition: New
- SKU: 48510-69675
- Warranty: This genuine part is guaranteed by Toyota's factory warranty.


2004 Toyota 4Runner Shock Absorber, Front Passenger Side
Part Number: 48510-80230$231.94 MSRP: $331.16You Save: $99.22 (30%)Ships in 1 Business DayProduct Specifications- Other Name: Absorber Set, Front Right-Hand; Suspension Shock/Strut Kit; Complete Strut; Strut; Absorber Assembly, Shock, Front Passenger Side
- Position: Front Passenger Side
- Replaces: 48510-80089
- Part Name Code: 48510
- Item Weight: 9.60 Pounds
- Item Dimensions: 27.1 x 8.5 x 7.4 inches
- Condition: New
- Fitment Type: Direct Replacement
- SKU: 48510-80230
- Warranty: This genuine part is guaranteed by Toyota's factory warranty.


2004 Toyota 4Runner Shock Absorber, Front Passenger Side
Part Number: 48510-80229$231.94 MSRP: $331.16You Save: $99.22 (30%)Ships in 1-3 Business DaysProduct Specifications- Other Name: Absorber Set, Front Right-Hand; Suspension Shock/Strut Kit; Complete Strut; Absorber Assembly, Shock, Front Passenger Side
- Position: Front Passenger Side
- Replaces: 48510-80088
- Part Name Code: 48510
- Item Weight: 9.30 Pounds
- Item Dimensions: 26.4 x 8.5 x 7.7 inches
- Condition: New
- Fitment Type: Direct Replacement
- SKU: 48510-80229
- Warranty: This genuine part is guaranteed by Toyota's factory warranty.


2004 Toyota 4Runner Shock Absorber, Front Driver Side
Part Number: 48520-39885$225.42 MSRP: $321.85You Save: $96.43 (30%)Ships in 1 Business DayProduct Specifications- Other Name: Absorber Set, Front Left-Hand; Suspension Shock/Strut Kit; Complete Strut; Strut; Absorber Assembly, Shock, Front Driver Side
- Position: Front Driver Side
- Replaces: 48520-39535
- Part Name Code: 48520
- Item Weight: 9.70 Pounds
- Item Dimensions: 27.1 x 8.4 x 7.7 inches
- Condition: New
- Fitment Type: Direct Replacement
- SKU: 48520-39885
- Warranty: This genuine part is guaranteed by Toyota's factory warranty.


2004 Toyota 4Runner Shock Absorber, Rear Driver Side
Part Number: 48540-39445$420.17 MSRP: $615.76You Save: $195.59 (32%)Ships in 1-3 Business DaysProduct Specifications- Other Name: Absorber Assembly, Shock; Rear Left Shock Absorber; Suspension Kit; Strut Assembly; Shock Set; Strut Kit.; Absorber Assembly, Shock, Rear Driver Side
- Position: Rear Driver Side
- Part Name Code: 48540
- Item Weight: 7.40 Pounds
- Item Dimensions: 26.4 x 6.6 x 5.9 inches
- Condition: New
- Fitment Type: Direct Replacement
- SKU: 48540-39445
- Warranty: This genuine part is guaranteed by Toyota's factory warranty.


2004 Toyota 4Runner Shock Absorber, Rear Driver Side
Part Number: 48540-39455$404.96 MSRP: $593.47You Save: $188.51 (32%)Ships in 1-3 Business DaysProduct Specifications- Other Name: Absorber Assembly, Shock; Rear Left Shock Absorber; Suspension Kit; Strut Assembly; Shock Set; Strut Kit.; Shock; Absorber Assembly, Shock, Rear Driver Side
- Position: Rear Driver Side
- Part Name Code: 48540
- Item Weight: 6.90 Pounds
- Item Dimensions: 25.6 x 6.8 x 5.7 inches
- Condition: New
- Fitment Type: Direct Replacement
- SKU: 48540-39455
- Warranty: This genuine part is guaranteed by Toyota's factory warranty.

2004 Toyota 4Runner Shock Absorber, Rear Passenger Side
Part Number: 48530-80089$416.42 MSRP: $610.27You Save: $193.85 (32%)Ships in 1-3 Business DaysProduct Specifications- Other Name: Absorber Assembly, Shock; Rear Right Shock Absorber; Suspension Kit; Strut Assembly; Shock Set; Strut Kit; Shock; Absorber Assembly, Shock, Rear Passenger Side
- Position: Rear Passenger Side
- Part Name Code: 48530
- Item Weight: 6.50 Pounds
- Item Dimensions: 26.4 x 6.7 x 5.7 inches
- Condition: New
- Fitment Type: Direct Replacement
- SKU: 48530-80089
- Warranty: This genuine part is guaranteed by Toyota's factory warranty.
2004 Toyota 4Runner Shock Absorber, Front Driver Side
Part Number: 48520-39875$225.42 MSRP: $321.85You Save: $96.43 (30%)Ships in 1-3 Business DaysProduct Specifications- Other Name: Absorber Set, Front Left-Hand; Suspension Shock/Strut Kit; Complete Strut; Absorber Assembly, Shock, Front Driver Side
- Position: Front Driver Side
- Replaces: 48520-39525
- Part Name Code: 48520
- Item Weight: 10.00 Pounds
- Item Dimensions: 26.9 x 8.4 x 7.6 inches
- Condition: New
- Fitment Type: Direct Replacement
- SKU: 48520-39875
- Warranty: This genuine part is guaranteed by Toyota's factory warranty.
- Product Specifications
- Other Name: Absorber Assembly, Shock; Rear Right Shock Absorber; Suspension Kit; Strut Assembly; Shock Set; Strut Kit; Shock; Absorber Assembly, Shock, Rear Passenger Side
- Position: Rear Passenger Side
- Part Name Code: 48530
- Item Weight: 7.10 Pounds
- Item Dimensions: 26.1 x 6.8 x 5.8 inches
- Condition: New
- Fitment Type: Direct Replacement
- SKU: 48530-80090
- Warranty: This genuine part is guaranteed by Toyota's factory warranty.
2004 Toyota 4Runner Shock Absorber
Looking for affordable OEM 2004 Toyota 4Runner Shock Absorber? Explore our comprehensive catalogue of genuine 2004 Toyota 4Runner Shock Absorber. All our parts are covered by the manufacturer's warranty. Plus, our straightforward return policy and speedy delivery service ensure an unparalleled shopping experience. We look forward to your visit!
2004 Toyota 4Runner Shock Absorber Parts Q&A
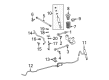
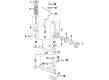
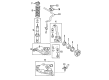
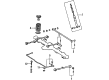
- Q: How to replace the Shock Absorber Assembly Rear LH (W/ REAS) on 2004 Toyota 4Runner?A: The replacement procedure for Shock Absorber Assembly Rear LH (W/ REAS) requires enforcing all necessary Service Precautions. The first step is to eliminate the rear wheel along with the rear stabilizer link assembly. Disconnection of the shock absorber assembly rear LH starts with bolt and bracket removal and proceeds by using a spanner to stabilize the bracket before removing the joint. Ensure that shock absorbers extend to their recommended normal suspension position. Remove the bolt to disconnect the shock absorber assembly rear LH from the rear axle housing yet maintain the axle housing on a support until reaching the normal suspension extension point. Fully extend the shock absorber rod and then remove and hold the body part to carry the assembly by taking out a nut using wrenches and retainer and shock absorber assembly rear LH and cushion No.1. You must remove the lower bracket from the shock absorber assembly that operates on the left-hand side of the rear position. Attach the lower bracket to shock absorber assembly rear LH before following the installation steps in order to install the cushion retainer, cushion No. 1, and the assembly with the nut and torque it to 25 Nm (255 kgf-cm, 18 ft. lbs.). Set up the shock absorber assembly rear LH in a way that its positioning protrusion enters the frame bracket hole and attach the hose from the front side. One should first mount the shock absorber assembly rear LH with its bolt and then fit the bracket with its bolt afterward tightening it to 29 Nm (296 kgf-cm, 21 ft. lbs.). A spanner should maintain bracket steadiness when installing the joint with a tightening process to create 1 mm (0.04 inch) gap spacing at a reference torque of 25 Nm (255 kgf-cm, 18 ft. lbs.). Install the rear wheel followed by the rear stabilizer link assembly with a torques of 112 Nm (1,137 kgf-cm, 83 ft. lbs.). First stabilize the suspension with vehicle jacking while performing several bounce tests. Check for fluid leaks while the bolt of the shock absorber assembly rear LH reaches full torque at 98 Nm (1,000 kgf-cm, 72 ft. lbs.). The shock absorber assembly bolt of the rear LH needs to be loosened before draining its absorber oil during disposal.
Related 2004 Toyota 4Runner Parts
 2004 Toyota 4Runner CV Boot
 2004 Toyota 4Runner Coil Springs
 2004 Toyota 4Runner Steering Knuckle
 2004 Toyota 4Runner Sway Bar Link
 2004 Toyota 4Runner Alignment Bolt
 2004 Toyota 4Runner Axle Shaft
 2004 Toyota 4Runner Bump Stop
 2004 Toyota 4Runner Lateral Link
 2004 Toyota 4Runner Ride Height Sensor
 2004 Toyota 4Runner Shock And Strut Mount
 2004 Toyota 4Runner Strut Housing
 2004 Toyota 4Runner Sway Bar Bushing