×
ToyotaParts- Hello
- Login or Register
- Quick Links
- Live Chat
- Track Order
- Parts Availability
- RMA
- Help Center
- Contact Us
- Shop for
- Toyota Parts
- Scion Parts
My Garage
My Account
Cart
OEM Toyota Echo Coil Springs
Strut Spring- Select Vehicle by Model
- Select Vehicle by VIN
Select Vehicle by Model
orMake
Model
Year
Select Vehicle by VIN
For the most accurate results, select vehicle by your VIN (Vehicle Identification Number).
9 Coil Springs found


Toyota Echo Coil Spring, Rear Part Number: 48231-52040
$104.51 MSRP: $146.69You Save: $42.18 (29%)Ships in 1-3 Business Days


Toyota Echo Coil Spring, Rear Part Number: 48231-52720
$105.69 MSRP: $148.35You Save: $42.66 (29%)Ships in 1-3 Business Days
Toyota Echo Coil Spring, Front Part Number: 48131-52670
$87.03 MSRP: $122.16You Save: $35.13 (29%)Ships in 1-3 Business DaysToyota Echo Coil Spring, Front Part Number: 48131-52020
$87.41 MSRP: $122.69You Save: $35.28 (29%)Ships in 1-3 Business DaysToyota Echo Coil Spring, Front Part Number: 48131-52080
$88.03 MSRP: $123.58You Save: $35.55 (29%)Ships in 1-3 Business DaysToyota Echo Coil Spring, Front Part Number: 48131-52660
$90.55 MSRP: $127.10You Save: $36.55 (29%)Ships in 1-3 Business DaysToyota Echo Coil Spring, Front Part Number: 48131-52320
$92.68 MSRP: $130.10You Save: $37.42 (29%)Ships in 1-3 Business DaysToyota Echo Coil Spring, Front Part Number: 48131-52620
$107.47 MSRP: $150.85You Save: $43.38 (29%)Ships in 1-3 Business Days
Toyota Echo Coil Spring, Rear Part Number: 48231-52060
$112.21 MSRP: $157.50You Save: $45.29 (29%)
Toyota Echo Coil Springs
Choose genuine Coil Springs that pass strict quality control tests. You can trust the top quality and lasting durability. Shopping for OEM Coil Springs for your Toyota Echo? Our website is your one-stop destination. We stock an extensive selection of genuine Toyota Echo parts. The price is affordable so you can save more. It only takes minutes to browse and find the exact fit. Easily add to cart and check out fast. Our hassle-free return policy will keep you stress-free. We process orders quickly for swift delivery. Your parts will arrive faster, so you can get back on the road sooner.
Toyota Echo Coil Springs Parts and Q&A
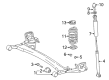
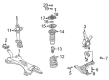
- Q: How to remove and install the coil springs and associated components on Toyota Echo?A:The coil spring removal process begins by taking out the rear wheels before undoing the package tray trim by removing both the high-mounted stop light and its 2 clips. First remove the rear seat by unmounting the rear seat cushion and seatback and by taking off the 2 bolts and seatback side hinge from a split type rear seat model. The next step requires removal of both the door scuff plate and door opening trim but before that unstuck the quarter trim by disassembling the bolt and rear seat outer belt. When working on the roof side inner garnish of a 2-door vehicle you should first disconnect the front seat outer belt shoulder anchor then remove the bolt before removing the garnish. After taking out the room partition board begin supporting the rear axle beam through jacks installed at both sides. Start by holding the piston rod and uninstalling the 2 nuts which will expose the washer and upper suspension support before unfastening the Shock Absorber nut and washer and finishing by taking off the lower suspension support. First disconnect the lower side set nut from the shock absorber located on the opposite side and then remove the washer. After lowering the jacks slowly, you can remove the coil spring together with its upper and lower insulators. The shock absorber rod needs compression and extension for inspection to detect abnormal resistance or unusual sounds so the shock absorber should be replaced if problems are discovered. Before disposing of the shock absorber extend the rod completely and drill a hole into the cylinder to release the gas inside while taking precautions against flying chips and understanding that the gas is non-poisonous and colorless and odorless. Start shock absorber installation by positioning the upper insulator to meet the coil spring end and then add both lower insulator and coil spring to the axle beam. Both shock absorbers should be attached to the axle beam during the jack lift with washers and nuts under 49 Nm (500 kgf-cm, 36 ft. lbs.) torque following suspension stabilization. After installing the lower suspension support to the shock absorber you must place the upper suspension support with washer on the body while holding the piston rod to position it 15-18 mm (0.591-0.709 inch) below the lower nut before torquing both nuts to 25 Nm (250 kgf-cm, 18 ft.-lbs.). The procedure includes removing jacks and following with the room partition board installation before moving to the roof side inner garnish then the front seat outer belt shoulder anchor with bolt torqued to 41 Nm (420 kgf-cm, 30 ft. lbs.) specific to the 2-door model. Proceed by installing the quarter trim and rear seat outer belt using the provided bolt while torquing them both to 41 Nm (420 kgf-cm, 30 ft. lbs.). After placing the rear seat install the seatback side hinge with its two bolts torqued to 37 Nm (380 kgf-cm, 27 ft. lbs.) before laying the rear seat cushion and seatback. Utilize the package tray trim along with rear wheels for installation before securing them by torquing wheels to 103 Nm (1,050 kgf-cm, 76 ft. lbs.).

Related Toyota Echo Parts
 Toyota Echo Axle Beam Mount
 Toyota Echo Bump Stop
 Toyota Echo Camber and Alignment Kit
 Toyota Echo Coil Spring Insulator
 Toyota Echo Crossmember Bushing
 Toyota Echo Front Cross-Member
 Toyota Echo Shock Absorber
 Toyota Echo Shock and Strut Boot
 Toyota Echo Steering Knuckle
 Toyota Echo Strut Mounts
 Toyota Echo Sway Bars
 Toyota Echo Trailing Arm Bushing