×
ToyotaParts- Hello
- Login or Register
- Quick Links
- Live Chat
- Track Order
- Parts Availability
- RMA
- Help Center
- Contact Us
- Shop for
- Toyota Parts
- Scion Parts
My Garage
My Account
Cart
OEM 2005 Toyota Echo Coil Springs
Strut Spring- Select Vehicle by Model
- Select Vehicle by VIN
Select Vehicle by Model
orMake
Model
Year
Select Vehicle by VIN
For the most accurate results, select vehicle by your VIN (Vehicle Identification Number).
3 Coil Springs found


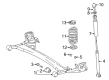
2005 Toyota Echo Coil Spring, Rear
Part Number: 48231-52720$102.61 MSRP: $144.03You Save: $41.42 (29%)Ships in 1-3 Business DaysProduct Specifications- Other Name: Spring, Coil, Rear; Coil Spring, Rear; Coil Springs; Spring; Spring, Coil, Rear Passenger Side; Spring, Coil, Rear Driver Side
- Position: Rear
- Item Weight: 4.30 Pounds
- Item Dimensions: 17.2 x 10.7 x 5.7 inches
- Condition: New
- Fitment Type: Direct Replacement
- SKU: 48231-52720
- Warranty: This genuine part is guaranteed by Toyota's factory warranty.

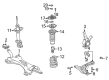
2005 Toyota Echo Coil Spring, Front
Part Number: 48131-52620$107.47 MSRP: $150.85You Save: $43.38 (29%)Ships in 1-3 Business DaysProduct Specifications- Other Name: Spring, Coil, Front; Coil Spring, Front; Coil Springs; Spring; Spring, Front Coil, Passenger Side; Spring, Front Coil, Driver Side
- Position: Front
- Item Weight: 6.90 Pounds
- Item Dimensions: 15.5 x 7.1 x 5.8 inches
- Condition: New
- Fitment Type: Direct Replacement
- SKU: 48131-52620
- Warranty: This genuine part is guaranteed by Toyota's factory warranty.
2005 Toyota Echo Coil Spring, Front
Part Number: 48131-52660$90.55 MSRP: $127.10You Save: $36.55 (29%)Ships in 1-3 Business DaysProduct Specifications- Other Name: Spring, Coil, Front; Coil Spring, Front; Coil Springs; Spring; Spring, Front Coil, Passenger Side; Spring, Front Coil, Driver Side
- Position: Front
- Replaces: 48131-52680
- Item Weight: 6.90 Pounds
- Item Dimensions: 15.5 x 7.0 x 5.7 inches
- Condition: New
- Fitment Type: Direct Replacement
- SKU: 48131-52660
- Warranty: This genuine part is guaranteed by Toyota's factory warranty.
2005 Toyota Echo Coil Springs
Looking for affordable OEM 2005 Toyota Echo Coil Springs? Explore our comprehensive catalogue of genuine 2005 Toyota Echo Coil Springs. All our parts are covered by the manufacturer's warranty. Plus, our straightforward return policy and speedy delivery service ensure an unparalleled shopping experience. We look forward to your visit!
2005 Toyota Echo Coil Springs Parts Q&A
- Q: How to remove and install the coil springs on 2005 Toyota Echo?A: The coil spring removal process begins by removing the rear wheels before taking out the package tray trim through removal of the high-mounted stop light and its associated 2 clips. To begin disassembly of the coil spring first remove the rear seat by extracting the rear seat cushion and seatback. Additionally remove the two bolts on split type rear seats and their side hinge. Start by removing the door scuff plate and door opening trim then proceed to take off the quarter trim by dislodging its bolt and removing the rear seat outer belt. To access the roof side inner garnish on a 2-door vehicle you must first disconnect the front seat outer belt shoulder anchor before the bolt removal and garnish removal. Initiate board removal from the room partition and secure the rear axle beam on each side with jacks. Use the piston rod to hold the frame and remove two nuts leading to the washer followed by upper suspension support before taking off the shock absorber nut and washer and ending in lower suspension support removal. First disconnect the lower side set nut with washer from the opposite shock absorber before lowering jacks gradually to remove the coil spring along its upper and lower insulators. Inspection requires compressing the shock absorber rod for detecting abnormal resistance or unusual sounds; if you find issues the shock absorber requires replacement. The shock absorber disposal includes extending the rod to full length before making a hole in the cylinder for gas discharge while maintaining chip safety and acknowledging gas inertia as colorless odorless and not poisonous. The first step is to install the coil spring by placing the upper insulator against its terminal then installing the lower insulator combined with the coil spring onto the axle beam. You should then connect the shock absorbers to the axle beam under the jacks while using washers and nuts before torquing them to 49 Nm (500 kgf-cm, 36 ft. lbs.). Wait until the suspension becomes stable before torquing the nuts. The installation starts by placing the lower support for suspension onto the shock absorber along with the upper support combined with a washer attaching to the body. While maintaining grip on the piston rod install the lower nut so the rod extends beyond the lower nut by 15 - 18 mm (0.591 - 0.709 inch) before torquing up the upper nut against the lower nut to 25 Nm (250 kgf-cm, 18 ft. lbs.). Reinstall the room partition board followed by the roof side inner garnish but ensure the front seat outer belt shoulder anchor installation with its bolt on two-door vehicles receives a 41 Nm (420 kgf-cm, 30 ft. lbs.) torque. The Quarter Trim and rear seat outer belt require installation with their bolt along with torque to 41 Nm (420 kgf-cm, 30 ft. lbs.). The second stage of installation begins with the door opening trim and door scuff plate before moving to the rear seat attachment process including proper application of the two seatback side hinge bolts secured at 37 Nm (380 kgf-cm, 27 ft. lbs.). After completing the seatback assembly, complete the installation with rear seat cushion and seatback. The last step requires installation of package tray trim and rear wheels which should be torqued to 103 Nm (1,050 kgf-cm, 76 ft. lbs.).
Related 2005 Toyota Echo Parts
 2005 Toyota Echo Control Arm
 2005 Toyota Echo Bump Stop
 2005 Toyota Echo Coil Spring Insulator
 2005 Toyota Echo Control Arm Bolt
 2005 Toyota Echo Control Arm Bushing
 2005 Toyota Echo Front Cross-Member
 2005 Toyota Echo Shock Absorber
 2005 Toyota Echo Shock And Strut Mount
 2005 Toyota Echo Steering Knuckle
 2005 Toyota Echo Sway Bar Bracket
 2005 Toyota Echo Sway Bar Bushing
 2005 Toyota Echo Sway Bar Kit