×
ToyotaParts- Hello
- Login or Register
- Quick Links
- Live Chat
- Track Order
- Parts Availability
- RMA
- Help Center
- Contact Us
- Shop for
- Toyota Parts
- Scion Parts
My Garage
My Account
Cart
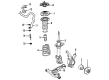
OEM Toyota Echo Sway Bar Kit
Stabilizer Sway Bar Set- Select Vehicle by Model
- Select Vehicle by VIN
Select Vehicle by Model
orMake
Model
Year
Select Vehicle by VIN
For the most accurate results, select vehicle by your VIN (Vehicle Identification Number).
2 Sway Bar Kits found

Toyota Echo Stabilizer Bar, Front
Part Number: 48811-52090$140.17 MSRP: $198.43You Save: $58.26 (30%)Ships in 1-3 Business DaysToyota Echo Stabilizer Bar, Front
Part Number: 48811-52031$103.88 MSRP: $145.82You Save: $41.94 (29%)Ships in 1-3 Business Days
Toyota Echo Sway Bar Kit
Choose genuine Sway Bar Kit that pass strict quality control tests. You can trust the top quality and lasting durability. Shopping for OEM Sway Bar Kit for your Toyota Echo? Our website is your one-stop destination. We stock an extensive selection of genuine Toyota Echo parts. The price is affordable so you can save more. It only takes minutes to browse and find the exact fit. Easily add to cart and check out fast. Our hassle-free return policy will keep you stress-free. We process orders quickly for swift delivery. Your parts will arrive faster, so you can get back on the road sooner.
Toyota Echo Sway Bar Kit Parts and Q&A
- Q: How to remove and install the Sway Bar Kit and related components on Toyota Echo?A:The sway bar kit removal process begins by uninstalling the front wheels followed by uninstalling sway bar links through link gripping while taking off the 2 nuts, 5 retainers and 4 cushions before repeating the procedure on the opposite side. Using Special Service Tool: 09628-62011 disconnect the tie rod ends from the steering knuckles after removing the cotter pin and nut. The same process needs to be done on the other side. The steering knuckle connection to lower suspension arms requires unfastening the clip and removing the nut before employing Special Service Tool: 09628-00011 (09628-00030, 09628-00040, 09628-00050) to complete the procedure on both sides. Position the engine hood in a safe spot before attaching the engine sling device to engine hangers through the removal of a bolt and installation of 2 alignment-hoist hook parts numbered 1 (Parts No.: No. 1 engine hanger: 12281-21010, Bolt: 91511-60818). Secure the hanger system of No. 1 engine (Parts No.: No. 1 engine hanger: 12281-21010, Bolt: 91511-60818) using 40 Nm (400 kgf.cm, 29 ft. lbs.) torque before attaching the engine chain hoist to the hangers. To disconnect the engine's rear mount, remove the bolt combined with 2 nuts from the mount while also removing the sliding yoke and disconnecting the power steering pressure feed and return tubes before you detach the tube clamp using a bolt. Use a transmission jack to support the lower suspension member when removing its 4 bolts to lower it before proceeding with sway bar kit removal through 4 bolt disconnection of 2 brackets and bushings along with the sway bar kit. Begin installation of the sway bar kit by first inserting its two bushings along with brackets and four bolts until torque reaches 19 Nm (190 kgf.cm, 14 ft. lbs). Make sure the bushings face the exterior of paint lines. The suspension member installation requires the 09670-00010 Special Service Tool to orientate the holes first before attaching the four bolts. Torque these bolts to 70 Nm for Bolt A followed by Bolt B receiving a torque of 116 Nm. The power steering system requires installation of tube clamp and bolt with 7.8 Nm (80 kgf.cm, 69 inch lbs.) torque followed by connecting pressure feed and return tubes. After connecting the sliding yoke to the engine rear mount using the bolt and 2 nuts then torquing them to 80 Nm (810 kgf.cm, 59 ft. lbs.), proceed to discharge the engine sling device and install the engine hood. Fasten the steering knuckles to lower suspension arms with the nut that requires 98 Nm (1,000 kgf.cm, 72 ft. lbs.) torque and follow by placing a new clip. Additional tightening of the nut to 60 degrees is necessary for unaligned holes before doing the same on the opposite side. The tie rod ends should be fastened to steering knuckles using a nut tightened to 49 Nm (500 kgf.cm, 36 ft. lbs.). Enable the installation of a new cotter pin while torquing the nut up to meet 60 degrees alignment if needed and proceed with the same procedure on the opposite side. The sway bar links require four cushions along with five retainers before installation of the two nuts torqued to 18 Nm (180 kgf.cm, 13 ft. lbs.). Front wheels should be torqued to 103 Nm (1,050 kgf.cm, 76 ft. lbs.) during installation.
- Q: How to service and repair the Sway Bar Kit on Toyota Echo?A:Start sway bar kit servicing by taking out the front tires and sway bar links before holding the link to remove 2 nuts and 5 retainers and 4 cushions and the link assembly from both sides. Disconnect the steering knuckles from tie rod ends through a process including the removal of the cotter pin and nut followed by the use of Special Service Tool: 09628-62011 to disconnect the tie rod end that is then repeated for the other side. The process next requires removal of the clip and nut from the lower suspension arms before using Special Service Tool: 09628-00011 (09628-00030, 09628-00040, 09628-00050) to disconnect the steering knuckle while repeating the procedure for the second side. After removing the hood you must fit the engine sling device to engine hangers by unbolting Part No.: 91511-60818 together with the 2 No. 1 engine hangers (Parts No.: No. 1 engine hanger: 12281-21010). Attach the 2 No. 1 engine hangers (Parts No.: No. 1 engine hanger: 12281-21010, Bolt: 91511-60818) to the engine with a torque of 40 Nm (400 kgf-cm, 29 ft. lbs.) After installing hangers, attach the engine chain hoist to them while avoiding suspension from any other section or part of the engine. Begin by disconnecting the engine rear mount through bolt removal and 2 nut removal before separating the sliding yoke and cutting the power steering pressure feed and return tubes apart before removing the bolt which secures the tube clamp. First secure the suspension member with a transmission jack then detach its 4 bolts before lowering the member; finally remove the sway bar kit and 4 bolts together with 2 brackets and double bushings and the bar itself. Installation of the sway bar kit requires 2 bushings and brackets together with 4 bolts to be tightened to 19 Nm (190 kgf-cm, 14 ft. lbs.) while keeping bushings positioned outside paint lines. Install the suspension member using Special Service Tool: 09670-00010 to align the holes, then install it with 4 bolts, torqued to 70 Nm (715 kgf-cm, 52 ft. lbs.) for Bolt A and 116 Nm (1,185 kgf-cm, 86 ft. lbs.) for Bolt B. Connect the tube clamp with the bolt, torqued to 7.8 Nm (80 kgf-cm, 69 inch lbs.), then connect the power steering pressure feed and return tubes, followed by connecting the sliding yoke and the engine rear mount with the bolt and 2 nuts, torqued to 80 Nm (810 kgf-cm, 59 ft. lbs.). First remove the engine sling device before installing the engine hood then connect the lower suspension arms with the steering knuckles while tightening the nut to 98 Nm (1,000 kgf-cm, 72 ft. lbs.). If needed, add a new clip and turn the nut an extra 60 degrees before repeating for the other side. You must connect the tie rod ends to the steering knuckles using a nut torqued to 49 Nm (500 kgf-cm, 36 ft. lbs.). After installing the new cotter pin you should tighten the nut additional 60 degrees as needed before repeating the process on the other side. To complete the installation, connect the sway bar links through the addition of the link and four cushions and five retainers and two nuts which must be tightened to 18 Nm (180 kgf-cm, 13 ft. lbs.) until the front wheels can be installed and torqued to 103 Nm (1,050 kgf-cm, 76 ft. lbs.).

Related Toyota Echo Parts
 Toyota Echo Control Arm
 Toyota Echo Alignment Bolt
 Toyota Echo Bump Stop
 Toyota Echo Coil Spring Insulator
 Toyota Echo Coil Springs
 Toyota Echo Control Arm Bolt
 Toyota Echo Front Cross-Member
 Toyota Echo Shock Absorber
 Toyota Echo Shock And Strut Mount
 Toyota Echo Steering Knuckle
 Toyota Echo Sway Bar Bracket
 Toyota Echo Sway Bar Bushing