×
ToyotaParts- Hello
- Login or Register
- Quick Links
- Live Chat
- Track Order
- Parts Availability
- RMA
- Help Center
- Contact Us
- Shop for
- Toyota Parts
- Scion Parts
My Garage
My Account
Cart
OEM Toyota Corolla Coil Springs
Strut Spring- Select Vehicle by Model
- Select Vehicle by VIN
Select Vehicle by Model
orMake
Model
Year
Select Vehicle by VIN
For the most accurate results, select vehicle by your VIN (Vehicle Identification Number).
139 Coil Springs found


Toyota Corolla Coil Spring, Rear Part Number: 48231-02C90
$60.78 MSRP: $85.31You Save: $24.53 (29%)Ships in 1-3 Business Days

Toyota Corolla Coil Spring, Front Part Number: 48131-02M90
$63.62 MSRP: $89.31You Save: $25.69 (29%)Ships in 1-3 Business Days

Toyota Corolla Spring, Front Part Number: 48131-02M70
$65.99 MSRP: $92.63You Save: $26.64 (29%)Ships in 1-3 Business Days

Toyota Corolla Spring, Front Part Number: 48131-02Y70
$63.62 MSRP: $89.31You Save: $25.69 (29%)Ships in 1-3 Business DaysToyota Corolla Spring, Front Part Number: 48131-02Y30
$62.67 MSRP: $87.97You Save: $25.30 (29%)Ships in 1-3 Business DaysToyota Corolla Coil Spring, Front Part Number: 48131-02M80
$66.94 MSRP: $93.96You Save: $27.02 (29%)Ships in 1-3 Business Days
Toyota Corolla Coil Spring, Rear Part Number: 48231-02V10
$54.00 MSRP: $75.17You Save: $21.17 (29%)Ships in 1-2 Business Days
Toyota Corolla Coil Spring, Rear Part Number: 48231-02V20
$54.96 MSRP: $76.50You Save: $21.54 (29%)Ships in 1-2 Business Days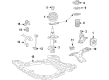
Toyota Corolla Coil Spring, Front Part Number: 48131-0ZB20
$59.02 MSRP: $82.15You Save: $23.13 (29%)Ships in 1-2 Business Days

Toyota Corolla Coil Spring, Front Part Number: 48131-02E50
$57.37 MSRP: $79.86You Save: $22.49 (29%)Ships in 1-3 Business Days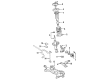
Toyota Corolla Coil Spring, Front Part Number: 48131-02D00
$57.61 MSRP: $80.19You Save: $22.58 (29%)Ships in 1-3 Business Days

Toyota Corolla Spring, Front Part Number: 48131-12L40
$60.07 MSRP: $84.32You Save: $24.25 (29%)Ships in 1-2 Business DaysToyota Corolla Coil Spring, Front Part Number: 48131-12F40
$61.02 MSRP: $85.65You Save: $24.63 (29%)Ships in 1-2 Business DaysToyota Corolla Coil Spring, Front Part Number: 48131-12M50
$63.03 MSRP: $88.47You Save: $25.44 (29%)Ships in 1-2 Business DaysToyota Corolla Coil Spring, Front Part Number: 48131-12M30
$63.03 MSRP: $88.47You Save: $25.44 (29%)Ships in 1-2 Business DaysToyota Corolla Coil Spring, Front Part Number: 48131-02D10
$61.37 MSRP: $86.15You Save: $24.78 (29%)Ships in 1-3 Business DaysToyota Corolla Coil Spring, Front Part Number: 48131-12K71
$61.49 MSRP: $86.31You Save: $24.82 (29%)Ships in 1-2 Business DaysToyota Corolla Coil Spring, Front Part Number: 48131-12F60
$63.39 MSRP: $88.97You Save: $25.58 (29%)Ships in 1-3 Business DaysToyota Corolla Spring, Front Part Number: 48131-02Y40
$61.73 MSRP: $86.65You Save: $24.92 (29%)Ships in 1-3 Business Days


Toyota Corolla Coil Spring, Front Part Number: 48131-1N700
$77.25 MSRP: $108.43You Save: $31.18 (29%)
| Page 1 of 7 |Next >
1-20 of 139 Results
Toyota Corolla Coil Springs
Choose genuine Coil Springs that pass strict quality control tests. You can trust the top quality and lasting durability. Shopping for OEM Coil Springs for your Toyota Corolla? Our website is your one-stop destination. We stock an extensive selection of genuine Toyota Corolla parts. The price is affordable so you can save more. It only takes minutes to browse and find the exact fit. Easily add to cart and check out fast. Our hassle-free return policy will keep you stress-free. We process orders quickly for swift delivery. Your parts will arrive faster, so you can get back on the road sooner.
Toyota Corolla Coil Springs Parts and Q&A
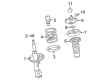
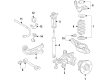
- Q: How to overhaul the front shock absorber with coil springs on Toyota Corolla?A:The overhaul procedure for the front Shock Absorber with coil spring starts with unmounting the front wheel along with front stabilizer link assy LH disconnection through nut removal but if Ball Joint rotation happens with this step then use a hexagon (6 mm) wrench on the stud to prevent this movement. Begin by disconnecting the front flexible hose while taking out the bolt to separate front flexible hose No.1 and Speed Sensor front LH (if ABS equipped) or just remove the front flexible hose if no ABS is present. Extract the front shock absorber with coil spring through the removal of 2 bolts and nuts from its lower sides and 3 nuts from its upper side on the shock absorber assy front LH. Fasten the front shock absorber with coil spring by attaching 2 nuts and a bolt to the bracket at the lower side while maintaining it in a vise position. To remove the front suspension support dust cover LH, utilize Special Service Tool: 09727-30021 along with the correct procedure for compressing the front coil spring LH but refrain from using an impact wrench to protect the tool from damage. Controller 09729-22031 operates on the front coil spring seat upper LH to remove its supporting nut before extracting the assembly that comprises of front suspension support sub-assy LH, front suspension support LH dust seal, front coil spring seat upper LH, front coil spring insulator upper LH, front coil spring LH, front spring bumper LH, and front coil spring insulator lower LH. The shock absorber requires inspection by compressing and extending its rod for signs of irregular resistance or untypical sounds before replacement if problems are detected. The shock absorber installation process starts with placing the front coil spring insulator lower LH onto the shock absorber before adding the front spring bumper LH on top of the piston rod. Install the front coil spring LH while holding it with Special Service Tool: 09727-30021 then place it on the shock absorber such that the lower end reaches the spring lower seat gap. You should first place the front coil spring insulator upper LH onto the system before adding the front coil spring seat upper LH with its mark positioned outward, following it with the front suspension support LH dust seal and front suspension support sub-assy LH. The front coil spring seat upper LH must be held by Special Service Tool: 09729-22031 before installing a new nut at 47 Nm (479 kgf-cm, 35 ft. lbs.) torque. Remove the tool before installing the front suspension support dust cover LH while applying MP grease No.2 into the suspension support sub-assy LH without touching the rubber surface of the upper support. The front shock absorber needs installation with coil spring while using 2 bolts and 3 nuts to create torques of 39 Nm (398 kgf-cm, 29 ft. lbs.) and 153 Nm (1,560 kgf-cm, 113 ft. lbs.). Ensure to stop the bolt from rotation as you torque the nut. The front flexible hose and speed sensor front LH must be installed at a 29 Nm (296 kgf-cm, 21 ft. lbs.) torque when ABD is present or only the hose by itself without the sensor when ABD is not present. Use a hexagon wrench (6 mm) to stabilize the ball joint stud during installation of the front stabilizer link assy LH with appropriate torque of 74 Nm (755 kgf-cm, 55 ft. lbs.). The front tire installation should be completed by tightening it to 103 Nm (1,050 kgf-cm, 76 ft. lbs.) while performing a front wheel alignment check and adjustment.
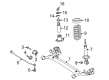
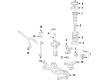
- Q: How to overhaul the rear shock absorber with coil springs on Toyota Corolla?A:You should commence rear Shock Absorber coil spring overhaul by taking away the rear wheel together with the spare wheel cover assembly and rear floor finish plate and luggage compartment trim cover inner LH. Putting a jack under the rear axle beam, remove first the 2 nuts and bolt along with subsequently the nut and washer and shock absorber. The shock absorber assembly rear LH requires Special Service Tool: 09727-30021 to compress the coil spring but the use of impact wrenches should be avoided because they can damage the tool. Use a 6 mm hexagon wrench to hold the piston rod while removing the nut and separate the support plate from the cushion then the spring bracket from the upper insulator along with the suspension support and spring bumper and coil spring. The shock absorber assembly needs inspection when the rod is compressed and extended to verify correct function and sound quality; replace the assembly if issues arise. Insert the shock absorber through the necessary space of the spring lower seat while compressing the coil spring with Special Service Tool: 09727-30021. Then place the coil spring inside the shock absorber and position the lower end into the seat gap. Users should first install the spring bumper and suspension support before positioning the spring bracket with upper insulator according to the illustration. When performing this operation they must ensure symmetry on the RH side. After installing the cushion and support plate temporarily tighten a new center nut with the Special Service Tool: 09727-30021 detached then check the spring bracket direction before securing a new nut while using a 6 mm hexagon wrench to torque the piston rod to 56 Nm (571 kgf-cm, 41 ft. lbs.). First mount the coil spring shock absorber then set its nut and washer loosely before attaching the 2 nuts and bolt and torque them to 80 Nm (816 kgf-cm, 59 ft. lbs.). The suspension stabilization includes putting the rear wheel onto position and lowering the vehicle before bouncing it multiple times. It is essential to fully tighten the rear shock absorber with coil spring nut to reach a torque of 80 Nm (816 kgf-cm, 59 ft. lbs.) before performing the rear wheel alignment inspection. The disposal of shock absorber assembly rear LH requires the shock absorber rod extension and drilling a cylinder hole to discharge internal gas while being watchful of flying chips and remembering that the gas is both colorless and odorless and non-toxic.


Related Toyota Corolla Parts
 Toyota Corolla Shock Absorber
 Toyota Corolla Steering Knuckle
 Toyota Corolla Trailing Arm
 Toyota Corolla Axle Shaft
 Toyota Corolla Bump Stop
 Toyota Corolla Camber and Alignment Kit
 Toyota Corolla Control Arm Bolt
 Toyota Corolla Front Cross-Member
 Toyota Corolla Lateral Link
 Toyota Corolla Suspension Strut Rod
 Toyota Corolla Sway Bar Bushing
 Toyota Corolla Trailing Arm Bushing