×
ToyotaParts- Hello
- Login or Register
- Quick Links
- Live Chat
- Track Order
- Parts Availability
- RMA
- Help Center
- Contact Us
- Shop for
- Toyota Parts
- Scion Parts
My Garage
My Account
Cart
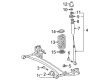
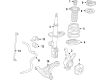
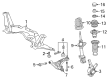
OEM Toyota Yaris Coil Springs
Strut Spring- Select Vehicle by Model
- Select Vehicle by VIN
Select Vehicle by Model
orMake
Model
Year
Select Vehicle by VIN
For the most accurate results, select vehicle by your VIN (Vehicle Identification Number).
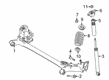
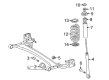
15 Coil Springs found


Toyota Yaris Coil Spring, Rear Part Number: 48231-52C01
$98.58 MSRP: $138.37You Save: $39.79 (29%)Ships in 1-2 Business Days
Toyota Yaris Spring, Rear Part Number: 48231-WB005
$38.01 MSRP: $52.92You Save: $14.91 (29%)Ships in 1-3 Business Days
Toyota Yaris Coil Spring, Rear Part Number: 48231-0D700
$59.48 MSRP: $83.48You Save: $24.00 (29%)Ships in 1-3 Business Days
Toyota Yaris Coil Spring, Front Part Number: 48131-52A52
$74.41 MSRP: $104.44You Save: $30.03 (29%)Ships in 1-3 Business Days
Toyota Yaris Coil Spring, Front Part Number: 48131-WB004
$75.71 MSRP: $106.28You Save: $30.57 (29%)Ships in 1-3 Business DaysToyota Yaris Coil Spring, Front Part Number: 48131-WB003
$76.73 MSRP: $107.70You Save: $30.97 (29%)Ships in 1-3 Business Days
Toyota Yaris Coil Spring, Front Part Number: 48131-52G81
$81.07 MSRP: $113.80You Save: $32.73 (29%)Ships in 1-3 Business DaysToyota Yaris Coil Spring, Front Part Number: 48131-52E11
$89.69 MSRP: $125.90You Save: $36.21 (29%)Ships in 1-3 Business DaysToyota Yaris Coil Spring, Front Part Number: 48131-52E20
$92.89 MSRP: $130.39You Save: $37.50 (29%)Ships in 1-3 Business Days
Toyota Yaris Coil Spring, Rear Part Number: 48231-52A51
$124.89 MSRP: $176.80You Save: $51.91 (30%)Ships in 1-3 Business Days
Toyota Yaris Coil Spring, Front Part Number: 48131-52A40
$79.26 MSRP: $111.27You Save: $32.01 (29%)
Toyota Yaris Coil Spring, Rear Part Number: 48231-WB006
$34.05 MSRP: $47.38You Save: $13.33 (29%)Toyota Yaris Coil Spring, Rear Part Number: 48231-0D681
$59.02 MSRP: $82.15You Save: $23.13 (29%)Toyota Yaris Coil Spring, Front Part Number: 48131-52G52
$75.71 MSRP: $106.27You Save: $30.56 (29%)Toyota Yaris Coil Spring, Rear Part Number: 48231-52F30
$76.66 MSRP: $107.60You Save: $30.94 (29%)
Toyota Yaris Coil Springs
Choose genuine Coil Springs that pass strict quality control tests. You can trust the top quality and lasting durability. Shopping for OEM Coil Springs for your Toyota Yaris? Our website is your one-stop destination. We stock an extensive selection of genuine Toyota Yaris parts. The price is affordable so you can save more. It only takes minutes to browse and find the exact fit. Easily add to cart and check out fast. Our hassle-free return policy will keep you stress-free. We process orders quickly for swift delivery. Your parts will arrive faster, so you can get back on the road sooner.
Toyota Yaris Coil Springs Parts and Q&A
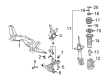
- Q: How to remove the rear coil springs on Toyota Yaris?A:The first step to remove the rear coil springs requires the disconnecting of the negative cable battery terminal. Begin by taking out both the rear seat cushion cover pad sub-assembly along with rear seatback assembly from Sedan Fixed Seat Type vehicles. Empty the brake fluid from the rear wheel then rinse off any paint-contacted brake fluid instantly before proceeding. A screwdriver should be used to free the claw of the connector lock portion until both ends of the skid control sensor wire (w/ ABS) are isolated from the connector lock without causing damage to the wire by removing the cover. Obtain the nut then disconnect the skid control sensor wire. The union nut wrench will allow you to disconnect the rear LH flexible hose from the brake tube before removing the clip and separate the flexible hose from the axle beam. The same approach must be utilized for the rear RH flexible hose component. Leave the two bolts on the rear axle beam in place without breaking their connection. To begin the process remove the rear absorber cap (for Hatchback) followed by removing the rear Shock Absorber caps from both the left and right sides. The removal of rear shock absorbers requires following the identical steps between the right-hand-side and the left-hand-side procedures. The last step entails lowering the jacks slowly and extracting the coil spring with its coil spring insulator upper and coil spring insulator lower before completing the same operation on the rear coil spring RH.
- Q: How to install the front shock absorber with coil springs on Toyota Yaris?A:Before installing the Shock Absorber with coil spring, temporarily tighten a new bolt at No. 2 suspension support. Then attach the front shock absorber onto the steering knuckle by securing it with 2 bolts and 2 nuts using 164 Nm (1,672 kgf-cm, 121 ft-lbf) torque while ensuring bolt stability during nut loosening. Install the flexible hose and Speed Sensor of vehicles with ABS using a bolt but avoid twisting it during installation and torque it to 29 Nm (300 kgf-cm, 22 ft-lbf). Vehicles without ABS can install the flexible hose in the same manner. Position the front stabilizer link assembly followed by installation of a nut before torquing it to 74 Nm (755 kgf-cm, 55 ft-lbf). Use a socket hexagon wrench 6 to steady the stud if the ball joint begins to turn. Tighten the front shock absorber with coil spring by securing its rod with a socket hexagon wrench 6 and applying a torque of 55 Nm (561 kgf-cm, 41 ft-lbf) to the nut. Put in the front suspension support dust cover followed by attaching the outer cowl top panel. The cowl to register duct sub-assembly should be installed on hatchbacks but the front air shutter seal needs to be installed on sedans. Mount the front Wiper Motor unit alongside the link and install the cowl top ventilator louver LH specific to hatchbacks as well as the cowl top ventilator louver sub-assembly required for both hatchbacks and sedans. The installation of the hood to cowl top seal happens first for hatchbacks while sedans need the installation of cowl side ventilator sub-assemblies LH and RH. Both the front wiper arm with blade assemblies LH and RH must be installed for all hatchbacks and sedans after which front wiper arm head caps and cable connection to the negative battery terminal at 5.4 Nm (55 kgf-cm, 48 in-lbf) torque are performed before inspecting and adjusting front wheel alignment.


Related Toyota Yaris Parts
 Toyota Yaris Shock Absorber
 Toyota Yaris Sway Bar Link
 Toyota Yaris Axle Beam Mount
 Toyota Yaris Camber and Alignment Kit
 Toyota Yaris Control Arm Bolt
 Toyota Yaris Control Arm Bushing
 Toyota Yaris Front Cross-Member
 Toyota Yaris Shock and Strut Boot
 Toyota Yaris Strut Bearing
 Toyota Yaris Sway Bar Bushing
 Toyota Yaris Sway Bars
 Toyota Yaris Transfer Case Bearing