×
ToyotaParts- Hello
- Login or Register
- Quick Links
- Live Chat
- Track Order
- Parts Availability
- RMA
- Help Center
- Contact Us
- Shop for
- Toyota Parts
- Scion Parts
My Garage
My Account
Cart
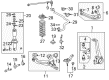
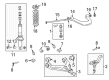
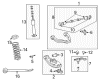
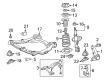
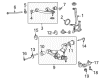
OEM Toyota Ball Joint
Control Arm Joint- Select Vehicle by Model
- Select Vehicle by VIN
Select Vehicle by Model
orMake
Model
Year
Select Vehicle by VIN
For the most accurate results, select vehicle by your VIN (Vehicle Identification Number).
96 Ball Joints found


Toyota Upper Ball Joint, Front Part Number: 43310-39016
$51.13 MSRP: $71.18You Save: $20.05 (29%)Ships in 1-3 Business DaysProduct Specifications- Other Name: Joint Assembly, Front Upper Ball; Suspension Ball Joint, Front Upper; Upper Ball Joints; Front Upper Ball Joint Assembly for Driver & Passenger Side.
- Position: Front Upper
- Replaces: 43310-39085, 43310-39065


Toyota Lower Ball Joint, Front Driver Side Part Number: 43340-39356
$108.65 MSRP: $152.52You Save: $43.87 (29%)Ships in 1-3 Business DaysProduct Specifications- Other Name: Joint Assembly, Lower Ball; Suspension Ball Joint, Front Left Lower; Joint Assembly, Lower Ball, Front Driver Side; Suspension Ball Joint; Ball Joint
- Position: Front Driver Side
- Replaces: 43340-39355


Toyota Lower Ball Joint, Front Driver Side Part Number: 43340-39595
$147.10 MSRP: $208.24You Save: $61.14 (30%)Product Specifications- Other Name: Joint Assembly, Lower Ball; Suspension Ball Joint, Front Left Lower; Joint Assembly, Lower Ball, Front Driver Side; Suspension Ball Joint; Ball Joint
- Position: Front Driver Side
- Replaces: 43340-39495, 43340-39575, 43340-39515


Toyota Lower Ball Joint, Front Passenger Side Part Number: 43330-39466
$108.65 MSRP: $152.52You Save: $43.87 (29%)Ships in 1-3 Business DaysProduct Specifications- Other Name: Joint Assembly, Lower Ball; Suspension Ball Joint, Front Right Lower; Joint Assembly, Lower Ball, Front Passenger Side; Suspension Ball Joint; Ball Joint
- Position: Front Passenger Side
- Replaces: 43330-39465


Toyota Lower Ball Joint, Front Passenger Side Part Number: 43330-39825
$145.81 MSRP: $206.40You Save: $60.59 (30%)Product Specifications- Other Name: Joint Assembly, Lower Ball; Suspension Ball Joint, Front Right Lower; Joint Assembly, Lower Ball, Front Passenger Side; Suspension Ball Joint; Ball Joint
- Position: Front Passenger Side
- Replaces: 43330-39615, 43330-39805, 43330-39655


Toyota Lower Ball Joint, Front Driver Side Part Number: 43340-39465
$127.24 MSRP: $180.13You Save: $52.89 (30%)Ships in 1-3 Business DaysProduct Specifications- Other Name: Joint Assembly, Lower Ball; Suspension Ball Joint, Front Left Lower; Joint Assembly, Lower Ball, Front Driver Side; Suspension Ball Joint; Ball Joint
- Position: Front Driver Side
- Replaces: 43340-39475, 43340-39325, 43340-39455


Toyota Lower Ball Joint, Front Passenger Side Part Number: 43330-39585
$126.30 MSRP: $178.79You Save: $52.49 (30%)Ships in 1-3 Business DaysProduct Specifications- Other Name: Joint Assembly, Lower Ball; Suspension Ball Joint, Front Right Lower; Joint Assembly, Lower Ball, Front Passenger Side; Suspension Ball Joint; Ball Joint
- Position: Front Passenger Side
- Replaces: 43330-39575, 43330-39415


Toyota Ball Joint, Front Driver Side Part Number: 43340-09140
$73.22 MSRP: $102.78You Save: $29.56 (29%)Ships in 1-3 Business DaysProduct Specifications- Other Name: Joint Assembly, Lower Ball; Suspension Ball Joint, Front Left; Lower Ball Joint; Joint Assembly, Lower Ball, Front Driver Side; Suspension Ball Joint
- Position: Front Driver Side


Toyota Joint Assembly, Lower Ball, Front Passenger Side Part Number: 43330-09780
$73.81 MSRP: $103.61You Save: $29.80 (29%)Ships in 1-3 Business DaysProduct Specifications- Other Name: Joint Assembly, Lower Ball; Suspension Ball Joint; Ball Joint
- Position: Front Passenger Side


Toyota Lower Ball Joint, Driver Side Part Number: 43340-39585
$147.80 MSRP: $209.23You Save: $61.43 (30%)Product Specifications- Other Name: Joint Assembly, Lower Ball; Suspension Ball Joint, Front Left Lower; Suspension Ball Joint; Ball Joint
- Position: Lower Driver Side
- Replaces: 43340-39287, 43340-39286

Toyota Lower Ball Joint, Passenger Side Part Number: 43330-39815
$147.80 MSRP: $209.23You Save: $61.43 (30%)Product Specifications- Other Name: Joint Assembly, Lower Ball; Suspension Ball Joint, Front Right Lower; Suspension Ball Joint; Ball Joint
- Position: Lower Passenger Side
- Replaces: 43330-39366, 43330-39367


Toyota Lower Ball Joint, Front Passenger Side Part Number: 43330-39556
$134.88 MSRP: $190.93You Save: $56.05 (30%)Ships in 1-3 Business DaysProduct Specifications- Other Name: Joint Assembly, Lower Ball; Suspension Ball Joint, Front Right Lower; Joint Assembly, Lower Ball, Front Passenger Side; Suspension Ball Joint; Ball Joint
- Position: Front Passenger Side
- Replaces: 43330-39555


Toyota Lower Ball Joint, Front Driver Side Part Number: 43340-39445
$75.95 MSRP: $106.60You Save: $30.65 (29%)Ships in 1-2 Business DaysProduct Specifications- Other Name: Joint Assembly, Lower Ball; Suspension Ball Joint, Front Left Lower; Joint Assembly, Lower Ball, Front Driver Side; Suspension Ball Joint; Ball Joint
- Position: Front Driver Side
- Replaces: 43340-39275

Toyota Lower Ball Joint, Front Passenger Side Part Number: 43330-39565
$96.09 MSRP: $134.88You Save: $38.79 (29%)Ships in 1-2 Business DaysProduct Specifications- Other Name: Joint Assembly, Lower Ball; Suspension Ball Joint, Front Right Lower; Joint Assembly, Lower Ball, Front Passenger Side; Suspension Ball Joint; Ball Joint
- Position: Front Passenger Side
- Replaces: 43330-39355


Toyota Upper Ball Joint, Passenger Side Part Number: 43350-39105
$72.63 MSRP: $101.95You Save: $29.32 (29%)Ships in 1-3 Business DaysProduct Specifications- Other Name: Joint Assembly, Front Upper B; Suspension Ball Joint, Front Right Upper; Upper Ball Joints; Joint Assembly, Front Upper Ball, Passenger Side; Suspension Ball Joint; Ball Joint
- Position: Passenger Side


Toyota Ball Joint, Front Driver Side Part Number: 43340-09170
$64.45 MSRP: $90.47You Save: $26.02 (29%)Ships in 1-3 Business DaysProduct Specifications- Other Name: Joint Assembly, Lower Ball; Suspension Ball Joint, Front Left; Lower Ball Joint; Joint Assembly, Lower Ball, Front Driver Side; Suspension Ball Joint
- Position: Front Driver Side
- Replaces: 43340-09040


Toyota Lower Ball Joint, Front Driver Side Part Number: 43340-39436
$117.66 MSRP: $165.16You Save: $47.50 (29%)Ships in 1-3 Business DaysProduct Specifications- Other Name: Joint Assembly, Lower Ball; Suspension Ball Joint, Front Left Lower; Joint Assembly, Lower Ball, Front Driver Side; Suspension Ball Joint; Ball Joint
- Position: Front Driver Side
- Replaces: 43340-39435


Toyota Upper Ball Joint, Driver Side Part Number: 43360-39095
$72.63 MSRP: $101.95You Save: $29.32 (29%)Ships in 1-3 Business DaysProduct Specifications- Other Name: Joint Assembly, Front Upper Ball; Suspension Ball Joint, Front Left Upper; Upper Ball Joints; Joint Assembly, Front Upper Ball, Driver Side; Suspension Ball Joint; Ball Joint
- Position: Driver Side


Toyota Lower Ball Joint, Passenger Side Part Number: 48625-0C011
$127.83 MSRP: $180.96You Save: $53.13 (30%)Ships in 1-3 Business DaysProduct Specifications- Other Name: Attachment, Lower Ball; Suspension Control Arm Bracket, Right; Ball Joint; Control Arm Bracket; Attachment, Front Lower Ball Joint, Passenger Side
- Position: Passenger Side


Toyota Ball Joint, Front Passenger Side Part Number: 43330-09810
$64.93 MSRP: $91.14You Save: $26.21 (29%)Ships in 1-3 Business DaysProduct Specifications- Other Name: Joint Assembly, Lower Ball; Suspension Ball Joint, Front Right; Lower Ball Joint; Joint Assembly, Lower Ball, Front Passenger Side; Suspension Ball Joint
- Position: Front Passenger Side
- Replaces: 43330-09330
| Page 1 of 5 |Next >
1-20 of 96 Results
Toyota Ball Joint
OEM parts deliver unmatched quality you can rely on. They pass extensive quality control inspections. Toyota produces them to the official factory specifications. This process helps prevent defects and imperfections. So you can get exceptional lifespan and a flawless fit. Need new OEM Toyota Ball Joint? You'll love our wide selection of genuine options. Shop in minutes and skip the hunt. Our prices are unbeatable, you'll save time and money. It's easy to shop and find the right piece. Our committed customer service team gives professional help from start to finish. Every part includes a manufacturer's warranty. We ship quickly, your parts will arrive fast at your door.
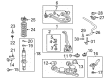
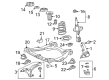
Toyota Ball Joint connecting knuckle to control arm permits wheel pivoting of smooth, steady steering. Toyota masters lean production lines which reduce scrap, accelerate assembly and empower every line worker to stop the belt to ensure quality. Toyota is in a constant state of refinement with Hybrid Synergy Drive, more powerful motors, more intelligent battery management and lighter gearboxes so that commuters are using less fuel without having to baby the throttle or lose feel. Toyota launched TNGA chassis, a common chassis that reduces hoods, increases stands, hardens mounts and allows designers to pursue safety ratings, playful handling and lower cabin hushpuppies. The loyalty towards Toyota increases due to rust resistance, powertrain exceeding 300,000 miles and component prices remain reasonable even when a vehicle traverses off highways or goes over bumpy dirt roads. The Ball Joint is placed between the control arm and steering knuckle on all contemporary suspensions, comprising hardened stud, precision socket and sealed boot to permit two axis movement and exclude grit and prevent any form of slop that will distort direction. Ball Joint substitutes the heavy-looking kingpins, and thus the owners can dial camber and caster in a short time, making the car track straight on the highway and with clean entry cornering without beating ride quality. Ball Joints are available in a prepacked life serving state and usually travel more than 80,000 miles before fatigue sets in and sends subtle clunking signals to the driver that the Ball Joint has taken more than its share of abuse.
Toyota Ball Joint Parts and Q&A
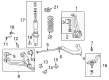
- Q: How to service and repair the lower ball joint on Toyota 4Runner?A:Service and repair of the lower ball joint starts with removing the front wheel while tightly setting torque to 110 Nm (1,150 kgf.cm, 83 ft. lbs.). The procedure begins with loosening the 4 bolts on the tie rod end to 80 Nm (820 kgf.cm, 59 ft. lbs.) while keeping them installed before removing the cotter pin and nut at 91 Nm (912 kgf.cm, 66 ft. lbs.). To disconnect the tie rod end from the steering knuckle use Special Service Tool: 09610-20012. The procedure for disconnecting the lower ball joint requires removal of the cotter pin followed by nutting it loose to 142 Nm (1,450 kgf.cm, 105 ft. lbs.) and then usage of Special Service Tool: 09628-62011 to uninstall the joint from the lower suspension arm while maintaining forward-facing orientation of the cotter pin hole. Disconnect the lower ball joint by lifting the upper suspension arm and steering knuckle then place them in a secure position. Test the ball joint rotation by moving the ball joint stud 5 times in each direction then apply torque using a wrench which should reach 0.1 to 2.5 Nm between 11 - 25 kgf.cm or 0.8 to 21.7 inch lbs during the 5th turn. After installation, check the front wheel alignment while conducting installation in the opposite direction of removal.
- Q: How to service and repair the ball joint on Toyota Tacoma?A:Service and repair of the ball joint begins by removing the front wheel while tightening it to 110 Nm (1,150 kgf-cm, 83 ft. lbs.). You should lift the lower suspension arm with a jack while you disconnect the tie rod end by easing the 2 lower ball joint set bolts to 160 Nm (1,600 kgf-cm, 116 ft. lbs.) without taking them off. Proceed with carrying out the removal process by completing the following steps: first remove the cotter pin along with the nut which needs to reach 72 Nm (730 kgf-cm, 53 ft. lbs.) torque but if the cotter pin holes become misaligned during installation tighten the nut an additional 60 degrees The Special Service Tool: 09610-20012 should be used for tie rod end breaking. To detach the lower ball joint you should first remove its cotter pin followed by loosening the nut to 110 Nm (1,100 kgf-cm, 80 ft. lbs.). Continue to tighten the nut beyond 60 degrees if needed. Special Service Tool: 09628-062011 enables lower ball joint disconnection before removing the nut, 2 bolts, and ball joint assembly. To check the lower ball joint rotation condition you should flip the ball joint stud 5 times before tightening the nut using a torque wrench on the 5th turn with a time span of 2 - 4 seconds until it reaches 0.1 - 3.45 Nm (1 - 35 kgf-cm, 0.8 - 30 inch lbs.). The procedures for installation proceed by relocating parts in the order opposite to removal.


Related Toyota Parts
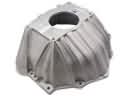 Toyota Bellhousing
 Toyota Coil Springs
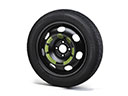 Toyota Spare Wheel
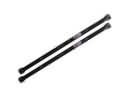 Toyota Torsion Bar
 Toyota Axle Beam Mount
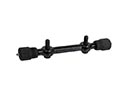 Toyota Control Arm Shaft Kit
 Toyota Crossmember Bushing
 Toyota Front Cross-Member
 Toyota Lateral Link
 Toyota Strut Bearing
 Toyota Sway Bars
 Toyota Trailing Arm
Browse Toyota Ball Joint by Models
Tacoma 4Runner Camry Tundra Corolla RAV4 Highlander Prius Sienna Land Cruiser Pickup FJ Cruiser Sequoia T100 Avalon Celica Supra Matrix MR2 Solara Venza C-HR Grand Highlander Paseo Previa Prius Prime bZ4X Corolla Cross Corolla iM Crown Crown Signia GR Corolla Mirai Prius V Tercel Van Prius Plug-In Prius AWD-e RAV4 Prime