×
ToyotaParts- Hello
- Login or Register
- Quick Links
- Live Chat
- Track Order
- Parts Availability
- RMA
- Help Center
- Contact Us
- Shop for
- Toyota Parts
- Scion Parts
My Garage
My Account
Cart
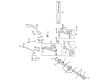
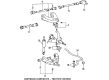
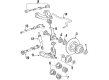
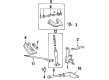
OEM Toyota Torsion Bar
Suspension Torsion Bar- Select Vehicle by Model
- Select Vehicle by VIN
Select Vehicle by Model
orMake
Model
Year
Select Vehicle by VIN
For the most accurate results, select vehicle by your VIN (Vehicle Identification Number).
40 Torsion Bars found


Toyota Torsion Bar, Passenger Side Part Number: 48161-60030
$543.77 MSRP: $796.90You Save: $253.13 (32%)Ships in 1-3 Business DaysProduct Specifications- Other Name: Spring, Torsion Bar; Torsion Bar, Front Right; Spring, Torsion Bar, Passenger Side
- Position: Passenger Side
Toyota Spring, Torsion Bar, Passenger Side Part Number: 48161-60040
$434.35 MSRP: $636.55You Save: $202.20 (32%)Ships in 1-3 Business DaysProduct Specifications- Other Name: Spring, Torsion Bar
- Manufacturer Note: W(ACTIVE HEIGHT CONTROL)
- Position: Passenger Side

Toyota Torsion Bar, Passenger Side Part Number: 48161-35250
$186.94 MSRP: $266.89You Save: $79.95 (30%)Ships in 1-3 Business DaysProduct Specifications- Other Name: Spring, Torsion Bar; Spring, Torsion Bar, Passenger Side
- Position: Passenger Side
Toyota Torsion Bar, Passenger Side Part Number: 48161-28040
$207.52 MSRP: $296.29You Save: $88.77 (30%)Ships in 1-3 Business DaysProduct Specifications- Other Name: Spring, Torsion Bar; Spring, Torsion Bar, Passenger Side
- Position: Passenger Side

Toyota Torsion Bar, Driver Side Part Number: 48162-35130
$234.18 MSRP: $334.36You Save: $100.18 (30%)Ships in 1-3 Business DaysProduct Specifications- Other Name: Spring, Torsion Bar; Spring, Torsion Bar, Driver Side
- Manufacturer Note: W/WINCH
- Position: Driver Side
Toyota Torsion Bar, Passenger Side Part Number: 48161-35130
$234.18 MSRP: $334.36You Save: $100.18 (30%)Ships in 1-3 Business DaysProduct Specifications- Other Name: Spring, Torsion Bar; Spring, Torsion Bar, Passenger Side
- Manufacturer Note: W/WINCH
- Position: Passenger Side

Toyota Torsion Bar, Passenger Side Part Number: 48161-35220
$248.51 MSRP: $354.82You Save: $106.31 (30%)Ships in 1-3 Business DaysProduct Specifications- Other Name: Spring, Torsion Bar; Spring, Torsion Bar, Passenger Side
- Position: Passenger Side
Toyota Torsion Bar, Passenger Side Part Number: 48161-35110
$300.33 MSRP: $428.79You Save: $128.46 (30%)Ships in 1-3 Business DaysProduct Specifications- Other Name: Spring, Torsion Bar; Spring, Torsion Bar, Passenger Side
- Position: Passenger Side
- Replaces: 48161-04030

Toyota Torsion Bar, Driver Side Part Number: 48162-60030
$543.77 MSRP: $796.90You Save: $253.13 (32%)Product Specifications- Other Name: Spring, Torsion Bar; Torsion Bar, Front Left; Spring, Torsion Bar, Driver Side
- Position: Driver Side

Toyota Torsion Bar, Driver Side Part Number: 48162-35110
Product Specifications- Other Name: Spring, Torsion Bar; Spring, Torsion Bar, Driver Side
- Position: Driver Side
- Replaces: 48162-04030
Toyota Torsion Bar, Driver Side Part Number: 48162-60040
$434.24 MSRP: $636.38You Save: $202.14 (32%)Product Specifications- Other Name: Spring, Torsion Bar; Torsion Bar, Front Left; Spring, Torsion Bar, Driver Side
- Manufacturer Note: W(ACTIVE HEIGHT CONTROL)
- Position: Driver Side
Toyota Torsion Bar, Driver Side Part Number: 48162-35260
Product Specifications- Other Name: Spring, Torsion Bar; Spring, Torsion Bar, Driver Side
- Manufacturer Note: W(7JJX15 WHEEL)
- Position: Driver Side
Toyota Torsion Bar, Driver Side Part Number: 48162-35160
Product Specifications- Other Name: Spring, Torsion Bar; Spring, Torsion Bar, Driver Side
- Position: Driver Side
Toyota Torsion Bar, Driver Side Part Number: 48162-35070
Product Specifications- Other Name: Spring, Torsion Bar; Spring, Torsion Bar, Driver Side
- Position: Driver Side
Toyota Torsion Bar, Driver Side Part Number: 48162-35060
Product Specifications- Other Name: Spring, Torsion Bar; Spring, Torsion Bar, Driver Side
- Position: Driver Side
Toyota Torsion Bar, Driver Side Part Number: 48162-28010
Product Specifications- Other Name: Spring, Torsion Bar; Spring, Torsion Bar, Driver Side
- Position: Driver Side
Toyota Torsion Bar, Passenger Side Part Number: 48161-35260
Product Specifications- Other Name: Spring, Torsion Bar; Spring, Torsion Bar, Passenger Side
- Manufacturer Note: W(7JJX15 WHEEL)
- Position: Passenger Side
Toyota Torsion Bar, Passenger Side Part Number: 48161-35190
Product Specifications- Other Name: Spring, Torsion Bar; Spring, Torsion Bar, Passenger Side
- Position: Passenger Side
Toyota Torsion Bar, Passenger Side Part Number: 48161-35160
Product Specifications- Other Name: Spring, Torsion Bar; Spring, Torsion Bar, Passenger Side
- Position: Passenger Side
Toyota Torsion Bar, Passenger Side Part Number: 48161-35070
Product Specifications- Other Name: Spring, Torsion Bar; Spring, Torsion Bar, Passenger Side
- Position: Passenger Side
| Page 1 of 2 |Next >
1-20 of 40 Results
Toyota Torsion Bar
OEM parts deliver unmatched quality you can rely on. They pass extensive quality control inspections. Toyota produces them to the official factory specifications. This process helps prevent defects and imperfections. So you can get exceptional lifespan and a flawless fit. Need new OEM Toyota Torsion Bar? You'll love our wide selection of genuine options. Shop in minutes and skip the hunt. Our prices are unbeatable, you'll save time and money. It's easy to shop and find the right piece. Our committed customer service team gives professional help from start to finish. Every part includes a manufacturer's warranty. We ship quickly, your parts will arrive fast at your door.
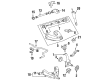
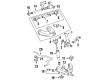
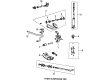
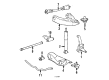
Toyota Torsion Bar is applied to maintain the ride height constant but allows the suspension to bend over bumpy surfaces. Toyota has earned its reputation by cutting down wastage on the line and driving constant repairs, thus drivers are likely to have cars that not only consume less fuel but also remain tough as the years go by. The hybrid knowledge is currently being transferred no longer just to small hatches but also to large SUVs, providing ordinary commuters with electric boxes without fear of range. Toyota relies on the TNGA platform to lose weight, reduce centers of gravity, and make steering more exact to give the cars a more relaxed ride throughout the range. The importance of these tweaks to global buyers is that fewer fill-ups and an increase in vehicle lifespan even in a harsh climate are the results. Toyota will also continue to introduce the plug-in models with handy EV range to allow families to reduce fuel costs on their daily trips. Torsion Bar in the suspension is twisted as a steel spring to store energy that it rotates to keep the vehicle in its desired height and allow each wheel to move freely over obstacles. A Torsion Bar even endures off-roading abuse and does not sag under the weight, as its massive diameter is an advantage over coil springs. Frequent inspections, wear grooves, or missing preload are discovered, and replacement of a new Torsion Bar immediately restores factory height. Toyota owners love the fact that a replacement Torsion Bar helps to have back their assurance in tracking without actually having to touch the shocks or the control arm.
Toyota Torsion Bar Parts and Q&A
- Q: How to remove and install the torsion bar spring with the anchor arm on Toyota Land Cruiser?A:Begin the process to remove the torsion bar spring with the anchor arm by taking off the front wheel together with the engine under cover. You must first mark key points on the torsion bar spring and anchor arm together with torque arm before measuring the dimensions between anchor arm bolt edge and frame structure for installation parameters. Chose the spring tension free by using a wrench on the anchor arm bolt then record its length at point B for later usage. The procedure to remove the torsion bar assembly begins by removing the anchor arm adjusting bolt and anchor arm swivel and followed by the anchor arm adjusting seat. Afterward the torsion bar spring with the anchor arm can be removed and the anchor arm separated from the spring. To proceed with the installation begin with removing the torque arm and its 2 nuts and bolt. Start by attaching the torque arm using its bolt and torque arm and then affix two nuts before torquing them to 225 Nm (2,300 kgf-cm, 166 ft. lbs.). During the installation of the torsion bar spring alongside the anchor arm make sure to apply a thin application of MP grease onto the spline section of the torsion bar springs. To install a fresh torsion bar spring together with the anchor arm you must attach it to the torque arm afterward. The installation of anchor arm adjusting seat must be accompanied by anchor arm swivel together with anchor arm adjusting bolt where the anchor arm adjusting bolt end should maintain a length comparable to the value of measurement "B" performed during removal. Use the anchor arm adjusting bolt to achieve dimension "A" within its stated value range. The installation process begins with matching both torsion bar spring and anchor arm marks before installation after which users must match the torsion bar spring and torque arm marks. Secure the anchor arm bolt through adjustment until the size of "A" reaches near the established measurement during disassembly. The front wheel installation follows after which the engine under cover is placed onto the vehicle body. Torque the front wheel to 131 Nm (1,340 kgf-cm, 97 ft. lbs.) before verifying the vehicle height through adjustments of the anchor arm bolt when the suspension is stable.

Related Toyota Parts
 Toyota Ball Joint
 Toyota CV Joint
 Toyota CV Boot
 Toyota Camber and Alignment Kit
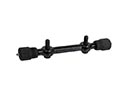 Toyota Control Arm Shaft Kit
 Toyota Crossmember Bushing
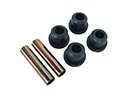 Toyota Leaf Spring Bushing
 Toyota Suspension Strut Rod
 Toyota Sway Bar Bushing
 Toyota Sway Bars
 Toyota Transfer Case Output Shaft Snap Ring
 Toyota Wheel Seal