×
ToyotaParts- Hello
- Login or Register
- Quick Links
- Live Chat
- Track Order
- Parts Availability
- RMA
- Help Center
- Contact Us
- Shop for
- Toyota Parts
- Scion Parts
My Garage
My Account
Cart
OEM Toyota Tacoma Ball Joint
Control Arm Joint- Select Vehicle by Model
- Select Vehicle by VIN
Select Vehicle by Model
orMake
Model
Year
Select Vehicle by VIN
For the most accurate results, select vehicle by your VIN (Vehicle Identification Number).
17 Ball Joints found


Toyota Tacoma Upper Ball Joint, Front Part Number: 43310-39016
$51.13 MSRP: $71.18You Save: $20.05 (29%)Ships in 1-3 Business Days


Toyota Tacoma Lower Ball Joint, Driver Side Part Number: 43340-39585
$147.80 MSRP: $209.23You Save: $61.43 (30%)
Toyota Tacoma Lower Ball Joint, Passenger Side Part Number: 43330-39815
$147.80 MSRP: $209.23You Save: $61.43 (30%)

Toyota Tacoma Lower Ball Joint, Front Passenger Side Part Number: 43330-39556
$134.88 MSRP: $190.93You Save: $56.05 (30%)Ships in 1-3 Business Days

Toyota Tacoma Lower Ball Joint, Front Driver Side Part Number: 43340-39445
$75.95 MSRP: $106.60You Save: $30.65 (29%)Ships in 1-2 Business Days
Toyota Tacoma Lower Ball Joint, Front Passenger Side Part Number: 43330-39565
$96.09 MSRP: $134.88You Save: $38.79 (29%)Ships in 1-2 Business Days


Toyota Tacoma Upper Ball Joint, Passenger Side Part Number: 43350-39105
$72.63 MSRP: $101.95You Save: $29.32 (29%)Ships in 1-3 Business Days


Toyota Tacoma Lower Ball Joint, Front Driver Side Part Number: 43340-39436
$117.66 MSRP: $165.16You Save: $47.50 (29%)Ships in 1-3 Business Days

Toyota Tacoma Upper Ball Joint, Driver Side Part Number: 43360-39095
$72.63 MSRP: $101.95You Save: $29.32 (29%)Ships in 1-3 Business Days

Toyota Tacoma Mount Bracket, Driver Side Part Number: 48626-04040
$92.89 MSRP: $130.39You Save: $37.50 (29%)Ships in 1-3 Business Days
Toyota Tacoma Mount Bracket, Passenger Side Part Number: 48625-04050
$92.89 MSRP: $130.39You Save: $37.50 (29%)Ships in 1-2 Business Days

Toyota Tacoma Upper Ball Joint, Passenger Side Part Number: 43350-39085
$87.56 MSRP: $122.91You Save: $35.35 (29%)Ships in 1-3 Business Days

Toyota Tacoma Lower Ball Joint, Passenger Side Part Number: 43330-39835
$88.39 MSRP: $124.07You Save: $35.68 (29%)Ships in 1-3 Business Days


Toyota Tacoma Upper Ball Joint, Driver Side Part Number: 43360-39085
$87.56 MSRP: $122.91You Save: $35.35 (29%)Ships in 1-3 Business Days


Toyota Tacoma Lower Ball Joint, Front Driver Side Part Number: 43340-39245
$87.56 MSRP: $122.91You Save: $35.35 (29%)Ships in 1-3 Business Days
Toyota Tacoma Lower Bracket, Driver Side Part Number: 48626-04030
$106.40 MSRP: $149.35You Save: $42.95 (29%)Ships in 1-3 Business DaysToyota Tacoma Lower Bracket, Passenger Side Part Number: 48625-04040
$106.40 MSRP: $149.35You Save: $42.95 (29%)Ships in 1-3 Business Days
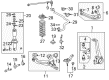
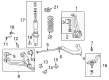
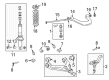
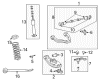
Toyota Tacoma Ball Joint
Choose genuine Ball Joint that pass strict quality control tests. You can trust the top quality and lasting durability. Shopping for OEM Ball Joint for your Toyota Tacoma? Our website is your one-stop destination. We stock an extensive selection of genuine Toyota Tacoma parts. The price is affordable so you can save more. It only takes minutes to browse and find the exact fit. Easily add to cart and check out fast. Our hassle-free return policy will keep you stress-free. We process orders quickly for swift delivery. Your parts will arrive faster, so you can get back on the road sooner.
Toyota Tacoma Ball Joint Parts and Q&A
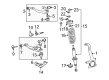
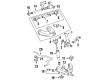
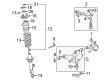
- Q: How to service and repair the upper ball joint on Toyota Tacoma?A:The service and repair of upper ball joints requires removal of the steering knuckle with axle hub from models RZN191L-TRPDKAB, RZN196L-CRPDKAB, PZN196L-PRPDKAB, VZN195L-CRPDKAB, and VZN195L-PRPDKAB. The ball joint upper nut installation requires flipping the ball joint stud for five rotations followed by a torque wrench operation at 2 to 4 second intervals until the fifth turn to measure the torque value which should fall within the range of 0.7-4.4 Nm (7 - 45 kgf-cm, 6 - 39 inch lbs.). Placement of the upper ball joint requires wireless boot removal followed by snap ring expulsion with a ring expander tool before using Special Service Tool: 09950-40011 in conjunction with supporting tools starting from deep socket wrench to finish the operation. The installation process of the new upper ball joint requires Special Service Tool: 09309-37010 with a socket wrench followed by snap ring installation using a snap ring expander and lastly securing the new boot with wire using the supplied grease from the kit. Cut off the process with axle hub installation of the steering knuckle.
- Q: How to service and repair the lower ball joint on Toyota Tacoma?A:Begin the lower ball joint service process by taking off the front wheel while torquing it to 110 Nm (1,150 kgf-cm, 83 ft. lbs.). The first step to disconnect the tie rod end involves unfastening its 4 bolts using 80 Nm (820 kgf-cm, 59 ft. lbs.) torque while leaving them in place. After that, use a torque wrench to remove the tie rod end nut and cotter pin at 90 Nm (930 kgf-cm, 67 ft. lbs.) before setting the nut to a torque angle of 60 degrees for correct alignment of the pin holes when necessary. The tie rod end disconnection from the steering knuckle requires the Special Service Tool: 09610-20012. The procedure for the lower ball joint entails removing its cotter pin and nut while using 140 Nm (1,450 kgf-cm, 103 ft. lbs.) torque before setting the nut at a further 60 degrees if the cotter pin holes are misaligned. The lower ball joint disconnection from the lower suspension arm needs Special Service Tool: 09628-62011 which must position the cotter pin hole to face forward for reinstallation. Using Special Service Tool 09628-62011 you must disconnect the lower ball joint from the lower suspension arm so you can later extract the lower ball joint by lifting the upper suspension arm and steering knuckle while securing them for support during removal. The ball joint stud's rotation condition should be checked by moving it 5 times backward and forward before installing the nut using a torque wrench covering a single continuous turn from 2 to 4 seconds which should yield readings between 0.1 and 2.5 Nm (1 to 25 kgf-cm, 1 to 22 inch lbs.). Install the components the opposite way removal occurred while wheel alignment testing should happen post-installation.


Related Toyota Tacoma Parts
 Toyota Tacoma Coil Springs
 Toyota Tacoma Steering Knuckle
 Toyota Tacoma Axle Shaft
 Toyota Tacoma Coil Spring Insulator
 Toyota Tacoma Control Arm Bushing
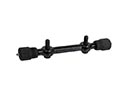 Toyota Tacoma Control Arm Shaft Kit
 Toyota Tacoma Crossmember Bushing
 Toyota Tacoma CV Joint
 Toyota Tacoma Radius Arm Bushing
 Toyota Tacoma Shock Absorber
 Toyota Tacoma Suspension Strut Rod
 Toyota Tacoma Wheel Seal