- Hello
- Login or Register
- Quick Links
- Live Chat
- Track Order
- Parts Availability
- RMA
- Help Center
- Contact Us
- Shop for
- Toyota Parts
- Scion Parts

Popular OEM Toyota Tacoma Parts
- Body & Hardware Parts View More >
- Electrical Parts View More >
- Engine Parts View More >
- Air & Fuel Delivery Parts View More >
- Belts & Cooling Parts View More >
- Steering Parts View More >
- Suspension Parts View More >
- Emission Control & Exhaust Parts View More >
- A/C & Heating Parts View More >
- Charging & Starting Parts View More >
- Brakes Parts View More >
- Transmission Parts View More >


Why Buy Genuine Toyota Tacoma Parts From ToyotaPartsNow.com
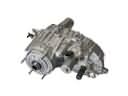
ToyotaPartsNow.com highlights the reliability of OEM Toyota Tacoma parts right at your fingertips. Our skilled staff assists customers in selecting the right Toyota Tacoma parts and provides expert help with any unique part requests. At ToyotaPartsNow.com, we make all Toyota Tacoma parts available to you quickly and efficiently through our fast order and reliable ship process. Our service is designed to make finding the correct Toyota Tacoma parts fast and easy whether you are an amateur or a professional. We offer access to a broad inventory that includes a wide range of Toyota years and variants. Affordable prices, quick processing and professional service are also our specialty to ensure your car remains in top condition with OEM Toyota Tacoma parts. You can feel confident shopping with us because all Toyota Tacoma parts, such as Driveline & Axles you purchase from our store are of genuine quality and built to last.
The Toyota Tacoma launched in 1995 as the successor to Hilux received major updates that concentrated on improving ride quality and both handling and safety features. The original Toyota Tacoma fleet presented a square body shape before adopting a ladder-frame chassis behind the rear suspension despite offering multiple cab options such as basic and extended models and the PreRunner versions. Toyota offered the 3.4L V6 engine as their performance-leading component especially in the 2000 S-Runner trim. The second-generation Toyota Tacoma obtained its primary development from Hino Japan which included VVT-iW system and D-4S fuel injection platform that enabled the vehicle to automatically shift between natural and direct injection modes depending on current driving conditions. Automatic transmissions were available as options in PreRunner and crew cab versions but regular cab and Xtracab models could be equipped with either automatic or manual transmissions. After 2000 the automatic limited-slip differential was introduced to improve traction but brake-based traction control systems eventually replaced it for simulated mechanical LSD functionality. When the Tacoma received its redesign in 2015 manufacturers added bigger front grille elements and refreshed headlights to keep its rugged identity intact. Toyota Tacoma owners can find authentic Tacoma parts in a wide catalog for their vehicle through official Toyota sources that deliver quality-tested components which come with manufacturer backing for extra peace of mind.
While the Toyota Tacoma is a trusty vehicle, it can develop a few mechanical system problems. A common problem with the 2001-2004 Toyota Tacoma models is the failure of the lower front ball joint assembly. And that can cause early breakdown and then a Toyota recall replacement. The other issue is related to the drivetrain, where the auto transmission can miss a shift usually at high mileage (approximately 125k to 150k miles). This fault is partly caused by a failing Toyota Tacoma throttle sensor or a bad shift solenoid part. It is not typically a sign that the transmission needs to be rebuilt. And lastly, there can also be electrical system issues where the amber front parking lights actually melt or crack the lens of the lights from excessive heat generated by the system. This is a problem where you need to swap out the full Toyota Tacoma headlight assembly to fix the problem. All these issues with the Toyota Tacoma make the necessity of regular check-up and maintenance to keep the vehicle functioning well and in top performance. Address these problems before they can do additional harm to the Toyota Tacoma.
Toyota Tacoma Parts and Q&A
- Q: How to install the oil filter on Toyota Tacoma?A:To install the 2TR-FE oil filter, clean the engine contact surface and apply engine oil to the O-ring of a new filter. Hand-tighten until the O-ring contacts the seat, then retighten with tool 09228-07501 by 3/4 turn to 13 N m. Fill the engine with oil and check for leaks.
- Q: How to replace the radiator assembly on Toyota Tacoma?A:In order to change the radiator assembly (2TR-FE), you need to loosen the negative battery terminal, remove the engine under cover, coolant, and fan shroud. Install the radiator assembly, removing old one, connection of hoses, fixing. Lastly, inspect the leaks and re-fit the engine under cover.
- Q: How to service and repair the alternator on Toyota Tacoma?A:Removal of the rear end cover, brush holder, and voltage regulator are necessary to service and repair the alternator. Remove the rectifier holder and pulley, making sure that they are well-torqued. Assemble by backloading the drive end frame, rotor and rectifier end frame with nuts. Change bearings and brushes.


