×
ToyotaParts- Hello
- Login or Register
- Quick Links
- Live Chat
- Track Order
- Parts Availability
- RMA
- Help Center
- Contact Us
- Shop for
- Toyota Parts
- Scion Parts
My Garage
My Account
Cart
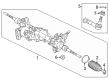
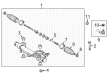
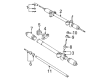
OEM Toyota Tacoma Rack And Pinion
Steering Gear- Select Vehicle by Model
- Select Vehicle by VIN
Select Vehicle by Model
orMake
Model
Year
Select Vehicle by VIN
For the most accurate results, select vehicle by your VIN (Vehicle Identification Number).
18 Rack And Pinions found


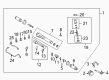
Toyota Tacoma Steering Gear Part Number: 44250-35042
$547.17 MSRP: $801.89You Save: $254.72 (32%)Ships in 1-3 Business Days


Toyota Tacoma Steering Gear Part Number: 44250-04040
$750.56 MSRP: $1099.96You Save: $349.40 (32%)
Toyota Tacoma Rack, Front Part Number: 44204-35050
$416.99 MSRP: $611.10You Save: $194.11 (32%)Ships in 1-3 Business Days
Toyota Tacoma Gear Assembly, Electric Part Number: 44250-04070
$914.80 MSRP: $1340.65You Save: $425.85 (32%)Ships in 1-2 Business DaysToyota Tacoma Gear Assembly, Electric Part Number: 44250-04060
$953.84 MSRP: $1397.87You Save: $444.03 (32%)Ships in 1-2 Business DaysToyota Tacoma Gear Assembly, Power Steering(For Rack & Pinion) Part Number: 44250-04050
$953.84 MSRP: $1397.87You Save: $444.03 (32%)Ships in 1-2 Business Days


Toyota Tacoma Steering Gear Part Number: 44250-04041
$663.17 MSRP: $971.88You Save: $308.71 (32%)
Toyota Tacoma Steering Gear Part Number: 44250-04021
$644.67 MSRP: $944.77You Save: $300.10 (32%)
Toyota Tacoma Rack, Front Part Number: 44204-35020
Toyota Tacoma Steering Gear Part Number: 44250-04030
$750.56 MSRP: $1099.96You Save: $349.40 (32%)
Toyota Tacoma Rack Part Number: 45521-35010
$143.82 MSRP: $203.60You Save: $59.78 (30%)
Toyota Tacoma Steering Gear Part Number: 44250-35020
Toyota Tacoma Steering Gear Part Number: 44250-35010

Toyota Tacoma Rack, Front Part Number: 44204-35010
Toyota Tacoma Rack, Front Part Number: 44204-04010
Toyota Tacoma Steering Gear Part Number: 44250-04011-84
Toyota Tacoma Steering Gear Part Number: 44250-04010

Toyota Tacoma Steering Gear Part Number: 45510-35010
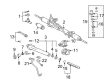
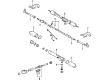
Toyota Tacoma Rack And Pinion
Choose genuine Rack And Pinion that pass strict quality control tests. You can trust the top quality and lasting durability. Shopping for OEM Rack And Pinion for your Toyota Tacoma? Our website is your one-stop destination. We stock an extensive selection of genuine Toyota Tacoma parts. The price is affordable so you can save more. It only takes minutes to browse and find the exact fit. Easily add to cart and check out fast. Our hassle-free return policy will keep you stress-free. We process orders quickly for swift delivery. Your parts will arrive faster, so you can get back on the road sooner.
Toyota Tacoma Rack And Pinion Parts and Q&A
- Q: How to remove the Rack And Pinion on Toyota Tacoma?A:The procedure to detach the power steering link from 2WD vehicles starts with disconnecting the negative battery terminal cable and straightening the front wheels. First use a seat belt to immobilize the steering wheel before marking critical points on the steering sliding yoke and steering intermediate shaft No. 2 and steering intermediate shaft. Then remove bolt A and B from the steering sliding yoke to separate it from steering intermediate shaft No. 2. Unfasten the bolts labeled A and B at the steering sliding yoke before sliding it upward to extract it from the steering intermediate shaft No. 2 to finish the removal process. The first step involves placing marks on the steering intermediate shaft No. 2 and power steering link followed by removing bolt C from the steering intermediate shaft No. 2. This allows workers to separate the components by sliding them upward. Tool 09610-20012 will help separate the tie rod end from the steering knuckle arm after removing its cotter pin and nut for the sub-assembly LH. You should perform the identical steps on the RH tie rod end sub-assembly. The pressure feed tube assembly separation starts with removing the bolt to remove the tube support bracket after which a union nut wrench tightens the flare nut before finally disconnecting the return hose through clip removal. The last step involves power steering link removal through the process of disconnecting two bolts and two nuts where the bolt should be turned instead of the nut.
- Q: How to install the Rack And Pinion on Toyota Tacoma?A:The installation of the power steering link for 2WD requires you to fasten it with two bolts and two nuts using a torque of 92 Nm (938 kgf-cm, 68 ft-lbf). The bolt's motion should be provided by the detent in the nut. The process requires first fastening the return hose to the clip afterwards tightening the flare nut to join the pressure feed tube while using a union nut wrench and ensuring torque between 22 Nm (222 kgf-cm, 16 ft-lbf) and 24 Nm (245 kgf-cm, 18 ft-lbf) without ties and utilizing a 300 mm (11.81 in.) torque wrench for best accuracy. Secure the tube support bracket to the specified torque value which should not exceed 28 Nm (286 kgf-cm, 21 ft-lbf). Installs the tie rod end sub-assembly LH onto the steering knuckle arm followed by tightening its nut to 49 Nm (500 kgf-cm, 36 ft-lbf). The installation completes with a new cotter pin insertion. Installation of the RH side functions identically to the LH side. Attach steering intermediate shaft No. 2 so its matchmarks line up with the rack and pinion then fasten bolt C with a torque of 35 Nm (357 kgf-cm, 26 ft-lbf). The steering sliding yoke requires alignment with matchmarks from both the steering intermediate shaft before being elevated by sliding it up to secure it with bolts A and B under 35 Nm (357 kgf-cm, 26 ft-lbf) torque. The front wheels should be torqued to 113 Nm (1,152 kgf-cm, 83 ft-lbf) then checked for directional alignment before inspecting the steering wheel center alignment point. A technician should complete repair by connecting the negative battery cable at 3.9 Nm (40 kgf-cm, 35 in-lbf). Power steering fluid replenishment then follows, followed by system bleeding and leakage checks and front wheel alignment inspection and adjustment.


Related Toyota Tacoma Parts
 Toyota Tacoma Steering Wheel
 Toyota Tacoma Power Steering Pump
 Toyota Tacoma Steering Shaft
 Toyota Tacoma Power Steering Hose
 Toyota Tacoma Steering Column
 Toyota Tacoma Drag Link
 Toyota Tacoma Power Steering Control Valve
 Toyota Tacoma Power Steering Cooler
 Toyota Tacoma Steering Column Cover
 Toyota Tacoma Tie Rod End
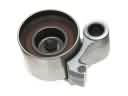 Toyota Tacoma Timing Belt Idler Pulley
 Toyota Tacoma Windshield Wiper Switch