×
ToyotaParts- Hello
- Login or Register
- Quick Links
- Live Chat
- Track Order
- Parts Availability
- RMA
- Help Center
- Contact Us
- Shop for
- Toyota Parts
- Scion Parts
My Garage
My Account
Cart
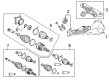
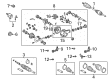
OEM Toyota Differential Mount
- Select Vehicle by Model
- Select Vehicle by VIN
Select Vehicle by Model
orMake
Model
Year
Select Vehicle by VIN
For the most accurate results, select vehicle by your VIN (Vehicle Identification Number).
132 Differential Mounts found


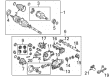
Toyota Differential Carrier Mount, Front Passenger Side Part Number: 52380-34010
$203.28 MSRP: $290.24You Save: $86.96 (30%)Ships in 1-2 Business DaysProduct Specifications- Other Name: Support Assembly, Front Differential; Differential Housing Support, Front; Support
- Manufacturer Note: NO.2
- Position: Front Passenger Side


Toyota Differential Carrier Support Part Number: 52380-0C010
$203.28 MSRP: $290.24You Save: $86.96 (30%)Ships in 1-2 Business DaysProduct Specifications- Other Name: Support Assembly, Differential; Differential Housing Support, Front; Support; Support Assembly, Front Differential
- Manufacturer Note: NO.1


Toyota Differential Carrier Mount, Driver Side Part Number: 52380-0C032
$245.92 MSRP: $351.12You Save: $105.20 (30%)Ships in 1-2 Business DaysProduct Specifications- Other Name: Support Assembly, Differential; Differential Housing Support, Front; Support; Support Assembly, Front Differential
- Manufacturer Note: NO.3
- Position: Driver Side


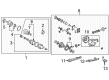
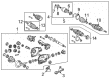
Toyota Front Support, Passenger Side Part Number: 52380-04071
$162.96 MSRP: $230.69You Save: $67.73 (30%)Ships in 1-2 Business DaysProduct Specifications- Other Name: Support Assembly, Front Differential; Differential Housing Support, Front Right; Support
- Manufacturer Note: RH
- Position: Passenger Side
- Replaces: 52380-60021


Toyota Front Support, Driver Side Part Number: 52380-04061
$182.31 MSRP: $260.30You Save: $77.99 (30%)Ships in 1-3 Business DaysProduct Specifications- Other Name: Support Assembly, Front Differential; Differential Housing Support, Front Left; Support
- Manufacturer Note: LH
- Position: Driver Side
- Replaces: 52380-60010, 52380-60012


Toyota Stopper, Differential Mount, Upper Part Number: 41653-04020
$21.14 MSRP: $29.42You Save: $8.28 (29%)Ships in 1-2 Business DaysProduct Specifications- Other Name: Stopper, Differentia
- Position: Upper
- Replaces: 41653-60030


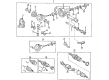
Toyota Support Part Number: 52380-60040
$200.95 MSRP: $286.91You Save: $85.96 (30%)Ships in 1-3 Business DaysProduct Specifications- Other Name: Support Assembly, Differential


Toyota Support Assembly, Front Differential Part Number: 52380-60030
$200.95 MSRP: $286.91You Save: $85.96 (30%)Ships in 1-3 Business DaysProduct Specifications- Other Name: Support Assembly, Differential


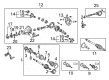
Toyota Support Part Number: 52380-42082
$135.58 MSRP: $191.93You Save: $56.35 (30%)Product Specifications- Other Name: Support Assembly, Differential; Differential Mount, Rear; Support, Rear Differential; Differential Mount
- Replaces: 52380-42081


Toyota Support Assembly, Front Differential, Passenger Side Part Number: 52380-60110
$182.31 MSRP: $260.30You Save: $77.99 (30%)Ships in 1-3 Business DaysProduct Specifications- Other Name: Support Assembly, Differential
- Manufacturer Note: RH
- Position: Passenger Side


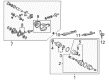
Toyota Front Support Part Number: 52380-45030
$342.30 MSRP: $501.65You Save: $159.35 (32%)Ships in 1-3 Business DaysProduct Specifications- Other Name: Support Assembly, Differential; Differential Mount; Support, Rear Differential


Toyota Support Assembly, Front Differential Part Number: 52380-60090
$134.41 MSRP: $190.27You Save: $55.86 (30%)Ships in 1-3 Business DaysProduct Specifications- Manufacturer Note: NO.2
- Position: Front


Toyota Inner Support, Passenger Side Part Number: 52380-60080
$134.41 MSRP: $190.27You Save: $55.86 (30%)Ships in 1-3 Business DaysProduct Specifications- Other Name: Support Assembly, Differential; Differential Housing Support, Front Outer, Front Right Inner; Outer Support; Support Assembly, Front Differential
- Manufacturer Note: NO.1
- Position: Passenger Side


Toyota Support Part Number: 52380-42050
$175.89 MSRP: $248.99You Save: $73.10 (30%)Ships in 1-3 Business DaysProduct Specifications- Other Name: Support Assembly, Differential; Differential Housing Support, Rear; Differential Mount; Support, Rear Differential


Toyota Support Part Number: 52380-42071
$195.13 MSRP: $278.60You Save: $83.47 (30%)Ships in 1-3 Business DaysProduct Specifications- Other Name: Support Assembly, Differential; Differential Mount; Support, Rear Differential


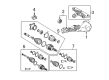
Toyota Front Support Part Number: 52380-45010
$266.54 MSRP: $380.56You Save: $114.02 (30%)Ships in 1-3 Business DaysProduct Specifications- Other Name: Support Assembly, Differential; Differential Mount; Support, Rear Differential


Toyota Rear Support Part Number: 52390-45010
$309.18 MSRP: $441.44You Save: $132.26 (30%)Ships in 1-3 Business DaysProduct Specifications- Other Name: Support Assembly, Differential; Differential Mount; Support Assembly, Differential, Rear
- Position: Rear


Toyota Front Support Lower Insulator Part Number: 41654-0C010
$16.12 MSRP: $22.44You Save: $6.32 (29%)Ships in 1-3 Business DaysProduct Specifications- Other Name: Stopper, Differentia; Stopper, Differential Mount, Lower
- Position: Lower
- Replaces: 41654-26010


Toyota Front Support Upper Insulator Part Number: 41653-0C010
$27.59 MSRP: $38.41You Save: $10.82 (29%)Ships in 1-3 Business DaysProduct Specifications- Other Name: Stopper, Differentia; Stopper, Differential Mount, Upper
- Position: Upper


Toyota Support Assembly, Differential, Rear Part Number: 52380-60050
$149.21 MSRP: $211.23You Save: $62.02 (30%)Product Specifications- Position: Rear
| Page 1 of 7 |Next >
1-20 of 132 Results
Toyota Differential Mount
OEM parts deliver unmatched quality you can rely on. They pass extensive quality control inspections. Toyota produces them to the official factory specifications. This process helps prevent defects and imperfections. So you can get exceptional lifespan and a flawless fit. Need new OEM Toyota Differential Mount? You'll love our wide selection of genuine options. Shop in minutes and skip the hunt. Our prices are unbeatable, you'll save time and money. It's easy to shop and find the right piece. Our committed customer service team gives professional help from start to finish. Every part includes a manufacturer's warranty. We ship quickly, your parts will arrive fast at your door.
Toyota Differential Mount transmits engine force in a smooth way to the wheels, ensuring that all the drives remain assured and secure. Toyota emerged to become a global brand starting out as a 1937 start-up company by cutting down on waste and enabling rapid solutions to problems. The owners of Toyota cars on the road have confidence in the lineup since hybrids can be filled with fuel but they are willing to go on even after strenuous use. Toyota expanded the Hybrid Synergy Drive to sedans, crossovers, and trucks, demonstrating economy of scale. Toyota designed the TNGA platform to lose weight, tighten the handling, and bake in crash strength since the design. Through lean assembly lines, the flaws are identified in a few minutes and hence cars come out the line uniform and prepared to endure years of abuse. The open-ended experiments with hybrids, such as a 42-mile electricity squeeze of the new plug-in RAV4, are obsessive over range. Differential Mount attaches the axle housing to the chassis with a slight flex to prevent the driveline lash which would shake cabins on a bumpy road. Differential Mount is also able to maintain gear alignment to allow limited-slip units to push torque to the gripping wheel. The mount takes up road shocks and keeps bearings protected as well as cornering even at city or highway speed. Differential Mount gets old, and after a period, there appear cracks or drooping rubber; these are some signs that you need to change the mounting; otherwise, chances are you will attract the wrath of paying money on replacing the axle. Differential Mount is universal throughout the line and is compatible with different platforms but remains tough in the rain, salty air, and even full throttle launches.
Toyota Differential Mount Parts and Q&A
- Q: How to install the rear differential mount cushion and related components on Toyota Highlander?A:The installation of the rear No. 1 differential mount cushion requires Special Service Tool: 09570-24011 to set at a measurement of 2.2 +/- 0.5 mm (0.09 +/- 0.02 in.) and an angle of 0 degrees +/- 3 degrees. The installation of the rear No. 2 differential mount cushion requires use of Special Service Tools: 09570-24011 and 09316-12010 to achieve a 4.7 +/- 0.5 mm (0.19 +/- 0.02 in.) measurement with identical angle requirements. The procedure begins with differential mount cushion installation after which workers should fit the rear differential carrier assembly and the rear suspension member. Install both rear drive shaft snap rings followed by rear drive shaft assemblies from the LH and then RH sides of the vehicle. The next sequence of installation involves the rear No. 1 and No. 2 suspension arm assemblies followed by rear axle carrier sub-assemblies on both vehicle sides. The rear strut rod assemblies should be installed temporarily on both sides before installing the rear axle hub and bearing assemblies. The installer must mount rear disc parts alongside rear disc brake calipers for both sides and then install rear axle shaft nuts only temporarily. Set the suspension system and fully tighten all rear No. 1 and No. 2 suspension arm assemblies together with the rear strut rod assemblies for both sides. The next procedure requires installation of the No. 3 and No. 2 parking brake cable assemblies before separating and discarding the rear disc brake caliper assemblies along with the rear discs from both sides. First check the rear axle hub bearing loose joints and unevenness of both sides before installing rear brake components including discs and calipers. The propeller requires complete tightening from the rear axle shaft nuts as well as from the center bearing shaft assembly. As the last step install the center and tail exhaust pipe assemblies before inspecting and adjusting the transfer oil followed by rear wheel installation with torque set to 103 Nm (1050 kgf-cm, 76 ft-lbf), complete the check for rear wheel alignment and then inspect for rear speed sensor signal and exhaust gas leaks.
- Q: How to install the No. 1 rear differential mount cushion on Toyota Sequoia?A:Install the No. 1 rear differential mount cushion by using Special Service Tool 09570-60010 and verify that the tool fits the entire circumference of the mount while it is temporarily installed to avoid tool slip. The spare wheel stopper requires application of 4 bolts that should be tightened to 20 Nm (204 kgf-cm, 15 ft-lbf). The last step should involve installing the rear differential carrier assembly.


Related Toyota Parts
 Toyota CV Joint
 Toyota Coil Springs
 Toyota CV Boot
 Toyota Axle Beam Mount
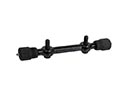 Toyota Control Arm Shaft Kit
 Toyota Lateral Link
 Toyota Shock and Strut Boot
 Toyota Strut Housing
 Toyota Sway Bar Bracket
 Toyota Sway Bars
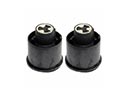 Toyota Trailing Arm Bushing
 Toyota Transfer Case Output Shaft Snap Ring