×
ToyotaParts- Hello
- Login or Register
- Quick Links
- Live Chat
- Track Order
- Parts Availability
- RMA
- Help Center
- Contact Us
- Shop for
- Toyota Parts
- Scion Parts
My Garage
My Account
Cart
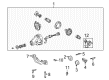
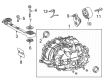
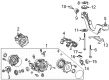
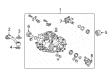
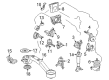
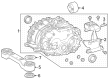
OEM Toyota Highlander Differential Mount
- Select Vehicle by Model
- Select Vehicle by VIN
Select Vehicle by Model
orMake
Model
Year
Select Vehicle by VIN
For the most accurate results, select vehicle by your VIN (Vehicle Identification Number).
36 Differential Mounts found


Toyota Highlander Support Cushion, Passenger Side Part Number: 41651-48030
$65.16 MSRP: $91.47You Save: $26.31 (29%)Ships in 1-2 Business Days

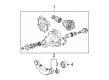
Toyota Highlander Support, Rear Differential Part Number: 52380-0E020
$309.18 MSRP: $441.44You Save: $132.26 (30%)Ships in 1-3 Business Days
Toyota Highlander Front Support Part Number: 52380-0E050
$364.89 MSRP: $534.75You Save: $169.86 (32%)Ships in 1-3 Business Days
Toyota Highlander Front Support Part Number: 52380-0E041
$366.14 MSRP: $536.58You Save: $170.44 (32%)Ships in 1-2 Business DaysToyota Highlander Front Support Part Number: 52380-0E040
$407.79 MSRP: $597.63You Save: $189.84 (32%)Ships in 1-3 Business Days
Toyota Highlander Differential Mount, Front Part Number: 52380-48120
$411.65 MSRP: $603.28You Save: $191.63 (32%)Ships in 1-3 Business DaysToyota Highlander Differential Mount, Front Part Number: 52380-48060
$447.86 MSRP: $656.34You Save: $208.48 (32%)Ships in 1-3 Business Days
Toyota Highlander Support Assembly, Differential, Front Part Number: 52380-48050
$440.46 MSRP: $645.50You Save: $205.04 (32%)Ships in 1-3 Business Days
Toyota Highlander Support, Differential Part Number: 52391-48090
$131.82 MSRP: $186.61You Save: $54.79 (30%)Ships in 1-3 Business Days
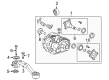
Toyota Highlander Differential Mount, Front Part Number: 52380-48080
$286.88 MSRP: $409.61You Save: $122.73 (30%)Ships in 1-3 Business Days
Toyota Highlander Support, Rear Differential Part Number: 52380-48040
$317.92 MSRP: $453.91You Save: $135.99 (30%)
Toyota Highlander Differential Mount, Front Part Number: 52380-0E010
$341.96 MSRP: $501.15You Save: $159.19 (32%)
Toyota Highlander Stopper, Rear Differential Mount, Driver Side Part Number: 41653-0E050
$7.88 MSRP: $10.96You Save: $3.08 (29%)Ships in 1-3 Business DaysToyota Highlander Dynamic Damper Stopper Part Number: 41653-0E140
$12.66 MSRP: $17.61You Save: $4.95 (29%)Ships in 1-2 Business Days
Toyota Highlander Front Support Stopper Part Number: 41653-0R020
$14.09 MSRP: $19.61You Save: $5.52 (29%)Ships in 1-3 Business Days
Toyota Highlander Differential Mount Stopper, Lower Part Number: 41654-0E020
$14.21 MSRP: $19.78You Save: $5.57 (29%)Ships in 1-3 Business Days
Toyota Highlander Stopper, Upper Part Number: 41653-0E040
$15.28 MSRP: $21.27You Save: $5.99 (29%)Ships in 1-3 Business Days
Toyota Highlander Transmission Support Stopper, Lower Part Number: 41654-48010
$19.83 MSRP: $27.60You Save: $7.77 (29%)
Toyota Highlander Lower Mount Part Number: 41654-0R020
$24.13 MSRP: $33.58You Save: $9.45 (29%)Ships in 1-3 Business Days
Toyota Highlander Stopper, Rear Differential Mount, Upper Part Number: 41653-0E010
$24.96 MSRP: $34.75You Save: $9.79 (29%)Ships in 1-3 Business Days
| Page 1 of 2 |Next >
1-20 of 36 Results
Toyota Highlander Differential Mount
Choose genuine Differential Mount that pass strict quality control tests. You can trust the top quality and lasting durability. Shopping for OEM Differential Mount for your Toyota Highlander? Our website is your one-stop destination. We stock an extensive selection of genuine Toyota Highlander parts. The price is affordable so you can save more. It only takes minutes to browse and find the exact fit. Easily add to cart and check out fast. Our hassle-free return policy will keep you stress-free. We process orders quickly for swift delivery. Your parts will arrive faster, so you can get back on the road sooner.
Toyota Highlander Differential Mount Parts and Q&A
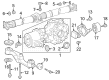
- Q: How to remove the differential mount cushions on Toyota Highlander?A:The procedure for removing differential mount cushions begins by following steps to remove the rear wheels and then taking out the propeller with center bearing shaft assembly followed by tail Exhaust Pipe assembly and center exhaust pipe assembly. Begin by taking off each left and right Speed Sensor then each axle shaft nut from both sides. Both sides require separation of their rear disc Brake Caliper assemblies as well as their corresponding rear discs. Both rear axle hub and bearing assemblies need removal before separating the Number 3 and Number 2 Parking Brake Cable assemblies. The next step involves the removal of rear strut rod assemblies from both sides as well as the parallel sequence of rear axle carrier sub-assemblies and rear No. 2 suspension arm assemblies. The necessary next steps involve taking off the rear No. 1 suspension arm assembly from the right side followed by removing the rear Drive Shaft assemblies with their snap rings from both sides. Separate and remove the rear suspension member together with the rear differential carrier assembly. It is necessary to use Special Service Tool: 09570-24011 09316-12010 to remove the rear No. 1 differential mount cushion while ensuring tool contact with the sub-frame and maintaining equal bolt tension in the two No. 1 rear differential mount cushion holes. This step should only be performed when the cushion shows damage. The special service tool should be used for the rear No. 2 differential mount cushion using the same precautions and this step should be done only when the cushion is damaged.
- Q: How to install the rear differential mount cushion and related components on Toyota Highlander?A:The installation of the rear No. 1 differential mount cushion requires Special Service Tool: 09570-24011 to set at a measurement of 2.2 +/- 0.5 mm (0.09 +/- 0.02 in.) and an angle of 0 degrees +/- 3 degrees. The installation of the rear No. 2 differential mount cushion requires use of Special Service Tools: 09570-24011 and 09316-12010 to achieve a 4.7 +/- 0.5 mm (0.19 +/- 0.02 in.) measurement with identical angle requirements. The procedure begins with differential mount cushion installation after which workers should fit the rear differential carrier assembly and the rear suspension member. Install both rear Drive Shaft snap rings followed by rear drive shaft assemblies from the LH and then RH sides of the vehicle. The next sequence of installation involves the rear No. 1 and No. 2 suspension arm assemblies followed by rear axle carrier sub-assemblies on both vehicle sides. The rear strut rod assemblies should be installed temporarily on both sides before installing the rear axle hub and bearing assemblies. The installer must mount rear disc parts alongside rear disc Brake Calipers for both sides and then install rear axle shaft nuts only temporarily. Set the suspension system and fully tighten all rear No. 1 and No. 2 suspension arm assemblies together with the rear strut rod assemblies for both sides. The next procedure requires installation of the No. 3 and No. 2 Parking Brake Cable assemblies before separating and discarding the rear disc brake caliper assemblies along with the rear discs from both sides. First check the rear axle hub bearing loose joints and unevenness of both sides before installing rear brake components including discs and calipers. The propeller requires complete tightening from the rear axle shaft nuts as well as from the center bearing shaft assembly. As the last step install the center and tail Exhaust Pipe assemblies before inspecting and adjusting the transfer oil followed by rear wheel installation with torque set to 103 Nm (1050 kgf-cm, 76 ft-lbf), complete the check for rear wheel alignment and then inspect for rear Speed Sensor signal and exhaust gas leaks.


Related Toyota Highlander Parts
 Toyota Highlander Axle Shaft
 Toyota Highlander Coil Spring Insulator
 Toyota Highlander CV Boot
 Toyota Highlander CV Joint
 Toyota Highlander Shock Absorber
 Toyota Highlander Spare Wheel
 Toyota Highlander Steering Knuckle
 Toyota Highlander Strut Bearing
 Toyota Highlander Sway Bar Link
 Toyota Highlander Trailing Arm
 Toyota Highlander Transfer Case Output Shaft Snap Ring
 Toyota Highlander Wheel Seal